Convert from HSL to RGB colour codes in C#

A function to create a new colour in C# from HSL values:

class ColorScale
    {
        public static Color ColorFromHSL(double h, double s, double l)
        {
            double r = 0, g = 0, b = 0;
            if (l != 0)
            {
                if (s == 0)
                    r = g = b = l;
                else
                {
                    double temp2;
                    if (l < 0.5)
                        temp2 = l * (1.0 + s);
                    else
                        temp2 = l + s - (l * s);

                    double temp1 = 2.0 * l - temp2;

                    r = GetColorComponent(temp1, temp2, h + 1.0 / 3.0);
                    g = GetColorComponent(temp1, temp2, h);
                    b = GetColorComponent(temp1, temp2, h - 1.0 / 3.0);
                }
            }
            return Color.FromArgb((int)(255 * r), (int)(255 * g), (int)(255 * b));

        }

        private static double GetColorComponent(double temp1, double temp2, double temp3)
        {
            if (temp3 < 0.0)
                temp3 += 1.0;
            else if (temp3 > 1.0)
                temp3 -= 1.0;

            if (temp3 < 1.0 / 6.0)
                return temp1 + (temp2 - temp1) * 6.0 * temp3;
            else if (temp3 < 0.5)
                return temp2;
            else if (temp3 < 2.0 / 3.0)
                return temp1 + ((temp2 - temp1) * ((2.0 / 3.0) - temp3) * 6.0);
            else
                return temp1;
        }
    }

Thanks to David Greenwood for showing me this, and the unknown/unnamed elves who initially created it and saved it on our office server.

Create a list of Rhino geometry within a Grasshopper component using GeometryBase

How to create a generic, mixed list of geometry within a Grasshopper component, and send it to a single output:

class GeometryBuilder
{
    //constructor
    public GeometryBuilder()
    {
        //...
    }

    //property - declare our geometry list here
    private List<Rhino.Geometry.GeometryBase> geom = new List<Rhino.Geometry.GeometryBase>();
    public List<Rhino.Geometry.GeometryBase> Geom
    { get { return geom; } set { geom = value; }}

    //methods
    public BuildGeometry()
    {
        //add a line
        //lines don't inherit from GeometryBase, so we can't cast it to be in
        // our Geom list, but we can convert it to a NurbsCurve, which does.
        Rhino.Geometry.Line ln = new Line(new Point3d(0,0,0), new Point3d(1,1,0));
        Geom.Add((GeometryBase)(ln.ToNurbsCurve())); 

        //Meshes DO inherit from GeometryBase, so we can add them to Geom directly
        Rhino.Geometry.Mesh msh = someOtherMesh;
        Geom.Add((GeometryBase)msh);

        //Generally, things within Rhino.Geometry that are classes can be cast to GeometryBase.
        //Things which are structs can not, though there is usually a sensible way to convert them.

        //Point3d is a struct, so we can't cast it to GeometryBase.
        //The Rhino Point is a class, and it contains a constructor converting from Point3d
        Rhino.Geometry.Point3d pt3d = new Point3d(5,2,0);
        Rhino.Geometry.Point pt = new Point(pt3d);
        Geom.Add((GeometryBase)pt);
    }
}


class GrasshopperComponent : GH_Component
{
    //constructors etc...
    //...

    //set inputs
    //...

    //set outputs
    protected override void RegisterOutputParams(GH_Component.GH_OutputParamManager pManager)
    {
        //our output is created using the 'AddGeometryParameter' method. Remember to set 'access' to 'list'.
        pManager.AddGeometryParameter("My Geometry","my geom","This is a list of generic geometry", GH_ParamAccess.list);
    }

    protected override void SolveInstance(IGH_DataAccess DA)
    {
        //generate our list of geometry from the class we made
        var GeometryBuilder gb = new GeometryBuilder();
        gb.BuildGeometry();

        //the geometry is now saved within the Geom property of our gb instance of GeometryBuilder.
        //All we need to do now is send the geometry to the Grasshopper output
        DA.SetDataList(0, gb.Geom);
    }
}

Install or repair Windows 7 or Windows 8 from USB – no disc needed

How to perform a clean install of Windows from USB without a disc, and how to repair a corrupted install of Windows.

For either of these tasks, we need a copy of the original media that was used to install Windows. This guide will show you how to get this media, how to put it onto a USB stick, and how to run the USB stick to install or repair your copy of Windows.

This method is also suitable for dualbooting Windows on a Mac via Bootcamp.

You will need the computer you wish to install Windows on, another computer with an internet connection and Windows already installed, and a spare 4GB USB stick. This guide will install a trial version of Windows – you will need a valid licence key from Microsoft in order to activate it.

Step 1: Download ISO

An ISO file is bit-for-bit copy of the contents of a disc. The method we are using involves copying an ISO to a USB disc so that your computer runs it as if it were a DVD.

If you have your own ISO (or your own Windows disc you can create an ISO from) then I would recommend you use this.

However, if you have lost your installation media, don’t worry! The website getintoPC appears to be clean, and offers ISOs of pretty much any version of Windows you might need. Click this link to browse for your version of Windows, or use one of the following:

Make sure you download the version of Windows according to your licence key, or activation may not work!

Step 2: Create bootable USB

To create the USB, we will use a program called Windows 7 USB DVD Download Tool. (Despite the name, it is good for creating USB sticks of any version of Windows.) Download it from here and install it on a working Windows PC.

Then run it. On the first screen, find your ISO:

Screenshot of Windows 7 USB DVD Download Tool - choose ISO file

On the next screen, select USB.

Screenshot of Windows 7 USB DVD Download Tool -  insert USB device

Insert your USB stick into the computer. Select your USB stick from the drop down list. (You may need to press refresh before you see your USB stick.)

Screenshot of Windows 7 USB DVD Download Tool -  choose media type

Finally, begin copying. This will take a while.

Step 3: Plug in the USB stick

Plug the USB stick into the computer you wish to install Windows on, and turn this computer on. Your computer may detect this USB stick automatically, and a Windows loading screen appears.

If not, you need to tell your computer to load from the USB stick. On the boot screen (the first screen that appears as soon as you hit the power button) look for something called ‘boot menu’ or similar. Look for the key next to this word – likely one of F2, F8, F10, F12 or DEL. (You may miss it the first couple of times!) Once you’ve found it, mash this key when you turn your computer on. On the next screen, use your keyboard to select the USB stick.

Step 4: Run the Windows recovery/installation tool

Wait a couple of minutes, and a menu should appear. Depending on which version of Windows you have selected, you may see something different to this below, but the method will be similar.

If you are running a fresh installation of Windows, it is now a matter of following the prompts on the screen. If you are trying to repair Windows, there are a number of features that can help you to repair or reinstall Windows while preserving as much of your data as possible.

In the first screen, click ‘troubleshoot’.

Windows 8 recovery screen - continue, troubleshoot, turn off your PC

We then get the following options:

Windows 8 recovery screen - troubleshoot menu - options for refresh, reset and advanced options

You can choose either of these, depending on what exactly you need to do.

Refresh is useful for repairing existing installations of Windows. It reinstalls key parts of the operating system and removes programs whilst keeping personal files intact. The existing copy of Windows will be moved into a folder called ‘Windows.Old’ so you may still be able to recover any program files in here. ‘Refresh’ worked for me when Windows become corrupted and refused to boot. If you’re having problems and are considering reinstalling Windows, then I recommend you give this a go first!

Reset is a more drastic version and is essentially a full re-install of Windows.

Within ‘advanced’ there are further options:

Windows 8 recovery screen - troubleshoot menu - advanced options

Useful options here are:

Automatic repair. If your computer is failing to boot, it’s worth trying this first. It will attempt to fix your computer with minimal time and no loss of data. Can’t guarantee it will work, but it’s worth trying first before doing anything more drastic.

System restore is another option for repairing your computer if ‘automatic repair’ did not work. This is dependent on there being a ‘restore point’ being saved on your computer. Again, it has minimal risk and is worth trying after ‘automatic repair’.

If I am having problems booting Windows, which option should I pick?

Go through the options in the following order:

Quick win? Needs restore point? Keeps programs? Keeps personal data?
1) Automatic repair Yes No Yes Yes
2) System restore Yes Yes Yes Yes
3) Refresh No No No Yes
4) Reset No No No No

Remember that ‘reset’ will erase all of your existing files as well as the programs. Before you choose to do this to repair your installation of Windows, you may want to try to connect your hard drive to another computer to try and rescue any files that you can.

Multithreading a foreach loop in a Grasshopper component in C#

Grasshopper itself is a single-threaded process. That is, even if you have a very complicated calculation going on, and you have a powerful computer with many cores, it persists in using a single core. This is very frustrating when you end up waiting a long time for calculations to complete.

However, it doesn’t have to be the case that each component is single-threaded. Nearly all components are single-threaded, but when you create your own compiled component, there’s nothing to stop you from defying convention and making some lightning-fast multi-threaded components. And, as I have just found out, it’s very easy to set up.

While the code is simple, knowing when it is okay to use multi-threaded logic is a bit more challenging. Multi-threading works best when you have a single repetitive task. Rather than multithreading the entire component, you select bits of your code that are taking a long time to calculate, and set those up for multithreading.

Say you have a foreach loop. You might be looping through a list of 100000 points in a model, checking if they are intersecting a shape. You then build a list of true/false that describes if each point is intersecting that shape. In regular single-threaded programming, your loop would go through each point one at a time, doing the intersection result and saving the result to your list.

This is a prime candidate for multithreading. The task is repetitive, and very importantly, each loop is independent, i.e. any one loop’s action does not depend on the result of any other loop.

With multi-threading, instead of running one at a time, we can divide the task up for each core on your computer. For example, if you have 2 cores, one core does half of the loops and the other does the other half.

.NET has some very useful classes/methods that really simplify setting this up. There are many of these for different tasks, but here we will focus on one in particular. Note that, as far as I know, these parallelisation tricks only work for compiled components (such as those created in Visual Studio) and won’t work in the c# script component within Grasshopper.

How to convert a ‘foreach’ loop into a parallel foreach loop

Let’s say you have the following foreach loop, which sends an output of results to Grasshopper:

var results = new List<bool>(new bool[pts.Count]);
foreach (Point3d pt in pts)
{
    bool isIntersecting = CheckIntersection(pt, shape);
    results.Add(isIntersecting);
}

DA.SetDataList(0, results);

This code uses a method I wrote, CheckIntersection, to see if a list of points are interacting with an input shape.

We set up a list to take our results, we cycle through our points, do a calculation on each, and then save the result. When finished, we send the result as an output back to Grasshopper. Simple enough.

The best thing to do is I show you how to parallelise this, and then explain what’s happening. Here’s the parallel version of the above code:

var results = new System.Collections.Concurrent.ConcurrentDictionary<Point3d, bool>(Environment.ProcessorCount, pts.Count);
foreach (Point3d pt in pts) results[pt] = false; //initialise dictionary

Parallel.ForEach(pt, pts=>
{
    bool isIntersecting = CheckIntersection(pt, shape);
    results[pt] = isIntersecting; //save your output here
}
);

DA.SetDataList(0, results.Values); //send back to GH output

Going from ‘foreach’ to ‘Parallel.ForEach’

The Parallel.ForEach method is what is doing the bulk of the work for us in parallelising our foreach loop. Rather than waiting for each loop to finish as in single threaded, the Parallel.ForEach hands out loops to each core to each of them as they become free. It is very simple – we don’t have to worry about dividing tasks between the processors, as it handles all that for us.

Aside from the slightly different notation, the information we provide is the same when we set up the loop. We are reading from collection ‘pts’, and the current item we are reading within ‘pts’ we will call ‘pt’.

The concurrent dictionary

One real problem though with multithreading the same task is that sometimes two or more processes can attempt to overwrite the same piece of data. This creates data errors, which may or may not be silent. This is why we don’t use a List for the multithreading example – List provides no protection from multiple processes attempting to write into itself.

Instead, we use the ConcurrentDictionary. The ConcurrentDictionary is a member of the Concurrent namespace, which provides a range of classes that allow us to hold and process data without having to worry about concurrent access problems. The ConcurrentDictionary works just about the same as regular Dictionaries, but for our purposes we can use it much like a list.

It is a little more complicated to set up, as you need to specify keys for each value in the dictionary, as well as the value itself. (I have used dictionaries once before here.) Rather than having a collection of items in an order that we can look up with the index (the first item is 0, the second item is 1 and so on) in a dictionary we look up items by referring to a specific item. This specific item is called the ‘key’. Here, I am using the points as the key, and then saving their associated value (the results we are trying to calculate) as a bool.

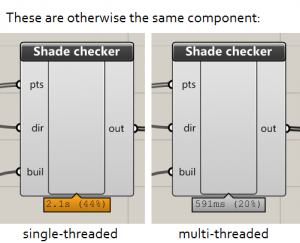
How much faster is parallel computation?

Basic maths will tell you that you will that your code should increase at a rate of how many cores you have. With my 4-core machine, I might expect a 60 second single-threaded loop to complete in about 15 seconds.

However, there are extra overheads in parallel processing. Dividing up the work, waiting for processes to finish towards the end, and working with the concurrent dictionary, all take up processor power that would otherwise be used in computing the problem itself.

In reality, you will still likely get a substantial improvement compared to single-threaded performance. With 4 cores, I am finding I am getting a performance improvement of around 2.5 to 3.5 times. So a task that would normally take 60 seconds is now taking around 20 seconds.

Two Grasshopper components showing processing time difference between single-threaded and multi-threaded computation

References

Thanks to David Greenwood for getting me started with multithreading. Front image source under CC licence.

Check whether points are inside a polyline curve in Grasshopper with C#

Let’s say you have a polyline in Grasshopper. You also have some points, some of them inside the curve and some of them outside. You want to sort the points depending on whether they are inside or outside the curve.

This component allows you to do that. Input your polyline and your points to check. The ‘A’ list will contain the points inside the curve, and the ‘B’ list will contain the points outside the curve.

inside-curve-component

This will then produce the following output:

A check in Grasshopper to test whether points are inside a polyline curve

Download component

The following component is a user object that allows the input of a single polyline.


If you are working with multiple polylines, and want to check that points are inside or outside every polyline at once, have a look at this file instead.

Source code

If you prefer, you can use the source code directly from below. It is formatted for the C# component in Grasshopper, though of course it can be easily generalised.

private void RunScript(List<Point3d> pts, Polyline crv, ref object A, ref object B)
  {

    var inside = new List<Point3d>();
    var outside = new List<Point3d>();

    foreach (Point3d pt in pts)
    {
      if(IsInside(pt, crv))
      {
        inside.Add(pt);
      }
      else outside.Add(pt);
    }
    A = inside;
    B = outside;

  }

  // <Custom additional code> 

  bool IsInside (Point3d pt, Polyline crv)
  {
    Point3d pt1, pt2;
    bool oddNodes = false;

    for (int i = 0; i < crv.SegmentCount; i++) //for each contour line
    {

      pt1 = crv.SegmentAt(i).From; //get start and end pt
      pt2 = crv.SegmentAt(i).To;

      if ( (pt1[1] < pt[1] && pt2[1] >= pt[1] || pt2[1] < pt[1] && pt1[1] >= pt[1]) && (pt1[0] <= pt[0] || pt2[0] <= pt[0]) ) //if pt is between pts in y, and either of pts is before pt in x
        oddNodes ^= ( pt2[0] + (pt[1] - pt2[1]) * (pt1[0] - pt2[0]) / (pt1[1] - pt2[1]) < pt[0] ); //^= is xor
      //end.X + (pt-end).Y   * (start-end).X  /(start-end).Y   <   pt.X
    }


    if (!oddNodes)
    {
      double minDist = 1e10;
      for (int i = 0; i < crv.SegmentCount; i++) {
        Point3d cp = crv.SegmentAt(i).ClosestPoint(pt, true);
        //Point3d cp = mvContour[i].closestPoint(pt);
        //minDist = min(minDist, cp.distance(pt));
        minDist = Math.Min(minDist, cp.DistanceTo(pt));
      }
      if (minDist < 1e-10)
        return true;
    }

    if(oddNodes) return true;

    return false;
  }

Bake and delete objects in Rhino with RhinoCommon

A very basic implementation of baking and deleting objects in Rhino through Grasshopper.

Rhino ObjectTable

Rhino objects are accessed through the object table – a container object which holds information about all objects in a Rhino document.

Rhino.DocObjects.Tables.ObjectTable ot = Rhino.RhinoDoc.ActiveDoc.Objects;

Add an object

Within the ObjectTable is a range of methods for adding objects. There is a method for each kind of geometry (meshes, lines, points and so on).

For example, to add a line:

ot.AddLine(new Point3d(0, 0, 0), new Point3d(1, 1, 1));

Deleting the most recent object

The Object Table appears to be sorted in order that objects were added, most recent first. So, to delete the most recent object, we need to delete object 0:

//get guid of the most recent object
Guid id = ot.ElementAt(0).Id;

//deletes this object
if(z) ot.Delete(id, true);

Get the number of objects

Unless there’s a better way to do it, the method below works. This returns the number of objects in the object table.

var sf = new Rhino.DocObjects.ObjectEnumeratorSettings();
int count = ot.ObjectCount(sf);

References

Autoplay videos with three lines of HTML

I was mindlessly browsing the internet this evening, reading about smart watches on istartedsomething. A few pages into the post, a video was already playing as I scrolled down the page. I couldn’t see any Youtube or Vimeo branding, or any controls, so I assumed it was a GIF.

But it seemed too high-quality to be a GIF. Right-clicking the video showed otherwise – it was a proper video! This isn’t a product of the GIF and Flash internet we are accustomed to, but an example of HTML5 spotted in action.

I dug into the source code and found that the author was using the video tag. Reading up about the video tag on w3schools, the video tag is remarkably easy to use. It’s just a few lines of HTML, typed straight into an HTML file, no plugins or fuss necessary.

HTML video tag

Here is the source code you need to add a video to a web page:

<video autoplay loop muted>
<source type="video/mp4" src="http://james-ramsden.com/downloads/videos/smart-form-relax.mp4">
</video>

…and this is the output:

Useful video tags

The source code above is split into three lines, where we can define how the video plays. The first line must start with ‘video’. But after that, we can string together a list of terms to customise how it plays.

  • autoplay
  • loop
  • controls
  • muted
  • height=”640px”
  • height=”480px”
  • poster=”image.jpg” (image to show if the video isn’t loaded)

The second line defines the video location. Currently, the type can be ‘video/mp4’, ‘video/webm’ or ‘video/ogg’.

You can specify a start and end time within the source, for example:

src="http://james-ramsden.com/downloads/videos/smart-form-relax.mp4#t=10,11"

Will play the video between 10 and 11 seconds.

References

FastMesh v2: The stupidly easy way of creating efficient meshes from polylines

In a recent post, I found that converting polylines to meshes in Grasshopper can be problematic. Using a patch to create a mesh from a curve is slow, and directly converting from a curve to a mesh resulted in an inefficent mesh with too many faces.

curve-to-mesh

Mesh in Grasshopper

It seemed that in Grasshopper, there was no easy way to create efficient meshes from closed polylines, so I set about creating my own component. It produced meshes like this:

A simple mesh in Rhino, created in Grasshopper

But in cases with more complicated geometry, it didn’t always work – in the details, it would sometimes miss out triangles, or the mesh edge didn’t quite line up with the original boundary.

Revisiting the problem today, my colleague David Greenwood pointed me towards a method he’d found within the Rhino API – and we can access it in both the C# component and through visual studio. This method produces a mesh from a closed polyline – but amazingly, it returns the kind of efficient mesh we were wanting all along. And as a bonus, it’s really fast too!

The command you need is very simple:

A = Rhino.Geometry.Mesh.CreateFromClosedPolyline(pline);

We tried this method to create the roof tops of a whole city centre, with over 11000 building outlines as polylines. This is the result:

manchester-roof-mesh

Click the image above for full size.

Zooming in on an image, we can see that, bearing in mind that mesh faces like to be in triangles, the meshes seem to be roughly as efficient as we could imagine:

manchester-roof-mesh-close

And how long did these 11000 meshes take to generate? About half a second!

mesh-from-curve-timer

And if, instead of using the C# component, we write the code into a compiled component, such as when we create components with Visual Studio, the time is less than 300ms.

And if that is still too slow, we could also parallelise it, potentially bringing that time under 100ms.

So much for ripping out my hair trying to write my own algorithm or dig around for one elsewhere – I needn’t have bothered because it’s already implemented in Rhino!

Remotely change the value of any number slider in Grasshopper with C#

The slider in Grasshopper doesn’t have an input. That means that only a user with a mouse can change it, right?

grasshopper-connect-slider

A slider with some kind of input is an ongoing topic on the Grasshopper forum. I know myself I’ve been in the position many times where I’ve defined a number with a slider, only to realise I later need Grasshopper to be changing that number for me. In lieu of an updated slider, I have come up with a solution…

Following on from my earlier post on adding a coloured progress bar to Grasshopper sliders, it became apparent that it’s in fact very easy to change the values of a slider with a bit of code. Watch the video below to see what I mean:

The only hard bit is figuring out how to ‘connect’ to the slider you want to modify. Basically, we look at the objects connected to our C# component, and try to convert them to a slider. If this is successful, then we know we have a slider, and we can start changing its properties.

Modify the slider value

This is the same code as what was in the video above. It simply reads in a value, finds a slider connected to x, and changes the ‘x’ slider to the ‘y’ value.

  private void RunScript(object x, double y, ref object A)
  {
    var input = Component.Params.Input[0].Sources[0]; //get the first thing connected to the first input of this component
    var slider = input as Grasshopper.Kernel.Special.GH_NumberSlider; //try to cast that thing as a slider

    if(slider != null) //if the component was successfully cast as a slider
    {
      slider.SetSliderValue((decimal) y);
    }
  }

Change the slider min and max values

Changing the minimum and maximum values on the slider is also easy. To do this, we need to dig into the slider a little more. Inside slider.Slider, there are lots more hidden properties which are fun to play with:

  private void RunScript(object x, double y, ref object A)
  {
    var input = Component.Params.Input[0].Sources[0]; //get the first thing connected to the first input of this component
    var slider = input as Grasshopper.Kernel.Special.GH_NumberSlider; //try to cast that thing as a slider

    if(slider != null) //if the component was successfully cast as a slider
    {
      slider.Slider.Minimum = 0;
      slider.Slider.Maximum = y;
    }
  }

Change the appearance of a slider

There are lots of options hidden away for changing the appearance of a slider – my last post being one, adding progress bar by changing the slider’s ‘rail’.

There are lots of further options for changing the background colour, adding a border, or adding shadows.

Change the background and border of a slider in Grasshopper with the C# component

  private void RunScript(object x, double y, ref object A)
  {
    var input = Component.Params.Input[0].Sources[0]; //get the first thing connected to the first input of this component
    var slider = (Grasshopper.Kernel.Special.GH_NumberSlider) input; //try to cast that thing as a slider

    if(slider != null) //if the component was successfully cast as a slider
    {
      slider.Slider.DrawControlBackground = true;
      slider.Slider.DrawControlBorder = true;
      slider.Slider.ControlEdgeColour = Color.Blue;
      slider.Slider.ControlBackColour = Color.Aquamarine;
    }
  }

However, like changing the rail type, these changes are always lost when a user manually changes the slider. Obviously, what’s happening in the background is there is a separate process being called to ‘clean’ the slider whenever the slider value is changed via the UI. Finding it is a challenge though. If anyone knows the solution, I’d be glad to hear!

Cool Grasshopper hack: Set the slider rail colour

I’ve just discovered a cool feature for the Grasshopper number slider: You can add a ‘progress bar’ rail colour directly within the slider itself!

Using three sliders in grasshopper with RBG red green blue colours to add a progress bar to a number slider in Grasshopper

This is a feature built into Grasshopper itself. As far as I know, it is not accessible using the GUI, and the only way to get to it is using the API, such as by writing a bit of C#.

How to add a progress bar to a Grasshopper slider

The basic idea is that we use C# to find the slider we are interested in. Once we have found it, we can access the slider properties in the API. It was here I found the ‘rail’ property.

There are two key things we need to know, which I have covered in previous posts:

  • How to access the properties of any component in the Grasshopper canvas (link to post)
  • How to send data ‘backwards’ along a wire (link to post)

We also need the Color.FromArbg() method to define a new colour.

C# code

We can implement this with the C# component in Grasshopper. Set r, g, and b as integers.

  private void RunScript(object x, int r, int g, int b, ref object A)
  {
    var input = (Component.Params.Input[0].Sources[0]); //get the first thing connected to the first input of this component
    var slider = (Grasshopper.Kernel.Special.GH_NumberSlider) input; //try to cast that thing as a slider

    if(slider != null) //if the component was successfully cast as a slider
    {
      decimal max = slider.Slider.Maximum;
      Color c = Color.FromArgb(255, r, g, b);
      slider.Slider.RailDisplay = Grasshopper.GUI.Base.GH_SliderRailDisplay.Filled; //add progress bar
      slider.Slider.RailFullColour = c; //set progress bar colour
    }
  }

Watch the colour update in real time

Limitations

This is shamelessly a hacky bit of Grasshoppery fun. As much as I like it, this implementation is still not perfect. Whenever you directly change the slider you have edited the colour of, the progress bar disappears. It seems that in the slider.SetSliderValue() method, Grasshopper is setting the slider rail back to the Simple value (the default).

This perhaps points towards the idea that the colour bar was never meant to be implemented at all, and why it can’t be found in the user interface. Or it could point to the possibility that I have just done something wrong, and there is something else I need to implement!