Run a Grasshopper component from within your C# code

How to call and calculate a Grasshopper component from within some C# code, and read and return the component outputs.

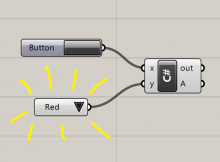
A Grasshopper component is essentially a visual interpretation of a method in programming. It has inputs, it does calculations, and it produces outputs. Grasshopper components are also saved within DLL libraries, and can be referenced. So, surely, it’s possible to access a component programatically from within something like a Visual Studio project? This is a quick first attempt to do so.

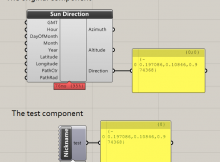
The code below attempts to read one of my own components (“CalcSunDirection”). The component runs with all inputs at default values, and then returns the first data item within output 2 (the third one in human-speak). This is copy-pasted from the Solve_Instance method when creating Grasshopper components in Visual Studio.

        protected override void SolveInstance(IGH_DataAccess DA)
        {
            //Create the component and run calculations
            var cs = new MyComponents.Components.CalcSunDirection();
            cs.CreateAttributes();
            cs.ExpireSolution(true);

            //add to document
            GH_Document GrasshopperDocument = this.OnPingDocument();
            GrasshopperDocument.AddObject(cs, false);

            //read output[2]
            cs.Params.Output[2].CollectData();
            var rtnval = cs.Params.Output[2].VolatileData.get_Branch(0)[0];

            //remove that component
            GrasshopperDocument.RemoveObject(cs.Attributes, false);

            //send output
            DA.SetData(0, rtnval);
        }

Grasshopper component for calculating sun direction written in C#, being called from a second test component

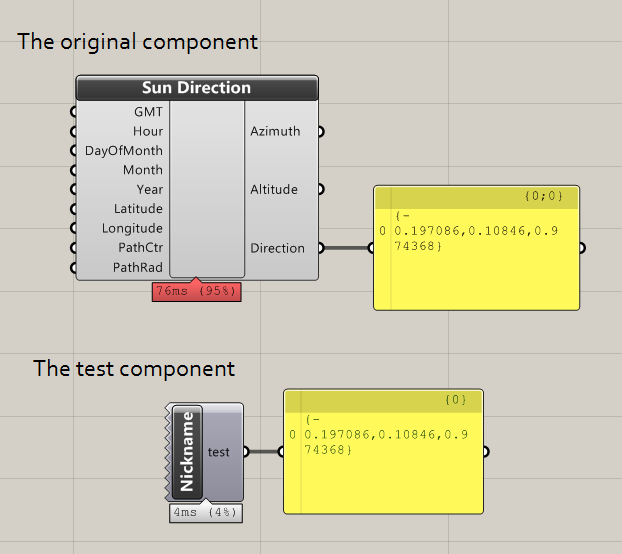
As we can see, the test component produces the same output as the CalcSunDirection component it is referencing. The above image is for comparison – in reality, the user wouldn’t see the CalcSunDirection, only the Test component.

I believe it is hypothetically possible to do this trick with any component, assuming that the DLL/GHA file containing the component you want to use is referenced in your Visual Studio project.

I tried to do this with some native Grasshopper components (such as the circle from CNR component). I looked up the namespace of the component using this tool, but I had trouble locating the DLL containing the component, so I was unable to add it to my VS project. (For example, the Circle CNR component has namespace CurveComponents.Component_CircleCNR, which is not within Grasshopper.dll. Anyone have any idea where I can find it?) Edit – found them! See below…

As a first attempt, the code above also seems inefficient in that you have to physically add the component before the outputs become readable. I get around this from a user experience point of view by removing that component after, but computationally, it still feels heavy and unnecessary.

Upon reflection, what I’ve essentially created is a programmatic version of the clustering feature of Grasshopper. Is this the best way to go about it? If you have any interesting suggestions, please let me know 🙂

Update – geometry GHA files

Many thanks to Andrew Heumann for answering my question above – many of the components are not contained within Grasshopper.dll but are saved elsewhere.

It appears that since version 0.8.0012 or so, they have been kept buried within the Program Files. On various computers, I’ve found them at:

C:\Program Files\Common Files\McNeel\Rhinoceros\5.0\Plug-ins\Grasshopper\0.9.76.0\Components

C:\Users\jrams\AppData\Roaming\McNeel\Rhinoceros\5.0\Plug-ins\Grasshopper\0.9.76.0\Components

If you are struggling to find them, and you don’t mind giving third party software direct access to your computer’s Master File Table (!), then UltraSearch is the fastest way to find the GHA files.

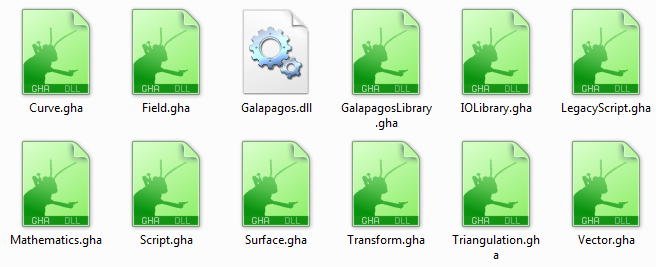
Within this folder is a collection of GHA files (which is essentially a DLL with the extension changed).

The full list is:

  • Curve.gha
  • Field.gha
  • Galapagos.dll
  • GalapagosLibrary.gha
  • IOLibrary.gha
  • LegacyScript.gha
  • Mathematics.gha
  • Script.gha
  • Surface.gha
  • Transform.gha
  • Triangulation.gha
  • Vector.gha

Grasshopper GHA extension files

So for the Circle CNR component, I would find it by referencing the Curve.gha file.

Update 2

See this post for updated code. This updated code allows you to create a dummy document, so you don’t need to paste components on the live document.

Convert a Brep to a Mesh in Rhino/Grasshopper C#

How to convert a Rhino Brep to a Rhino Mesh using RhinoCommon. This method is suitable for use in Grasshopper development and the Grasshopper C# component.

Create meshes from Brep

The code below produces a list of customised meshes based upon an input Brep and some mesh settings. The examples are written as static extension classes for compiled components (so you can access it directly as a Brep method), though can be easily adapted for the C# component too.

        public static List<Mesh> BrepToMeshes(this Brep brep, double maxEdge)
        {
            Mesh[] mesh;
            MeshingParameters mp = new MeshingParameters();
            mp.MaximumEdgeLength = maxEdge;
            mesh = Mesh.CreateFromBrep(brep, mp);
            return mesh.ToList<Mesh>();
        }

This method essentially replicates the Grasshopper components below:

Grasshopper component mesh to Brep

The MeshingParameters class replicates the ‘Mesh Settings’ component. You can assign settings to your mesh by creating an instance of MeshingParameters and accessing its properties, much as I have done with MaximumEdgeLength.

Joining the meshes

The output is a list of meshes. If you want to truly replicate the Mesh Brep component, you will also need to join all meshes in the list into a single mesh. This can be done with the Append method:

        public static Mesh JoinMeshes(this List<Mesh> meshes)
        {
            var rtnmesh = new Mesh();
            foreach (Mesh mesh in meshes)
            {
                rtnmesh.Append(mesh);
            }
            return rtnmesh;
        }

And for completeness, you can call the methods in a single line:

        public static Mesh BrepToMesh(this Brep brep, double maxEdge)
        {
            return JoinMeshes(BrepToMeshes(brep, maxEdge));
        }

Create 2D Delaunay triangulation mesh with C# in Grasshopper

How to perform a Delaunay triangulation on a list of points mapped in 2D, using the C# component in Grasshopper.

Delaunay triangulation is a highly efficient algorithm which creates a triangulated mesh from a collection of points. This page shows how to create a 2D mesh from a collection of points on the XY plane.

Input

A list of Point3d. These points should already be mapped onto a 2D plane – ideally onto the XY plane.

Points Grasshopper for Delaunay triangulation

If your points aren’t mapped onto a 2D plane, you’ll need to do this in advance. The reason for this is that the Delaunay triangulation algorithm below uses the Node2 type – essentially like a point, but only with X and Y coordinates – since this algorithm produces a 2D mesh.

Output

A regular, Grasshopper-friendly mesh.

Delaunay mesh in Grasshopper with C#

Steps

  1. Convert Point3d into Node2
  2. Add Node2 to Node2List (that’s a list of Node2s, not “node-to-list”!)
  3. Calculate connectivity of mesh faces
  4. Construct and return mesh

C# code

The code below uses Grasshopper.dll to perform the Delaunay triangulation.

    //input
    List<Point3d> pts;

    //convert point3d to node2
    //grasshopper requres that nodes are saved within a Node2List for Delaunay
    var nodes = new Grasshopper.Kernel.Geometry.Node2List();
    for (int i = 0; i < pts.Count; i++)
    {
      //notice how we only read in the X and Y coordinates
      //  this is why points should be mapped onto the XY plane
      nodes.Append(new Grasshopper.Kernel.Geometry.Node2(pts[i].X, pts[i].Y));
    }

    //solve Delaunay
    var delMesh = new Mesh();
    var faces = new List<Grasshopper.Kernel.Geometry.Delaunay.Face>();
    
    faces = Grasshopper.Kernel.Geometry.Delaunay.Solver.Solve_Faces(nodes, 1);
    
    //output
    delMesh = Grasshopper.Kernel.Geometry.Delaunay.Solver.Solve_Mesh(nodes, 1, ref faces);

What next?

Delaunay meshes are pretty amazing. They are quick to generate, quick to analyse and quick to render. They generate sensible triangulation and require no more information than the input points. Unless you absolutely must have smooth surfaces and edges, don’t use a surface, use a mesh.

This video uses Delaunay triangulation to power the graph in the bottom left. The graph was easily coloured by associating each node in the mesh with a value.

These posts will help you get started in making the most of your mesh:

References

Get points from polyline in RhinoCommon/Grasshopper C# component

Polylines are highly lightweight forms of curves that have many useful applications in Rhino and Grasshopper.

What is a polyline?

A polyline is a list of points, nothing more. When Rhino reads in a polyline, it creates the curve by doing a dot-to-dot of the points.

It can also be thought of as an interpolation of points with degree = 1. The curve will always pass through the inputted points.

polyline

Extracting the points from a polyline

Let’s say you have a polyline as input in Grasshopper. You want to extract the list of points used to create that polyline within a C# script.

The most intuitive method is to look for a property of the polyline called ‘Points’ or something like that. But if we try and find it…

polyline_grasshopper_code

…there’s nothing there! So if there’s no property containing the points, where is this data?

Method 1: Get the whole list of points

As shown in the RhinoCommon SDK documentation, PolyLine inherits from the Point3dList, which itself inherits from the RhinoList class.

We can use the ToList() method to get the list of points:

  private void RunScript(Polyline pline, object y, ref object A)
  {
    var pts = new List<Point3d>();

    pts = pline.ToList();

    A = pts;
  }

Method 2: Get a single point

We can extract a single point from the ToList() method:

  private void RunScript(Polyline pline, object y, ref object A)
  {
    var pt = new Point3d();

    pt = pline.ToList()[0];

    A = pt;
  }

Or, even shorter, we can treat the polyline like a list itself and access the points directly:

  private void RunScript(Polyline pline, object y, ref object A)
  {
    var pt = new Point3d();

    pt = pline[0];

    A = pt;
  }

Thanks to Fraser Greenroyd for our joint effort in unpicking this deceptively unintuitive challenge – he also wrote about it here.

Creating video screen captures for a website: My workflow

I am trying to use videos more often when I create a post. I try to make a screen recording of whatever it is I am trying to show – it just makes whatever idea I am trying to convey that much clearer.

Adding videos to web pages is now much easier thanks to the HTML5 video tag, but choosing video formats for the web is still a bit of a nightmare.

Here is one recent example from this post:

And here is the code behind it:

<video autoplay loop muted height="522px" width="712px">
<source type="video/webm" src="http://james-ramsden.com/downloads/videos/20150614-instantiate-grasshopper-value-slider.webm">
<source type="video/mp4" src="http://james-ramsden.com/downloads/videos/20150614-instantiate-grasshopper-value-slider.mp4">
</video>

Long story short, you need to encode your video into at least two formats. WebM is free of licensing issues and produces very good quality videos, but is limited to certain browsers. MP4 is the backup format. And of course, we want the video to look as nice as possible, without unnecessary black borders.

This is the process I use:

  1. Install CamStudio, free screen recording software
  2. Install the lossless video codec for CamStudio. This ensures our video is of the highest quality, so we can re-encode it later without compounding data loss problems.
  3. Use CamStudio to record your screen. I like to use the ‘fixed region’ setting if I want to only record a part of a window. Make sure you’ve selected the lossless video codec under ‘video options’.
  4. Use OnlineConvert to convert your video both to WebM and MP4. Default settings are all fine.

Then, to actually upload the videos to the web, I have recently discovered the ease of using FTP to access my website server. I logged into cPanel (the interface provided by my hosting company to interact with the server) and set up an FTP account. Then, I installed FileZilla, and used this to upload the video from my computer to my webspace.

And as you can see, the above video is pin sharp. It really pays off to use the two-formats approach as, for those who are on WebM-compatible browser, amazing levels of quality can be achieved with tiny file sizes. The video above is a mere 47kB! (As a comparison, MP4 was 125kB and uncompressed was 531kB.)

Actually, the only major browsers that aren’t compatible with WebM are Safari and Internet Explorer. It’s actually quite tempting to just stick twos up at the incumbents until they get a move on, if it saves me a few minutes of my life…

Instantiate a Value List Grasshopper component with C#

In a previous post I instantiated a slider automatically using only C#. This means it is possible for a component to add components to your canvas automatically, potentially saving a lot of time in many repetitive workflows.

Here is a similar piece of code, but for the Value List:

C# code

  private void RunScript(bool x, List<object> y, ref object A)
  {
    if(x)
    {
      //instantiate  new value list
      var vallist = new Grasshopper.Kernel.Special.GH_ValueList();
      vallist.CreateAttributes();

      //customise value list position
      int inputcount = this.Component.Params.Input[1].SourceCount;
      vallist.Attributes.Pivot = new PointF((float) this.Component.Attributes.DocObject.Attributes.Bounds.Left - vallist.Attributes.Bounds.Width - 30, (float) this.Component.Params.Input[1].Attributes.Bounds.Y + inputcount * 30);

      //populate value list with our own data
      vallist.ListItems.Clear();
      var item1 = new Grasshopper.Kernel.Special.GH_ValueListItem("Red", "r");
      var item2 = new Grasshopper.Kernel.Special.GH_ValueListItem("Green", "g");
      var item3 = new Grasshopper.Kernel.Special.GH_ValueListItem("Yellow", "y");
      vallist.ListItems.Add(item1);
      vallist.ListItems.Add(item2);
      vallist.ListItems.Add(item3);

      //Until now, the slider is a hypothetical object.
      // This command makes it 'real' and adds it to the canvas.
      GrasshopperDocument.AddObject(vallist, false);

      //Connect the new slider to this component
      this.Component.Params.Input[1].AddSource(vallist);
    }
  }

This code is written for the C# component in Grasshopper. If you are writing components within Visual Studio, there is a little extra work to do in defining GrasshopperDocument and Component, otherwise it’s pretty much a copy-and-paste job too.

GrasshopperDocument and Component variables in Grasshopper from C# component to Visual Studio

In the C# component for Grasshopper, it is easy to perform functions on either itself or on the document you are in. For example:

Component.Params.Input[0].SourceCount;

…will give you the number of things connected to the first input of the particular C# component containing that line of code.

This is made possible by some variables that are pre-defined within all C# components. Start a new C# component and scroll to lines 49-61 and you should see:

#region Members
  /// <summary>Gets the current Rhino document.</summary>
  private readonly RhinoDoc RhinoDocument;
  /// <summary>Gets the Grasshopper document that owns this script.</summary>
  private readonly GH_Document GrasshopperDocument;
  /// <summary>Gets the Grasshopper script component that owns this script.</summary>
  private readonly IGH_Component Component;
  /// <summary>
  /// Gets the current iteration count. The first call to RunScript() is associated with Iteration==0.
  /// Any subsequent call within the same solution will increment the Iteration count.
  /// </summary>
  private readonly int Iteration;
#endregion

This is all well and good if you want to use the C# component, but what if you’re developing something a bit more meaty, and want to move over to Visual Studio?

I often use the GrasshopperDocument and Component properties in particular, and wanted to be able to use these in VS.

Can’t I just call GrasshopperDocument and Component in Visual Studio?

Within the C# component, some magic goes on that gives these variables their abilities. So copy and paste of the above variables isn’t going to work.

Instead, what we need to do is create our own variables with the same names as above, and manually give them their functionality.

How to set up GrasshopperDocument and Component

Like pretty much everything on this blog, I write about stuff as I learn it, and there may be a better way to do things! But the method below works for me.

Open or start a new Grasshopper component project as usual. (See here for setting up.)

At the very top of your class, create some class variables:

GH_Document GrasshopperDocument;
IGH_Component Component;

Then, within Solve_Instance, we can give meaning to these variables:

Component = this;
GrasshopperDocument = this.OnPingDocument();

Or alternatively,

GrasshopperDocument = Instances.ActiveCanvas.Document;

So, your whole component class should look like:

    public class GHtestComponent : GH_Component
    {
        GH_Document GrasshopperDocument;
        IGH_Component Component;

        public GHtestComponent()
            : base("GH test", "Nickname",
                "Description",
                "Category", "Subcategory")
        {
        }

        protected override void RegisterInputParams(GH_Component.GH_InputParamManager pManager)
        {
        }

        protected override void RegisterOutputParams(GH_Component.GH_OutputParamManager pManager)
        {
        }

        protected override void SolveInstance(IGH_DataAccess DA)
        {
            Component = this;
            GrasshopperDocument = this.OnPingDocument();
        }

        protected override System.Drawing.Bitmap Icon
        { //..
        }

        public override Guid ComponentGuid
        { //..
        }
    }

Notes

According to this GH forum post, it is possible for the OnPingDocument() to return null. I haven’t explored further on when this might happen, but you may wish to wrap this line in an ‘if’ or a ‘try catch’.

It seems unnecessary to me to have to assign values to the variables in the Solve_Instance, but this is a way I have working. I couldn’t get it to work when I put it in the constructor.

I still haven’t found the equivalent line for RhinoDoc, mostly because I haven’t needed to. When the time comes for me to figure it out (or if you happen to know yourself and would like to share it with the world!) I’ll update this page.

Update: RhinoDoc

Accessing the RhinoDoc variable is actually really easy – at the top of your C# file, just add a ‘using’:

using Rhino;

Then you can use the RhinoDoc variable like you would use it in the C# component. Simple!

Map a value from one number scale to another – formula and C# code

Let’s say you have a number scale that has a minimum and a maximum. You have a second number scale with a min and a max. How do you map an arbitrary value somewhere on that number scale to the second scale?

A number scale, map a value from one scale to anotherLet’s call the top scale a with a0 = 10 and a1 = 40. The bottom scale goes from b0 = -1 to b1 = 1. We want to map the value a = 20 to some value of b. The equation is:

b=b_{0}+(b_{1}-b_{0})\displaystyle\frac{a-a_{0}}{a_{1}-a_{0}}


If you are normalising a value to between 0 and 1, then b0 = 0 and b1 = 1. The equation reduces nicely to:

b=\displaystyle\frac{a-a_{0}}{a_{1}-a_{0}}


C# code example

public double MapValue(double a0, double a1, double b0, double b1, double a)
{
	return b0 + (b1 - b0) * ((a-a0)/(a1-a0));
}

Instantiate new Grasshopper objects automatically with C#

The code here is doing two things:

  • Creating a new slider automatically and positioning it on the canvas
  • Connecting this slider to the original component

This is possible with any Grasshopper object, assuming you can find the class necessary to instantiate the component you are interested in.

  private void RunScript(bool x, List<object> y, ref object A)
  {

    Random rnd = new Random();

    if(x)
    {
      //instantiate  new slider
      Grasshopper.Kernel.Special.GH_NumberSlider slid = new Grasshopper.Kernel.Special.GH_NumberSlider();
      slid.CreateAttributes(); //sets up default values, and makes sure your slider doesn't crash rhino
      
      //customise slider (position, ranges etc)
      int inputcount = this.Component.Params.Input[1].SourceCount;
      slid.Attributes.Pivot = new PointF((float) this.Component.Attributes.DocObject.Attributes.Bounds.Left - slid.Attributes.Bounds.Width - 30, (float) this.Component.Params.Input[1].Attributes.Bounds.Y + inputcount * 30);
      slid.Slider.Maximum = 10;
      slid.Slider.Minimum = 0;
      slid.Slider.DecimalPlaces = 2;
      slid.SetSliderValue((decimal) (rnd.Next(1000) * 0.01));
      
      //Until now, the slider is a hypothetical object.
      // This command makes it 'real' and adds it to the canvas.
      GrasshopperDocument.AddObject(slid, false);

      //Connect the new slider to this component
      this.Component.Params.Input[1].AddSource(slid);
    }

  }

Thanks to Nicolas Chaulet who uncovered a lot of the code above.

Angle class for C#

A class which handles angles both as radians and degrees, with automatic conversions between each.

Using the class is easy.

Example usage:

Angle myAngle = new Angle(90, Angle.Type.Degrees); //new angle of 90 degrees
double myAngleAsRadians = myAngle.Radians; //returns 1.57

Angle myAngle2 = new Angle(Math.PI, Angle.Type.Radians); //new angle of PI radians
double myAngle2AsDegrees = myAngle.Degrees; //returns 180

Angle sum = myAngle + myAngle2; //returns a new angle of 1.5*pi rad

bool isSmaller = myAngle < myAngle2; //returns true

Angle class source code

Just add a new class file to your project and copy the text below. You may wish to change the namespace.

using System;
using System.Collections.Generic;
using System.Linq;
using System.Text;
using System.Threading.Tasks;

namespace YourNamespace
{
    /// <summary>
    /// Holds an angle as both radians and degrees, with conversions between each
    /// </summary>
    public class Angle
    {
        #region constructors
        /// <summary>
        /// Blank constructor. Remember to manually set some data to the properties!
        /// </summary>
        public Angle()
        {

        }
        /// <summary>
        /// Construct an angle with either a degree or a radian value
        /// </summary>
        /// <param name="input">Angle value</param>
        /// <param name="angleType">Specify whether input is in radians or degrees</param>
        public Angle(double input, Type angleType = Angle.Type.Radians)
        {
            if (angleType == Type.Degrees)
            {
                Degrees = input;
            }
            else if (angleType == Type.Radians)
            {
                Radians = input;
            }
        }
        /// <summary>
        /// Quickly construct a common angle
        /// </summary>
        /// <param name="preset">Choose angle</param>
        public Angle(Angle.Preset preset)
        {
            if (preset == Angle.Preset.Deg0) { Degrees = 0; }
            else if (preset == Preset.Deg180) { Degrees = 180; }
            else if (preset == Preset.Deg360) { Degrees = 360; }
            else if (preset == Preset.Rad2Pi) { Radians = twoPi; }
            else if (preset == Preset.RadPi) { Radians = Pi; }
            else Radians = 0;
        }
        #endregion constructors


        #region properties
        private double degrees;

        /// <summary>
        /// Angle in degrees
        /// </summary>
        public double Degrees
        {
            get { return degrees; }
            set
            {
                degrees = value;
                radians = ToRadians(value);
                updateFixedangles();
            }
        }

        private double radians;
        /// <summary>
        /// Angle in radians between -pi to pi
        /// </summary>
        public double Radians
        {
            get { return radians; }
            set
            {
                radians = value;
                degrees = ToDegrees(value);
                updateFixedangles();
            }
        }

        private double radians2pi;
        /// <summary>
        /// Angle in radians, modified to fall between 0 and 2pi. Read-only.
        /// </summary>
        public double Radians2pi
        {
            get { return radians2pi; }
        }

        private double degrees360;
        /// <summary>
        /// Value in degrees between 0 and 360. Read-only. 
        /// </summary>
        public double Degrees360
        {
            get { return degrees360; }
        }


        #endregion properties


        #region enums
        public enum Type { Radians, Degrees }
        /// <summary>
        /// Presets for quick setup of Angle constructor
        /// </summary>
        public enum Preset { Deg0, Deg180, Deg360, RadPi, Rad2Pi }
        #endregion enums


        #region constants
        private const double twoPi = 2 * Math.PI;
        private const double Pi = Math.PI;
        #endregion constants


        #region methods
        /// <summary>
        /// Convert an input angle of degrees to radians. Does not affect any properties in this class - set properties instead.
        /// </summary>
        /// <param name="val">Input in degrees</param>
        /// <returns>Value in radians</returns>
        public static double ToRadians(double val)
        {
            return val / (180 / Pi);
        }

        /// <summary>
        /// Convert an input angle of radians into degrees. Does not affect any properties in this class - set properties instead.
        /// </summary>
        /// <param name="val">Input in radians</param>
        /// <returns>Value in degrees</returns>
        public static double ToDegrees(double val)
        {
            return val * (180 / Pi);
        }

        /// <summary>
        /// Fixes an angle to between 0 and 360 or 2pi.
        /// </summary>
        /// <param name="val">Input angle</param>
        /// <param name="type">Specify whether the input angle is radians or degrees</param>
        /// <returns>The angle, fixed to between 0 and 360 or 0 and 2pi</returns>
        public static double FixAngle(double val, Type type)
        {
            if (type == Type.Radians)
            {
                //-2pi to 0 to between 0 and 2pi
                if (val < 0)
                {
                    return 2 * Math.PI - (Math.Abs(val) % (2 * Math.PI));
                }
                //over 2pi to between 0 and 2pi
                else if (val > 2 * Math.PI)
                {
                    return val % (2 * Math.PI);
                }
                //else it's fine, return it back
                else
                {
                    return val;
                }
            }
            else if (type == Type.Degrees)
            {
                //-360 to 0 to between 0 and 360
                if (val < 0)
                {
                    return 360 - (Math.Abs(val) % 360);
                }
                //over 360 to between 0 and 360
                else if (val > 360)
                {
                    return val % 360;
                }
                //else it's fine, return it back
                else
                {
                    return val;
                }
            }
            else return -1; //something's gone wrong
        }

        /// <summary>
        /// Looks at the radians and degrees properties, and updates their respective fixed angles
        /// </summary>
        private void updateFixedangles()
        {
            radians2pi = FixAngle(radians, Type.Radians);
            degrees360 = FixAngle(degrees, Type.Degrees);
        }

        /// <summary>
        /// Copies Radians2pi to Radians, and Degrees360 to Degrees. (I.e. fixes radians to 0<2pi and degrees to 0<360)
        /// </summary>
        public void FixAngles()
        {
            updateFixedangles();
            Radians = Radians2pi; //this also calls Degrees
        }

        #endregion methods


        #region operators

        /// <summary>
        /// Returns the sum of two angles
        /// </summary>
        /// <param name="a1">First angle</param>
        /// <param name="a2">Second angle</param>
        /// <returns>An angle constructed from the radian sum of the input angles</returns>
        public static Angle operator +(Angle a1, Angle a2)
        {
            return new Angle(a1.Radians + a2.Radians, Type.Radians);
        }

        /// <summary>
        /// Returns the difference between two angles
        /// </summary>
        /// <param name="a1">First angle</param>
        /// <param name="a2">Second angle</param>
        /// <returns>An angle constructed from the value that is the first angle minus the second angle</returns>
        public static Angle operator -(Angle a1, Angle a2)
        {
            return new Angle(a1.Radians - a2.Radians, Type.Radians);
        }

        /// <summary>
        /// Returns the exact division between two angles (i.e. how many times does the second angle fit into the first)
        /// </summary>
        /// <param name="a1">Numerator angle</param>
        /// <param name="a2">Dedominator angle</param>
        /// <returns>A new angle constructed from the value that is the first angle in radians divided by the second angle in radians</returns>
        public static Angle operator /(Angle a1, Angle a2)
        {
            return new Angle(a1.Radians / a2.Radians, Type.Radians);
        }

        public static Angle operator *(Angle a, double d)
        {
            return new Angle(a.Radians * d, Type.Radians);
        }

        public static Angle operator *(double d, Angle a)
        {
            return new Angle(a.Radians * d, Type.Radians);
        }

        public static Angle operator /(Angle a, double d)
        {
            return new Angle(a.Radians / d, Type.Radians);
        }

        public static bool operator <(Angle a1, Angle a2)
        {
            if (a1.Radians < a2.Radians) return true;
            else return false;
        }

        public static bool operator >(Angle a1, Angle a2)
        {
            if (a1.Radians > a2.Radians) return true;
            else return false;
        }

        public static bool operator <=(Angle a1, Angle a2)
        {
            if (a1.Radians <= a2.Radians) return true;
            else return false;
        }

        public static bool operator >=(Angle a1, Angle a2)
        {
            if (a1.Radians >= a2.Radians) return true;
            else return false;
        }

        public static implicit operator double(Angle angleobj)
        {
            return angleobj.Radians;
        }

        public static implicit operator string(Angle a)
        {
            return a.ToString();
        }

        #endregion operators


        #region overrides

        public override string ToString()
        {
            return Radians.ToString() + " radians";
        }

        #endregion overrides


    }

}