Send a command from Grasshopper to Rhino in C#

In Grasshopper, it’s possible to send commands directly from Grasshopper to Rhino. How? By using the C# component.

Simply add the following line to your C# code.

Rhino.RhinoApp.RunScript(string script, bool echo);
//script: The command to send
//echo: Set to true for the command to appear in Rhino's command prompt

For example, if I want to automatically save the Rhino document, I could add the following to a C# component:

Rhino.RhinoApp.RunScript("Save", true);

For more complex commands, we can use some special syntax. For example, if I want to save the file with a custom filename, I can use:

Rhino.RhinoApp.RunScript("_-Save test3.3dm", true);

The hyphen allows us to modify parameters, and the underscore allows us to enter more than one command at once without Rhino waiting for manual user input.

More information

The full list of Rhino commands is available here.

For more detail about using the RunScript method, read this.

Create a list of Rhino geometry within a Grasshopper component using GeometryBase

How to create a generic, mixed list of geometry within a Grasshopper component, and send it to a single output:

class GeometryBuilder
{
    //constructor
    public GeometryBuilder()
    {
        //...
    }

    //property - declare our geometry list here
    private List<Rhino.Geometry.GeometryBase> geom = new List<Rhino.Geometry.GeometryBase>();
    public List<Rhino.Geometry.GeometryBase> Geom
    { get { return geom; } set { geom = value; }}

    //methods
    public BuildGeometry()
    {
        //add a line
        //lines don't inherit from GeometryBase, so we can't cast it to be in
        // our Geom list, but we can convert it to a NurbsCurve, which does.
        Rhino.Geometry.Line ln = new Line(new Point3d(0,0,0), new Point3d(1,1,0));
        Geom.Add((GeometryBase)(ln.ToNurbsCurve())); 

        //Meshes DO inherit from GeometryBase, so we can add them to Geom directly
        Rhino.Geometry.Mesh msh = someOtherMesh;
        Geom.Add((GeometryBase)msh);

        //Generally, things within Rhino.Geometry that are classes can be cast to GeometryBase.
        //Things which are structs can not, though there is usually a sensible way to convert them.

        //Point3d is a struct, so we can't cast it to GeometryBase.
        //The Rhino Point is a class, and it contains a constructor converting from Point3d
        Rhino.Geometry.Point3d pt3d = new Point3d(5,2,0);
        Rhino.Geometry.Point pt = new Point(pt3d);
        Geom.Add((GeometryBase)pt);
    }
}


class GrasshopperComponent : GH_Component
{
    //constructors etc...
    //...

    //set inputs
    //...

    //set outputs
    protected override void RegisterOutputParams(GH_Component.GH_OutputParamManager pManager)
    {
        //our output is created using the 'AddGeometryParameter' method. Remember to set 'access' to 'list'.
        pManager.AddGeometryParameter("My Geometry","my geom","This is a list of generic geometry", GH_ParamAccess.list);
    }

    protected override void SolveInstance(IGH_DataAccess DA)
    {
        //generate our list of geometry from the class we made
        var GeometryBuilder gb = new GeometryBuilder();
        gb.BuildGeometry();

        //the geometry is now saved within the Geom property of our gb instance of GeometryBuilder.
        //All we need to do now is send the geometry to the Grasshopper output
        DA.SetDataList(0, gb.Geom);
    }
}

Grasshopper: Front and Centre for aligning legends to the Rhino Viewport

Grasshopper is a great way of creating legends and graphs beside your model, but how do you display them? You can use multiple viewports, but this is clumsy to set up. You could use Ladybug’s approach of keeping the legend close to your geometry in 3D space, but this means you have to move the viewport to inspect the legend.

legend1

Front and Centre is a Grasshopper cluster which moves legends or any other geometry directly in front of the camera. Add a timer and the legend automatically follows the camera. It intelligently scales the geometry to fit within the screen, and you can customise the location by modifying a centre point.

legend2

To use, connect the legend or geometry you wish to display to ‘Geo’. Optionally, you can add a point to define the centre of your screen to ‘pt’. Both these should be located somewhere in the plane Z=0.

frontandcentre

Set the Rhino camera with Grasshopper and C#

Setting the camera in Rhino can be a bit fiddly. Often, dragging and orbiting doesn’t give you the camera view you need. It is possible to manually set the camera using the ViewportProperties command, but even this often isn’t ideal.

However, it is surprisingly easy to set the Rhino camera with a few lines of C# code in Grasshopper. The key part is understanding how the Rhino camera works. The camera location is defined by a Point3d. In order to get the view direction, a second point is used, called the target. So if you want to ‘look around’, keep the camera location constant, and move the target. If you want to orbit around an object, keep the target the same and move the camera location. If you want to ‘walk’ (like in Sketchup) then you need to move the location and the target together.

To use the code below, create a C# component in Grasshopper. Copy the script below into the component. The snippet gets the camera in the selected Rhino viewport.

Get camera

private void RunScript(bool getcamera)
{
    //get current viewport    
    vp = doc.Views.ActiveView.ActiveViewport;
    //save camera location and camera target
    loc = vp.CameraLocation;
    tar = vp.CameraTarget;
}
// <custom additional code>

Rhino.Display.RhinoViewport vp; //used to get and set rhino camera properties
Point3d tar;
Point3d loc;

…and this one sets the viewport. You’ll need to set two Point3d inputs called loc and tar to take the user’s desired camera location and target points.

Set camera

private void RunScript(Point3d loc, Point3d tar)
{
    //get current viewport    
    vp = Rhino.RhinoDoc.ActiveDoc.Views.ActiveView.ActiveViewport;
    //set new camera
    vp.SetCameraLocations(tar, loc);
}
// <custom additional code>

Rhino.Display.RhinoViewport vp; //used to get and set rhino camera properties

These examples are of course very simple, but you don’t have to stop here. Once you’ve got the gist of it, this approach reveals not only the ability to manipulate the view but it allows a huge range of creativity. For example, I rendered OpenStreetMap data in Grasshopper and manipulated the camera to follow a road.

You can download the Grasshopper file to set the camera along a curve like the above video from here.

The mesh data structure in Grasshopper

Understanding meshes in Grasshopper can be a little tricky. They have a somewhat unintuitive data structure that can make it hard to handle meshes in C# code.

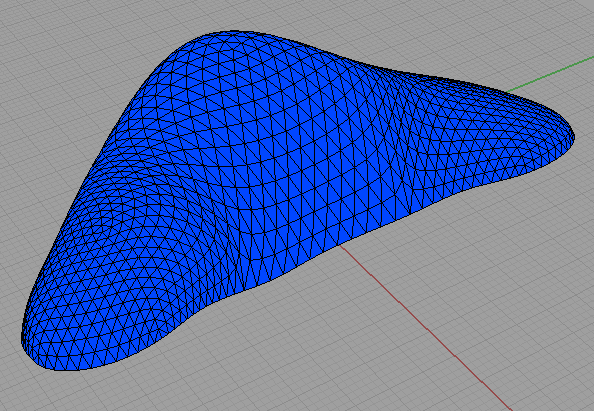
You probably already know a little about meshes. They are a form of geometry that contain a collection of faces, and that each face can have no more than 4 corners. How does Grasshopper handle this?

The basics

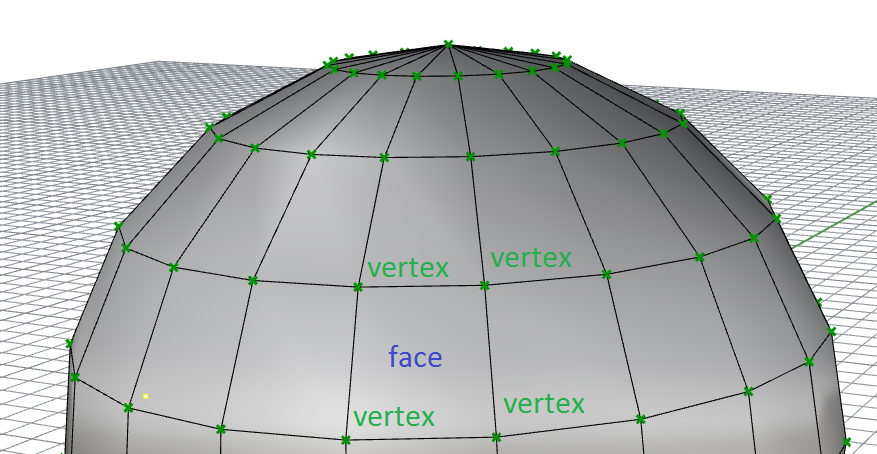
A mesh is a collection of faces. Each face is defied by 3 or 4 vertices. A vertex is a 3D point. A single mesh can contain as many faces and vertices as you want.

A mesh sphere in Grasshopper, indicating mesh points (vertices) and mesh faces


In terms of data structures, a mesh contains 2 lists:

  • A list of faces
  • A list of vertices

Firstly, we define a list of vertices. This is a list of 3D points. For each point, we can also imagine an index. For example, the fourth point in the list has an index of 4.

Then, we define each face. For each face, we define three vertices for triangles called A, B and C, or four vertices for quads, A, B, C and D. In the face list, the vertices contain the indices for the vertices, and not the coordinates of the vertices themselves. This is important to remember!

What does this mean when Rhino reads this data and tries to display a mesh? Take the example in the image below.

A table with an example showing how mesh faces and mesh vertices are held in the mesh data structure

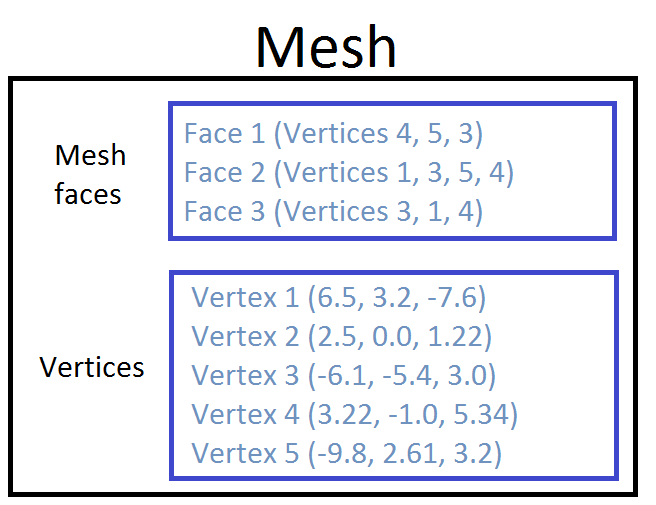
The mesh contains 3 faces. For the first face, we have three values and therefore three vertices, so face 1 is a triangle. What are the coordinates of these three vertices? To do this, we need to also look at the vertices list. Face 1 contains vertices 4, 5 and 3. Remember, these are the indices for our vertices. We take these three values and cross-reference them with the vertex list – reading the coordinates for vertices 3, 5 and 4.

Why is it so complicated?

The above system actually makes sense from a data efficiency point of view. Of course, in most meshes, multiple faces will share vertices. With the sphere above, each vertex is shared between 4 neighbouring faces. With the above data structure, we only need to define our mesh points once.

Furthermore, if we want to move a point on our sphere, we just have to update our vertex list. We don’t have to search for every copy of a node or worry about ‘breaking’ our mesh when we move mesh points about.

Manipulating meshes: A C# example

Create a C# component in Grasshopper. Create an input called ‘mesh’ and set its data type to Mesh.

  private void RunScript(Mesh mesh, ref object A)
  {
    //1) Let's read from an existing mesh

    //get faces from mesh
    List faces = new List();
    foreach(MeshFace face in mesh.Faces)
    {
      faces.Add(face);
    }

    //get vertices from mesh
    List vertices = new List();
    foreach(Point3d vertex in mesh.Vertices)
    {
      vertices.Add(vertex);
    }

    //2) Let's get the coordinates for a mesh face
    
    //get the indices for the 10th face
    int[] indices = new int[4];
    indices[0] = mesh.Faces[10].A;
    indices[1] = mesh.Faces[10].B;
    indices[2] = mesh.Faces[10].C;
    indices[3] = mesh.Faces[10].D;

    //We can now get the coordinates for the 10th face from these indices
    Point3d[] facepts = new Point3d[4];
    for (int i = 0; i < 4; i++)
    {
      facepts[i] = mesh.Vertices[indices[i]];
    }


    //3) Let's make a new mesh from scratch
    
    Mesh rtnmesh = new Mesh();
    //for the new mesh, we first need to define the vertices
    //we can add any points we like - let's just copy over the vertices list
    rtnmesh.Vertices.AddVertices(vertices);
    //now let's make a face and add it to the (currently empty) face list
    MeshFace tempface = new MeshFace(0, 1, 12, 11);
    rtnmesh.Faces.AddFace(tempface);

  }

Download an example

The code above is available in the file below.

Download

How to automatically get the measurement units in Grasshopper/Rhino

How to automatically find out if your Rhino document is set to millimetres or metres:

private void RunScript(ref object scale)
  {
    int rtnval = 1;
    Rhino.RhinoDoc  doc = Rhino.RhinoDoc.ActiveDoc;
    Rhino.UnitSystem  system = doc.ModelUnitSystem;
    if(system.ToString() == "Meters") rtnval = 1;
    else rtnval = 1000;
    scale = rtnval;
  }

This script returns a value of 1 if the document is in metres, or 1000 otherwise. (I assume that the user will only be using mm or m.)

To use, create a C# component in Grasshopper and copy the part between the curly brackets to the code of the C# component. Make sure that the component has an output called ‘scale’.

mm or m component

…or download the component from below:

Download

Creating a relaxed grid on a mesh dome roof with Rhino/Grasshopper and SmartForm

Something I’ve found in my archives – one of the first projects I did when starting my EngD in 2013. We had received a domed roof from the architect, and we had been asked to optimise the form and experiment with different gridding options.

The problem was that the model we received was nothing more than a collection of lines arranged into one grid pattern and lots of little mesh faces between these lines – no NURBS surfaces or anything else nice to work with! The challenge was therefore threefold: recreate the NURBS surface, manipulate the surface into a structurally more efficient form (think lots of non-zero Gaussian curvature) and then apply a range of grids to it.

In hindsight, the methodology presented below certainly isn’t the most efficient or effective, but the important thing (as is usually the case in engineering) is that it got the job done!

Continue reading Creating a relaxed grid on a mesh dome roof with Rhino/Grasshopper and SmartForm

How to read Excel files with Grasshopper

A quick guide to reading Excel files into Grasshopper for Rhino.

1) Install the LunchBox plugin for Grasshopper

2) Open the Excel file you want to read, and minimise it to the taskbar.

3) In Grasshopper, find the component called Excel Reader. Add your worksheet, column and row values in numerical format. Set ‘read’ to true.

Hints and tips

  • The component is clever – you don’t need to ‘link’ the Excel file to GH – it just looks for anything you have open. This is apparently more computationally efficient.
  • If you want to read multiple columns at once, enter multiple columns using the ‘series’ component. The output is a data tree instead of a list.

  • Always use numbers to describe columns (A=1, B=2…) and worksheets (Sheet1 = 1, Sheet2 = 2…).

How to install Ladybug for Grasshopper

Ladybug is a free plugin for Grasshopper that uses the EnergyPlus engine to provide a range of environmental calculations and visuals for input geometry. This guide will show you how to install Ladybug.

If you are looking to install the more recent Ladybug + Honeybee components for Grasshopper, this guide will help you too.

Check you have the right software

Firstly, you need Rhino 5. Rhino 4 won’t do! You can download a free trial here.

You also need Grasshopper, a free plugin for Rhino. Download the latest version here.

Then you need GHPython. Download it, and unzip it. In GH, open your components folder:

grasshopper special folders drop down menu

This should open a folder in a location like C:\Users\jramsden\AppData\Roaming\Grasshopper\Libraries. Paste GHPython.gha into this folder.

Install Ladybug

Visit the Ladybug page, take a read of it and have a look at the video. Then download the unlocked version from the page (or quicklink here). This should download a zip folder. Unzip this folder (the next step won’t work if you don’t unzip it first!).

Within the folder should be about 28 .ghuser files. Select them all and drag them directly into the GH window.

ladybug for grasshopper install components

Done! To double-check, go to your GH User Object folder under the Special Folders as above (e.g. C:UsersjramsdenAppDataRoamingGrasshopperUserObjects). The .ghuser folders should be in here.

Now a new tab should have appeared in your GH window called Ladybug.

ladybug ribbon icons grasshopper

There are 5 categories of components, labelled 0-4. In using Ladybug, these are run through roughly in order.