Force a component to re-compute in Grasshopper

Wouldn’t something like this be useful in Grasshopper?

recompute-component-grasshopper

Often, I am working with data files on my computer through Grasshopper. When those data files change, there may be no easy way for dependent Grasshopper components to update. One solution is to disconnect and re-connect a wire into that component. This is quite tedious though, especially in large documents. It is also possible to recalculate the entire canvas with right click, recompute. But this is not feasible if you have components in your canvas which take a long time to calculate.

You may want to read this post which talks a bit about the nitty-gritty of how Grasshopper does calculations. Basically, for each component, in the background there is a property called ‘expired’. If ‘expired’ is true, then Grasshopper that it has to recalculate that component. So if we can manually set this property for components we want to update, we can force a recalculation on only these components (and the components directly downstream of them).

The following C# script does exactly this. Set up a C# component as in the image with the code at the bottom.

expire-components-grasshopper

Then, select components you want to recompute. (Here, I have selected two path files, which links to files I want to re-read.) Finally, hit the button on the left. The result is that the paths recompute, which then triggers a recalculation of the components downstream. The rest of the document (including some very heavy components) remains untouched.

It’s not quite the right-click option I showed above, but in the meantime it’s a pretty effective solution which I hope is useful.

Code

  private void RunScript(bool expire_them, ref object A)
  {
    
    //fore each component on the canvas
    foreach (IGH_DocumentObject obj in GrasshopperDocument.Objects)
    {
      //if that component is selected
      if(obj.Attributes.Selected)
      {
        //...and if expire_them = true, then expire that component and ask it to recompute
        if(expire_them) obj.ExpireSolution(true);
      }
    }

  }

C#: Sort dictionary by key

How to sort dictionary by key in C#, and return a sorted list of values.

Let’s say you have some values. Each value is associated with a string, called a key. We want to sort the values such that their corresponding keys are in order.

c# sort dictionary by key

The basic idea is that we want to sort our keys, and then look up the dictionary according to the sorted keys.

But we have to be careful – we need to sort the keys without damaging the original dictionary. A good solution is to create a copy of the keys before you sort them.

See below for a full example:

Option 1: C# code to sort dictionary by key

  public List<object> SortDictionary()
  {
    //Create the data we want to sort.
    //In the data below, we are saying that "B corresponds to 21", "F corresponds to 43" and so on.
    //Normally, you would probably be feeding this data from somewhere else in your program.
    List<string> Keys = new List<string>();
    List<object> Values = new List<object>();
    Keys.Add("B");
    Keys.Add("F");
    Keys.Add("A");
    Keys.Add("D");
    Keys.Add("C");
    Keys.Add("E");
    Values.Add(21);
    Values.Add(43);
    Values.Add(6);
    Values.Add(54);
    Values.Add(65);
    Values.Add(3);

    //Declare new dictionary, where the key is a string and the corresponding data is an object
    var dict = new Dictionary<string, object>();
    //populate dictionary with data created above
    for (int i = 0; i < Keys.Count; i++) dict.Add(Keys[i], Values[i]);

    //Separately, sort our keys into alphabetical order
    //You need your keys in their own list. You may need to create this yourself if you don't already have it.
    Keys.Sort();

    //Now look up our dictionary according to our sorted keys
    List<object> sortedVals = new List<object>();
    for (int i = 0; i < Keys.Count; i++)
    {
      sortedVals.Add(dict[Keys[i]]);
    }
    return sortedVals;
  }

Thanks to Fraser Greenroyd for helping me with the code snippet above.

Option 2: Use SortedDictionary to sort a dictionary in C#

If you require that your dictionary is always going to be sorted, it might be better to use a SortedDictionary rather than just a Dictionary.

Whenever you add an item to a SortedDictionary, the item will be inserted into the correct location.

Note that there is a performance penalty for some SortedDictionary operations, so you should consider whether a SortedDictionary is best for you.

    var sdict = new SortedDictionary<string, object>();
    for (int i = 0; i < Keys.Count; i++) sdict.Add(Keys[i], Values[i]);
    return sdict.Values.ToList();

Convert a network of roads into 2D curve plans in Grasshopper

Building on from my Road Maker, where the centrelines of roads can be converted into 2D meshes suitable for rendering more realistic roads in Grasshopper (as done here), a recent task at the office required that these meshes then be turned into a collection of curves marking the outline of the road.

This Grasshopper script enables you to do this, using a couple of standard Grasshopper components. The basic workflow used here is to get a network of roads using Elk and OSM data.

elk-1

The Road Maker then converts this network into 2D meshes. We then extract the mesh edges and then use the RUnion to tidy it up as much as possible. The final result isn’t perfect but should minimise the amount of manual work needed at the end.

elk-2

We should then get a result that looks like:

road-network-curves-grasshopper

Remove nulls from a list using the C# component in Grasshopper

This simple script removes nulls from a list in Grasshopper. It preserves all data types and other data that you pass through it.

remove-nulls-grasshopper

To set up, copy the code below into a standard C# component in Grasshopper. Set input x as a list. Feed your list into x. The return ‘A’ will return the list x with nulls removed.

    var rtnlist = new List<object>();

    foreach (object obj in x)
    {
      if (obj != null) rtnlist.Add(obj);
    }

    A = rtnlist;

The other C# (counting nulls) in the image came from this post.

Count the number of repeated strings in a list in Grasshopper

This script takes in a list of strings. It consolidates repeated values and tells you how many times equal strings are repeated.

string-histogram-grasshopper

To use, copy the code below into a standard C# script component in Grasshopper. Add an additional output called B. Output A will show all the different values found in the list, and B will show the count for each item in A for the number of times that item was found.

    var names = new List<string>();
    var counts = new List<int>();

    foreach (string str in x)
    {
      bool exists = false;
      for (int i = 0; i < names.Count; i++)
      {
        if(str == names[i])
        {
          exists = true;
          counts[i]++;
        }
      }
      if (!exists)
      {
        counts.Add(1);
        names.Add(str);
      }

    }
    A = names;
    B = counts;

Access any component properties in C# using the Grasshopper API

In previous posts, I have touched upon the idea that it is possible to connect remotely to any component in the Grasshopper canvas and read or edit it, even when there are no wires connecting them. And in this recent post where I accessed the draw order of all components on the canvas, I found it was very easy to build a list of every component on the canvas.

So how far can we take this – is it possible to access any piece of information about any component of the entire canvas? How much can we learn and edit about components just using a bit of C#?

The code below is my attempt to find out. It is my attempt to write a code that, given any component in the canvas, will tell you as much as possible about it. For lack of a better name, I call it the Interrogator.

The Interrogator

The Interrogator is currently not very smart, but is a good start. It is a WIP and I may update this page as I teach the Interrogator more tricks. Set it up with a panel and a timer, then click on any component in the canvas. The Interrogator will tell you all it can about that component.

grasshopper-interrogator

As I learn more about the class structure of Grasshopper, I learn more about where different pieces of information are hiding, and how to access them. (Short story – the class hierarchy of Grasshopper is more a tangled web of inheritance and it’s easy to get lost!) Eventually, I want to be able to know how to access and modify everything about any component, which will help greatly in my ability to develop new and interesting Grasshopper components.

Code

For now, the limited information I can access is presented in the code below, in all its partially-commented glory. Just copy into a standard C# component, and let the Interrogator pick the brains of your components…

    var rtnlist = new List<string>();
    var rtntree = new DataTree<string>();

    //get all guids in doc - this is used to find the draw order
    var guids = new List<System.Guid>(); //guids of all componets
    foreach (IGH_DocumentObject docObject in GrasshopperDocument.Objects)
    {
      guids.Add(docObject.InstanceGuid);
    }
    //A = guids;

    foreach (IGH_DocumentObject obj in GrasshopperDocument.Objects)
    {
      if(obj.Attributes.Selected)
      {
        //find this object in the list of guids
        int loopno = 0;
        bool endloop = false;

        while (!endloop)
        {
          GH_Path pth = new GH_Path(loopno);
          //if object is selected, let's display its properties
          if(guids[loopno] == obj.InstanceGuid)
          {

            //build our component info list here!

            rtntree.Add(obj.NickName + " (" + obj.Name + ")", pth);
            rtntree.Add("Category: " + obj.Category + " > " + obj.SubCategory, pth); //the category in the GH tab
            rtntree.Add("Component GUID: " + obj.ComponentGuid.ToString(), pth);
            rtntree.Add("Description: " + obj.Description, pth);
            rtntree.Add("Draw order: " + loopno.ToString(), pth); //used for calculation order. New objects go to the end of the list by default
            rtntree.Add("Exposure: " + obj.Exposure, pth); //what is this?
            //you can  access the icon under obj.Icon
            rtntree.Add("Instance description: " + obj.InstanceDescription, pth);
            rtntree.Add("Instance GUID: " + obj.InstanceGuid.ToString(), pth);
            rtntree.Add("Attributes: " + obj.Attributes.ToString(), pth); //namespace and class in DLL

            rtntree.Add("Namespace: " + obj.Attributes.DocObject.ToString(), pth);


            //inputs
            //IList < Grasshopper.Kernel.IGH_Param > things = GrasshopperDocument.Objects as IList<Grasshopper.Kernel.IGH_Param>[0];
            //A = things;
            var para = obj as Grasshopper.Kernel.GH_ActiveObject;
            if(para != null)
            {
              rtntree.Add("Successfully cast as GH_ActiveObject", pth);
              rtntree.Add(para.ProcessorTime.ToString(), pth);
            }
            var para2 = obj as Grasshopper.Kernel.IGH_Component;
            if(para2 != null)
            {
              rtntree.Add("Successfully cast as IGH_Component", pth);
              rtntree.Add("Number of inputs: " + para2.Params.Input.Count().ToString(), pth);
            }
            //var para3 = obj as Grasshopper.Kernel.GH_PersistentParam<Grasshopper.Kernel.Types.IGH_Goo>;
            //rtntree.Add(para3.PersistentData[0].ToString(), pth);
            //var para4 = obj as Grasshopper.Kernel.Parameters.
            //if(para4 != null) rtntree.Add("yay", pth);


          }
          loopno++;
          if(loopno >= guids.Count) endloop = true;
        }
        A = rtntree;
      }
    }

How the draw order affects calculation order in Grasshopper

Usually, calculation in Grasshopper goes from left to right along the wires. The components on the left get calculated first, then they trigger components downstream to the right. This continues until the canvas has been fully calculated. After many months using Grasshopper, this is so obvious that it doesn’t even need thinking about.

Until, that is, you try to use Grasshopper contravening this fundamental logic. I recently had a task where I needed to calculate the glare using Honeybee. The glare calculation component uses the Rhino camera, meaning that the camera has to be moved into the correct position if the glare is going to be calculated correctly.

I decided to use the Horster camera control to adjust the camera. This gave me something like this:

Grasshopper component order problem with horster camera control and Honeybee glare calculation

The calculations are dependent upon the camera having already been placed in the correct position here. In other words, the camera must be set before the calculations are done. See the problem? Without an output on the camera component, the calculation geometry must come from the ‘building’ component. It’s therefore impossible to ensure that the camera is moved before the calculations are done.

Which component does Grasshopper calculate first?

A bit of background first. When Grasshopper calculates components, it has a property called expired. If a component needs calculating, it is marked as expired=true. If it is up to date and doesn’t need calculating, it is marked as expired=false. When you make a change to a component (such as changing its input values) it is marked as expired. And when a component is marked as expired, everything downstream (i.e. to the right) is also marked as expired.

In short, ‘expired’ means that the component is waiting to be re-calculated.

Once Grasshopper has a list of expired components, it must then choose how it is going to re-calculate them. It does this by working from left to right, starting with a component that has no un-expired inputs.

For most Grasshopper documents, this explanation is quite sufficient. But, in reality, there is a much more complicated algorithm going on. Notice in my diagram that there is more than one valid order it can choose to calculate the components:

  • Building, setCam, DoCalcs, result
  • Building, DoCalcs, setCam, result

So Grasshopper has two possible choices in what it wants to calculate first. And since, at the end of the day, it does choose one option, there must be some kind of further logic in the background on how it chooses calculation order. Without much else to go on, I head to the Grasshopper forums, where I read this older post and also asked this post.

What the calculation order does NOT depend on

The calculation order in Grasshopper does not depend on any of the following:

  • Component position (i.e. its x and y coordinates)
  • Order of inputs or outputs
  • The data contained within a component
  • The type of component *

So what does the calculation order depend on?

The draw order in Grasshopper

The calculation order is driven by one key thing: the draw order. In the background, Grasshopper saves a copy of all the components in your document in a list. The order of this list is the draw order.

It is called the ‘draw order’ as it is this that governs which components are ‘drawn’ on top of each other. See how the panels below are drawn one on top of the other? That’s the draw order in action.

Grasshopper draw order shown by two panels

You can easily change the draw order by using keyboard shortcuts:

  • CTRL+B sends the component to the back
  • CTRL+F sends the component to the front

Grasshopper draw order shown by two panels

How Grasshopper does calculations using the draw order

The draw order does more than help to prettify your Grasshopper canvas – it is a primary driver in the calculation order too. Essentially, when Grasshopper is solving the canvas, what is happening is:

  1. Grasshopper makes a list of all components in your canvas. The order of these is the same as the draw order. The component drawn at the back of everything else is item 0 in the draw order, and the draw order increases to the front as you go down the list.
  2. Grasshopper finds the back-most expired component. It asks this component to solve itself.
  3. Before this component actually calculates anything, first it looks to see if any of its inputs are also expired. If they are, it asks these to solve themselves too.
  4. Again, these components also check their inputs before doing any calculations. This continues until a component is found which is expired, but which has no expired inputs. This component then calculates itself and marks itself as not expired.
  5. Go back to number 2. Repeat until nothing is expired.

How to check the draw order

The easiest way to check the draw order, and thus the calculation order, is simply to drag the components each other and see what appears on top. The component on the bottom will be calculated first. And if we aren’t happy with the order, we can use CTRL+B and CTRL+F to change them.

horster-order-test-grasshopper

Looks like setCam is being calculated first. Yay!

But wait – it’s not quite as simple as that! What if the setCam component is behind DoCalcs, but ‘result’ is behind both setCam and DoCalcs? ‘Result’ will be triggered first by Grasshopper, and this will then trigger DoCalcs to solve itself. So what will happen is that, even though setCam is behind doCalcs, setCam will be calculated after doCalcs because of the influence of ‘result’.

We need to be completely sure that setCam is therefore behind everything, not just DoCalcs. We can use the CTRL+B shortcut to do this, but how can we be sure it’s working properly? There’s no visual feedback that the shortcut has sent the component behind everything else without checking manually for every component.

How to check the draw order – for geeks

And again, it’s C# to the rescue! With a quick C# component, we can get a list of all objects in the Grasshopper document – all in the draw order. And with a timer and a panel attached, we can add a bit of extra functionality – click on any component and it will be shown as ‘selected’ in the panel.

grasshopper-get-draw-order

To use this yourself, copy the code below into a C# component, and set up as in the diagram. To use, turn on the timer and select any component (or components) in your Grasshopper document.

    var rtnlist = new List<string>();

    foreach (IGH_DocumentObject obj in GrasshopperDocument.Objects)
    {
      if(obj.Attributes.Selected) rtnlist.Add(obj.NickName + " (" + obj.Name + ") SELECTED");
      else rtnlist.Add(obj.NickName + " (" + obj.Name + ")");
    }
    A = rtnlist;

Using this component, we can verify that we have successfully moved our setCam to the back of the draw order list:

grasshopper-check-draw-order

Our selected component is item 0 in the list, and so is right at the back of all components in the canvas. Great news!

Creating my first WordPress plugin and learning PHP

Firstly, I have to say that I was pleasantly surprised how easy it was to do both of these – that is, creating a simple WordPress plugin as well as learning from scratch enough PHP to do this. It still required some cognitive effort, but the whole ordeal was completed within an evening.

One of my tasks this weekend was sorting out my links page. I want to keep it looking fairly tidy and organised, so I used a table. Even the simple layout below took a fair amount of repetitive HTML in order to do this. If I wanted to make a change (e.g. widen one column) this would mean modify a value for every row. Not efficient!

old-links-page

The above table was made with code that looks like this:

old-links-page-2

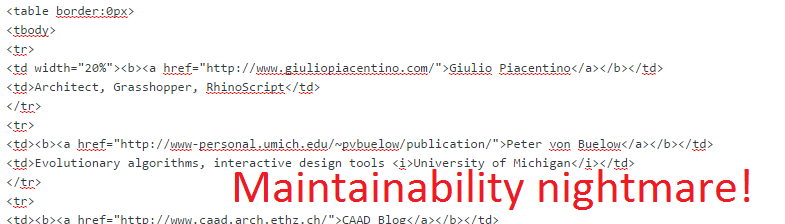
Imagine the list grows and there are 50 rows in the table. Then I decide to add a new column. I would have to manually add every extra cell manually, which is not going to be fun.

PHP

PHP is a scripting language that you can use to automate repetitive parts of your code, among many other tasks. It’s incredibly powerful – it’s the language that powers WordPress after all. I wondered if it was possible to have a PHP script generate the HTML to make the table.

So I set about learning some PHP using the excellent PHP tutorial at w3schools. I’m not familar with JavaScript, but PHP is similar enough to C# that it was mostly a breeze.

When learning, I found it was useful to create a document on my server. I logged into cPanel and created a new document here to practise with. cPanel includes a code editor. Alternatively you could create a local document. Which in hindsight is probably simpler.

Incidentally, what is the key difference between PHP and JavaScript? PHP runs on the server and delivers the output (i.e. the HTML) over the internet. With JavaScript, the server sends the code itself to the client machine (i.e. your computer) and the code executes there. I learnt that today 🙂

First attempt with PHP in WordPress (Spoiler: It fails!)

The easiest solution would be to add a bit of PHP script within the HTML that makes up the links page. On my practice page I eventually managed to get a solution working in principle. Essentially all you do is create a function with arguments like ‘URL’ and ‘description’, and in that function you use the echo command to construct the HTML.

function AddLinksRow($URL, $name, $description)
{
echo '<tr>
<td><a href="' . $URL . '"><img src="https://eu2.searchpreview.de/preview?s=' . $URL . '" /></a></td>
<td><b><a href="' . $URL . '">' . $name . '</a></b></td>
<td>' . $description . '</td>
</tr>';
}

echo '<table class="JR">';
AddLinksRow("http://www.google.co.uk","Google","Search the web with google");
AddLinksRow("http://www.bbc.co.uk","BBC","News");
echo '</table>';

This makes the following table:

php-test

If you’re already familiar with HTML table notation, you should be able to see how the function is constructing the HTML, and the great thing about PHP is that we can effectively include variables in our HTML. So we can reuse the same function to generate a new batch of HTML for each row of the table.

By default, I use the HTML editor in WordPress. (Not a fan of WYSIWYG as often what I see isn’t what I get.) So you would think that copying the code over into a WordPress page would be trivial.

If only! Even the HTML editor still undergoes some ‘tidying’ by WordPress. This is why it’s possible to create new paragraphs with the return key without having to use <p> tags. One other thing that it does is block PHP execution. Instead, your page will make a token attempt of trying to render your script.

There is a range of plugins for WordPress that re-enable in-line PHP execution in posts and pages, such as Insert PHP or Shortcode Exec PHP. Frustratingly, none of these seem to work.

Digging in, many of these projects have not been updated in a while, and none of them profess to have support for version 4.x of WordPress. This seemed to be a dead-end.

Shortcodes in WordPress plugins

But then it occurred to me that WordPress plugins are written in PHP. Many plugins use shortcodes to allow the user to interact with them. For example, a plugin has been written to generate a list of saved links from the Pocket bookmarking service. You can see my list here. All I had to do to generate this list was type [pocket_links] in my page, and this shortcode would find the Pocket WP plugin, which in turn would fill out the page for me. These shortcodes can also take arguments, e.g. [pocket_links count=5] to display 5 items only from my Pocket list.

So, in principle, would it be possible to write an extension where I could write a shortcode with the URL and description as arguments, and let a plugin turn this information into a table row? Instead of that messy HTML above, could I write something much tidier like this?

[AddRow URL=”http://www.google.co.uk” name=”Google” description=”Search the web”]

Starting my first WordPress plugin

The process is remarkably simple. I followed this tutorial to get going, but the process is basically:

  • Find the WP plugin folder on your server. Create a new folder for your plugin.
  • Create a new document called plugin_name.php
  • Type in some properties about the plugin you are about to create, such as file name and author.
  • Go to the plugins on your WP dashboard. Your plugin should already be there! Activate it.

And that’s about it. All you have to do then is create your actual plugin functionality.

Writing the plugin

To get the functionality I was after, I used a combination of this WordPress help file and also having a peek at the Pocket WP PHP file. Eventually, this was what my own plugin PHP file looked like:

<?php
/**
* Plugin Name: JR links
* Plugin URI: http://james-ramsden.com/downloads
* Description: Use shortcode [JR_Links address="" name="" description=""] within table tags. This adds a row for a table of links.
* Version: 1.0
* Author: James Ramsden
* Author URI: http://james-ramsden.com
**/

function JR_links_funct( $atts, $content = null ) 
{
	extract(shortcode_atts(array('address' => '','name' => '','description' => ''), $atts )); //extract parameters

	$html = '<tr>';
	$html .= '<td width="111px"><a href=" ' . $address . '"><img src="https://eu2.searchpreview.de/preview?s=' . $address . '" /></a></td>'; //image
	$html .= '<td width="20%"><b><a href="' . $address . '">' . $name . '</a></b></td>';
	$html .= '<td>' . $description . '</td>';
	$html .= '</tr>';
	return $html;
}
add_shortcode( 'JR_Links', 'JR_links_funct' ); //the shortcode is called [JR_Links] and calls the function JR_links_funct
?>

The entire code inside the PHP file.

And that’s it! This is about as short as meaningful extensions get, and I’m pretty pleased as a first attempt.

The green text at the top is the plugin properties that WordPress reads to populate the plugins list on your dashboard. It’s best to just copy-paste this for your own plugins, as you’ll find it in every one.

The add_shortcut function is the bit of code that tells the WordPress editor to listen for a shortcode. When the shortcode [JR_Links] is used, then WP feeds back to this function, which in turn will call the JR_links_funct function.

Within the extract line, we have added the ability to listen for three arguments: address, name and description. We can then inherit these arguments as variables in our function. A variable called $html is then used to construt the HTML we want to output. When we’ve finished, we return $html, which then returns this text back to the WordPress page.

Using the new plugin

Now the dirty HTML work has been pushed into the background, creating the table is now much tidier. Creating the table is now as simple as:

<table>
<p>[JR_Links address="http://www.giuliopiacentino.com/" name="Giulio Piacentino" description="Architect, Grasshopper, RhinoScript"]</p>
...
</table>

If I want to make any changes to the layout, I can now do this within the PHP file. The shortcode is simply passing over the information required; it’s up to the PHP file on what HTML this is turned into. For maintainability, this is so much better. Since the same PHP file creates every line of the table, we only have to make a change once in the PHP file for the change to propagate through every row.

new-links-page

Premium rendering tools for Rhino

As happens once every week or so, Rhino send me an email of new and updated plugins and tools. Normally, these emails get little more than a cursory glance to see if anything stands out.

My architecturally-inclined colleagues and friends have often spoken about the amazingly superior aesthetics of premium rendering packages. Being a practical kind of guy, I didn’t see anything wrong with the default Rhino render. It usually generates images which seemed adequately pretty for my needs. But in the email, there was a mention of an updated version of Octane Render, and because I have much more important, pressing things to do, I felt like this would be a good way to procrastinate.

I downloaded the Rhino demo and got it going. I chucked in whatever geometry was in my Rhino recent files list, and got it going. And I have to say that I was quite surprised at the result! Take a look…

Octane renders

A quick rendering example in Rhino using OctaneRender and out-of-the-box settings

A quick rendering example in Rhino using OctaneRender and out-of-the-box settings

A quick rendering example in Rhino using OctaneRender and out-of-the-box settings

Bearing in mind that these renders were done with every setting set at default, no materials applied, and that they were made by someone with minimal rendering experience who has no idea what he’s doing, the results are quite remarkable! I particularly like the way shadowing diffuses if the shading object is far away as in the last image.

Compare the above images with Rhino render (again, default settings, though I had to manually turn on sky and sun):

Rhino renders

Rhino render example of building geometry

rhino-render-example-2

Side by side

A quick rendering example in Rhino using OctaneRender and out-of-the-box settings rhino-render-example-2
A quick rendering example in Rhino using OctaneRender and out-of-the-box settings Rhino render example of building geometry

What’s the catch?

You shouldn’t have to guess. High quality software doesn’t come cheap! To buy a single standalone licence with the Rhino plugin will set you back €439.

What else is out there?

There is a wealth of competing renders out there. They are not all created the same, and it is worth looking around. For example, some renderers work on your CPU, which ensures good compatibility, whereas others (like Octane) only work on certain nVidia graphics cards.

A quick look-around at the competition revealed:

Update: Students can get Maxwell for free! Take a look here.

What if I have a really big job?

Photo-realistic rendering is a hugely expensive job (in terms of computational time, and often in terms of money too). Even a single image can take hours to render if the resolution, complexity and settings are all high.

This may be acceptable if you are creating a few images, but what if you are making a film or an animation, where every frame needs to be rendered? Algorithmic improvements only get you so far. Beyond that, the solution is to throw bucketloads of computing performance at the problem.

You might choose to set up a few EC2 instances to solve this. But this is perhaps too involved for a one-off job, not least because there is the headache of licensing to solve.

A quick google reveals numerous organisation that offer render farms for hire. Essentially these are huge numbers of computers all strung together to share the mammoth task of a large render job. These have advertised cumulative computational speeds in the hundreds of GHz. The lowest prices seem to start at around $0.004 per GHz-hour.

Access files and folders in Grasshopper with the C# component

It is very easy to delve into the files and folders on your computer in C#. The DirectoryInfo class contains a wealth of methods for reading, creating and modifying files and folders.

Here is an example created in Grasshopper showing how we can use the DirectoryInfo class to get a list of subfolders contained within a folder.

A grasshopper component to read in a file path and return containing folders. Created using the C# component.

Source code

This code takes in a folder path as a string, and returns a list of folder names contained within that folder.

The code is formatted for the C# component in Grasshopper but can be modified to suit any C# application.

  private void RunScript(string dir, ref object dirs)
  {

    System.IO.DirectoryInfo dirInfo = new System.IO.DirectoryInfo(dir);
    System.IO.DirectoryInfo[] dirInfos = dirInfo.GetDirectories("*.*");

    List<string> dirNames = new List<string>();

    foreach(System.IO.DirectoryInfo d in dirInfos)
    {
      dirNames.Add(d.Name);
    }

    dirs = dirNames;

  }