How to move the Picasa database to another drive

Picasa is an excellent photo library and batch photo editor. In the background, it uses a database to store information about your library. This article looks at the Picasa database, the problems with it, and how you can move the database anywhere else on your computer.

The Picasa database

In order to feel snappy, Picasa uses a database to cache the thumbnails and metadata of all the photos in your library. This data is saved in a folder in your AppData folder, called db3. To open the db3 folder:

  1. Open the Run dialog (Win+R), type %LocalAppData%, and press enter.
  2. Go to Google\Picasa2\db3

Troubleshooting the database (aka I ran out of space!)

This database also saves thumbnails for all the faces found when Picasa scans for faces. The trouble is that, with large libraries, the database can grow to several gigabytes or even more. My computer’s C drive is only a 120GB SSD, and this space matters.

The other day, Picasa finally gave up on me. Every time I started it, it was sluggish, and crashed within minutes. Contemplating a full reinstall, I headed to Windows Explorer, and noticed that the ‘free space’ bar on the C drive had actually disappeared. This is what apparently happens when your drive is full, and my C drive was full. As in 0kB-free-full. My computer was somehow still running. I didn’t even know that was possible.

It was with some help from WinDirStat that I found the problem – the db3 folder was the only data hog I couldn’t account for. It would make sense that Picasa was crashing. It was trying to update the database into a full drive.

The solution therefore was to try and move the db3 folder to my second drive. But with no settings in Picasa to choose the database location, how can I do this (without breaking anything!)?

How to move the database

The Picasa db3 folder is saved within the LocalAppData folder. It is technically possible to change the location of this, but not recommended.

The solution instead is to use symbolic links.

What is a symbolic link?

A symbolic link is a ‘super shortcut’. Whereas regular shortcuts, take you to another location on your computer, a symbolic link will open the shortcut as if it’s not a shortcut at all.

We can move our db3 folder anywhere we want, and put a symbolic link in its place. When Picasa tries to access the contents of db3, Windows points Picasa to the actual location of db3 without Picasa actually knowing that it’s been redirected. So Picasa still works, and we have a spacious C drive. Win-win!

How to set up a symbolic link

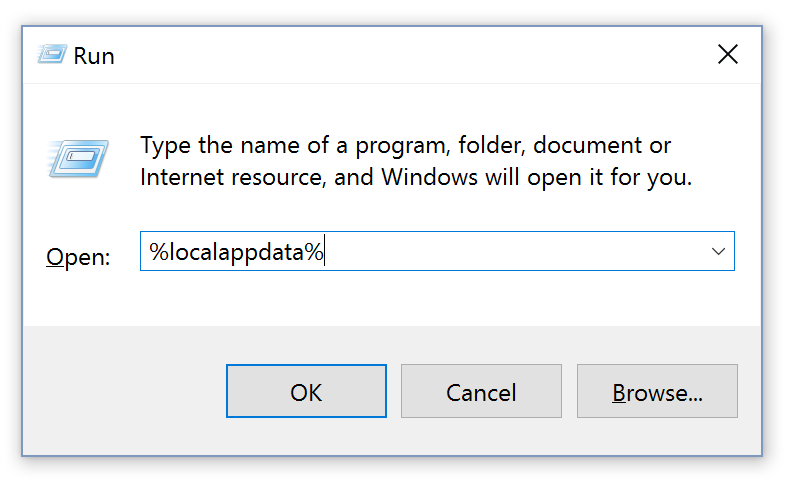
  1. Find your db3 folder. Open the Run dialog (Win+R), type %LocalAppData%, and press enter. Open Google\Picasa2. (That’s not a typo – Picasa 3 uses Picasa2 folders.)
  2. windows run dialog localappdata

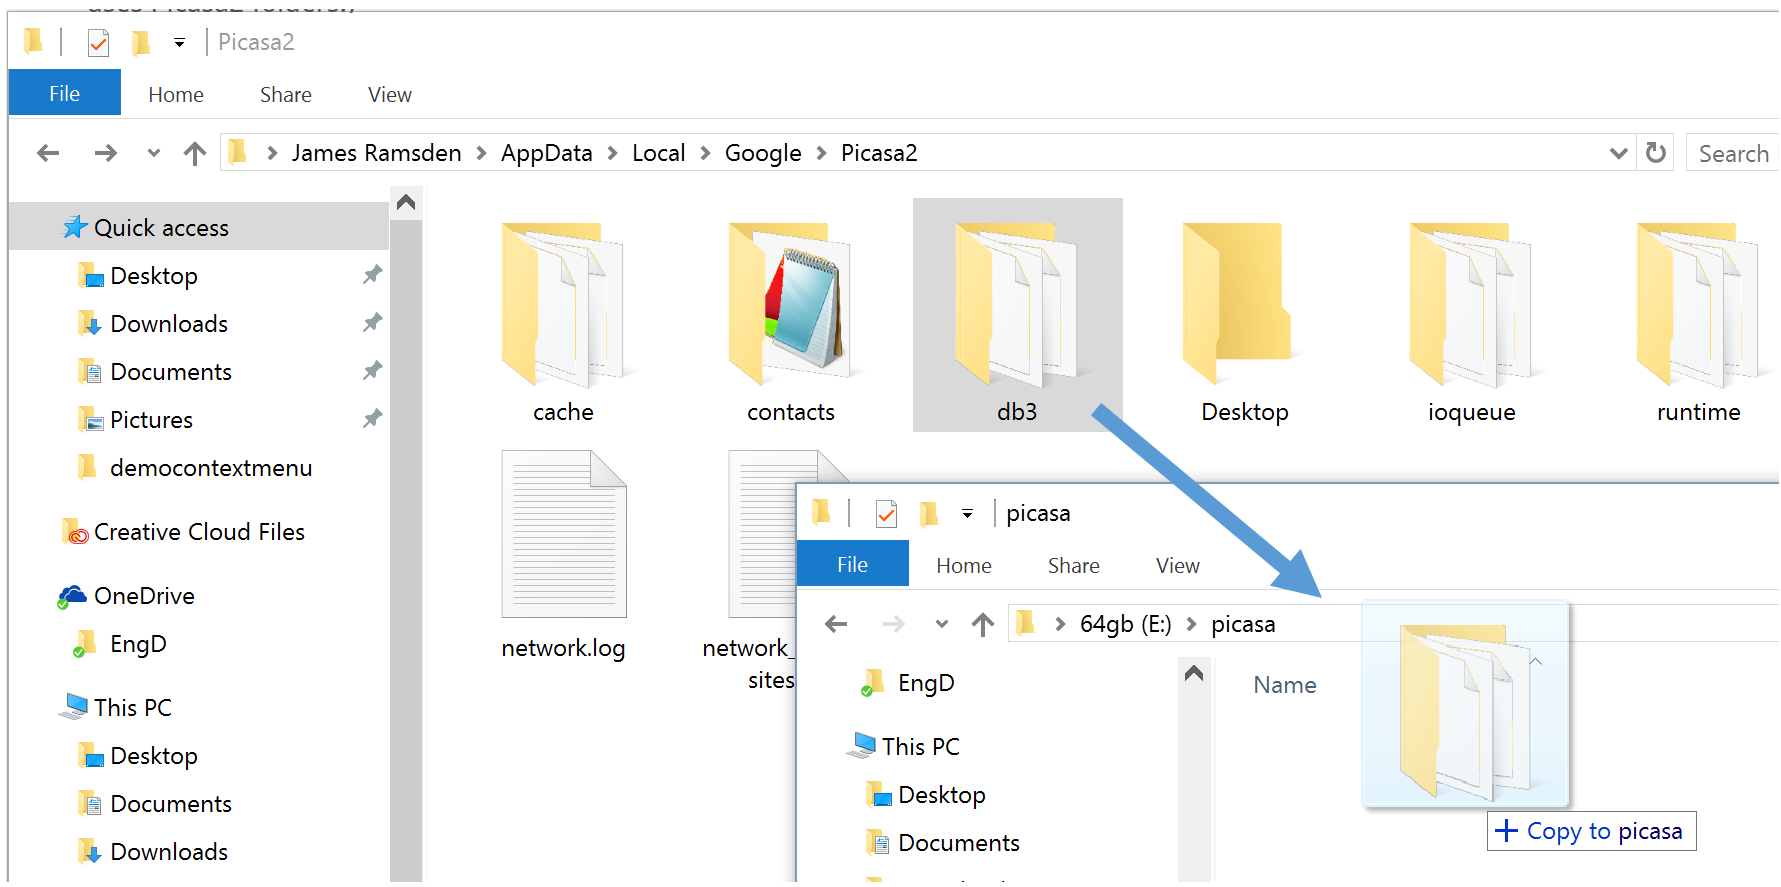
  3. Copy the db3 folder to its new location.
  4. copy database files to new location

  5. When it’s finished copying, either delete or back-up the original db3 folder. Make sure there’s nothing called db3 in the Picasa2 folder anymore.
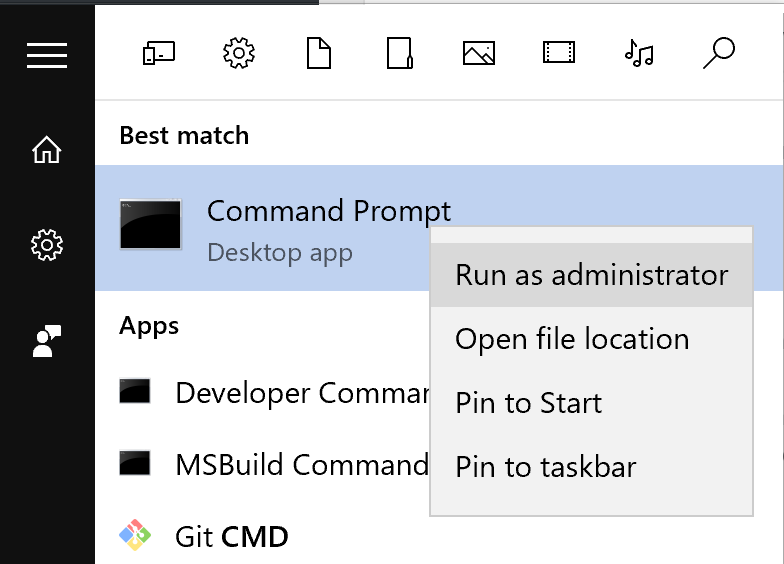
  6. In your start menu, type cmd. Command Prompt should appear. Now, right-click it, and select Run as administrator.
  7. command prompt run as administrator from start menu

  8. This is the hard bit! In Command Prompt, I would type the following command:
    mklink /J %LocalAppData%\Google\Picasa2\db3 E:\picasa\db3

    You would type something similar. The only bit that should change is the last bit, which is the location of where you have moved the db3 folder to.
  9. create symbolic link in command prompt
    Hit enter to create the link.

All set up – let’s check it’s working

And that’s it! In your Picasa2 folder, you should see that db3 has reappeared, but with a small arrow.
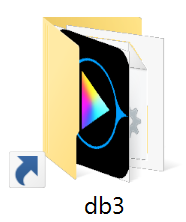
symbolic link folder icon

And if we go into this folder, watch what happens…

successful symbolic link folder address to Picasa database

Notice how the file address mimicks the db3 folder actually being within the Picasa2 folder. This is why it works for Picasa – because Picasa is now able to reference the files it needs in the place it thinks it needs them.

We can now load Picasa and carry on as normal. Nice!
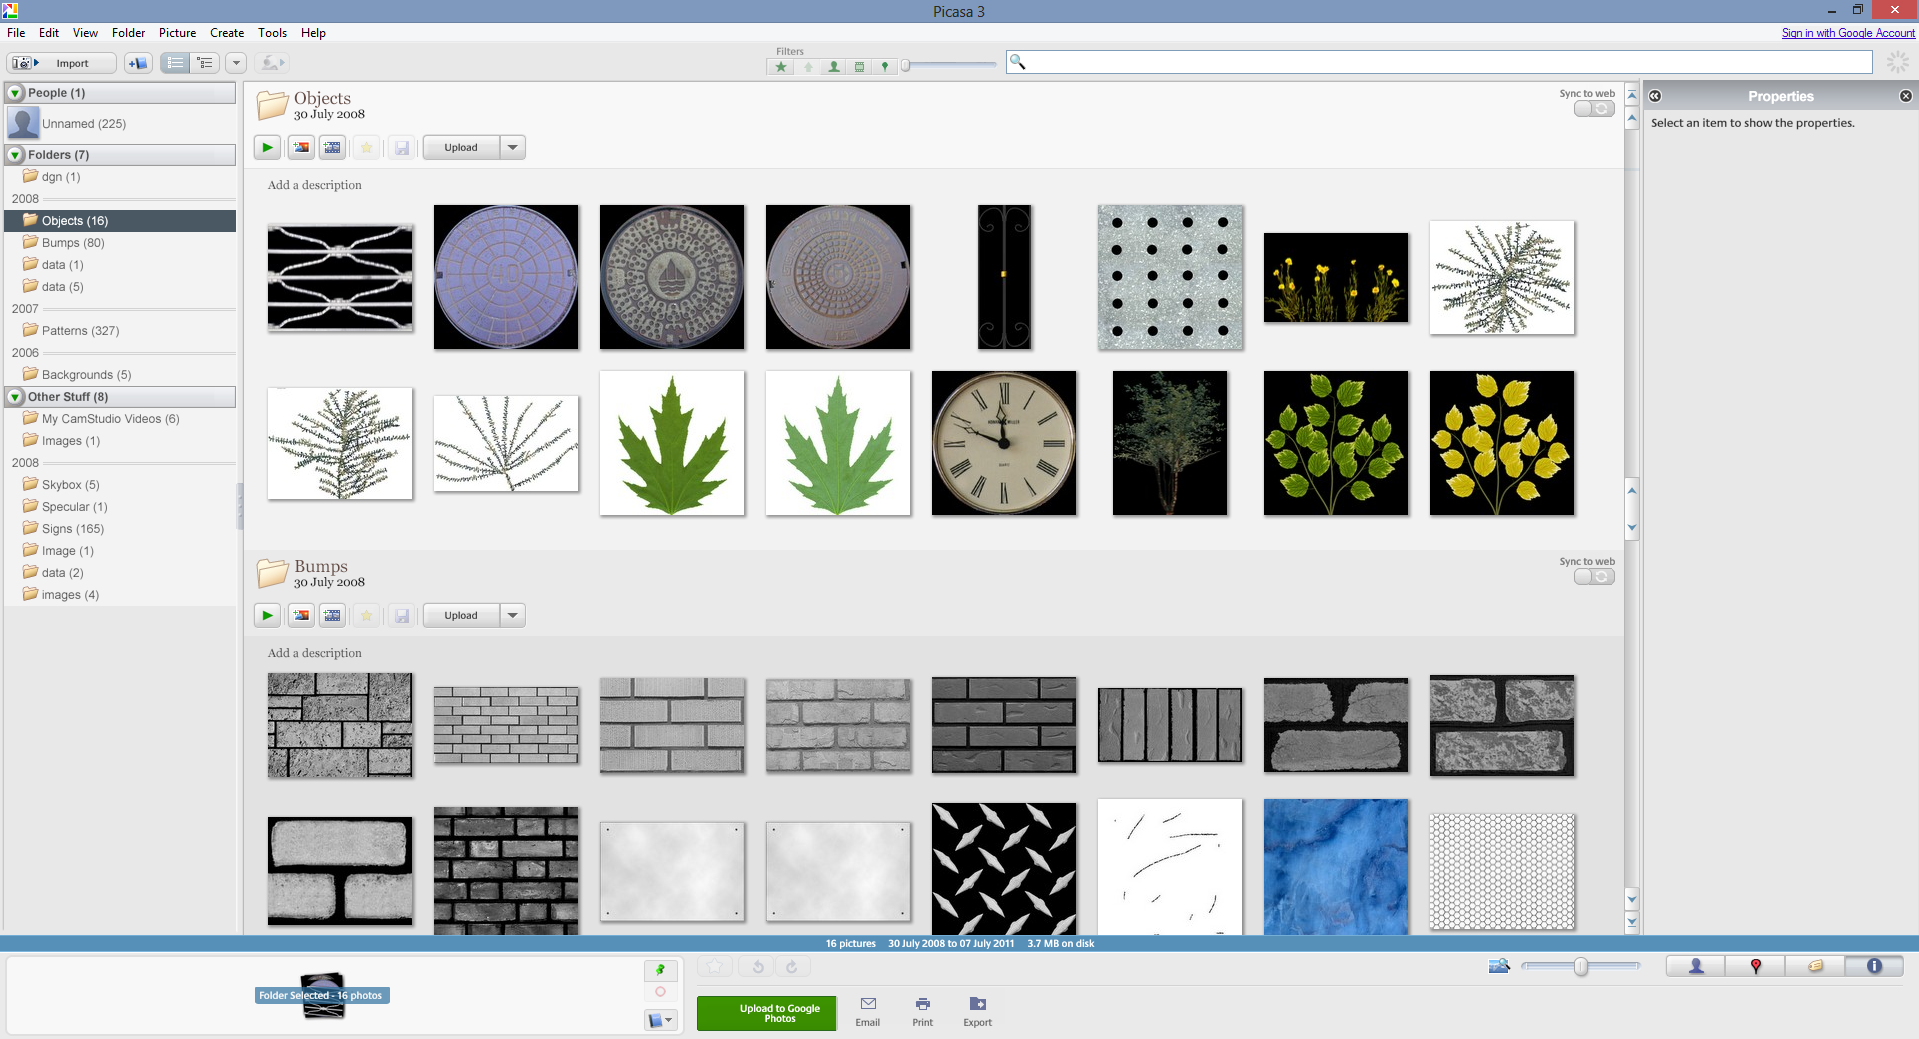
picasa-screenshot

What if it didn’t work?

For a more detailed guide on symbolic links, I recommend the How To Geek’s guide.

If you are struggling to set up the symbolic link, there are programs available which provide a nicer user interface than the Command Prompt. Check the above guide for more information.

How do I delete the symbolic link?

To put things back to how they were, it’s as easy as deleting the symbolic link.

  1. Find your Picasa2 folder again. Delete the symbolic link called db3.
  2. Copy the folder called db3 from your other drive back into the Picasa2 folder.

Back up your Picasa database

Needless to say, when you’re moving all this data around, you want to keep a backup of db3 safe. Especially, odds are if you’re reading this guide, you’re not quite sure what you’re doing…

If something goes wrong, just copy your backed-up copy of db3 back into the Picasa2 folder.

If something goes really wrong, it’s not the end of the world if you lose your db3 folder. All it means is Picasa has lost its database, but you haven’t lost your photos.

The only real inconvenience is that Picasa will be ‘like new’ when you start it again. So it will have to rebuild its database, and this takes time. Especially the facial recognition, which can take days or even weeks for a large library.

If you have a very large library, you might want to periodically back-up your db3 folder. On occasion, when Picasa crashes, the db3 folder can become corrupted, and it’s more likely to crash with a large library. A corrupted library can cause Picasa to fail completely, but it can also result in performance and stability issues. If this happens, try replacing the db3 folder with your backup of db3. This means that, if you do have to delete and replace your db3 folder, it doesn’t have to rebuild the database from scratch.

Why is the db3 folder so large?

I have to admit, I thought my computer was having a blip when it showed the folder in the gigabytes. But it does actually make sense.

For every file in the Picasa library, it stores thumbnails of different sizes. This means we can move through Picasa at lightning speed because the program doesn’t have to open every file it wants to render in its library. These thumbnails are images in themselves, and this does soon add up.

But what really seems to take up space is the facial recognition. The logic is the same – for every face it recognises, it creates a thumbnail. There is also further work to do in building up a profile for each person, so that Picasa can try to match future faces found against existing people.

Picasa can allegedly function with libraries right into the millions. I would hate to see the database size for this though. Because of the overheads of facial recognition, both in terms of storage space and processing, it has been advised that facial recognition is turned off for very large libraries.

And you still use Picasa because…?

Google have decided to drop Picasa in favour of Google Photos. While the web is great for sharing and access-anywhere, it will never replace the performance and functionality that you get with native programs.

Without shelling out for Adobe Lightroom, I haven’t found an alternative to Picasa that I like.

If Google also decide to stop publishing the Picasa installer, I have archived a copy here.

Install or repair Windows 7 or Windows 8 from USB – no disc needed

How to perform a clean install of Windows from USB without a disc, and how to repair a corrupted install of Windows.

For either of these tasks, we need a copy of the original media that was used to install Windows. This guide will show you how to get this media, how to put it onto a USB stick, and how to run the USB stick to install or repair your copy of Windows.

This method is also suitable for dualbooting Windows on a Mac via Bootcamp.

You will need the computer you wish to install Windows on, another computer with an internet connection and Windows already installed, and a spare 4GB USB stick. This guide will install a trial version of Windows – you will need a valid licence key from Microsoft in order to activate it.

Step 1: Download ISO

An ISO file is bit-for-bit copy of the contents of a disc. The method we are using involves copying an ISO to a USB disc so that your computer runs it as if it were a DVD.

If you have your own ISO (or your own Windows disc you can create an ISO from) then I would recommend you use this.

However, if you have lost your installation media, don’t worry! The website getintoPC appears to be clean, and offers ISOs of pretty much any version of Windows you might need. Click this link to browse for your version of Windows, or use one of the following:

Make sure you download the version of Windows according to your licence key, or activation may not work!

Step 2: Create bootable USB

To create the USB, we will use a program called Windows 7 USB DVD Download Tool. (Despite the name, it is good for creating USB sticks of any version of Windows.) Download it from here and install it on a working Windows PC.

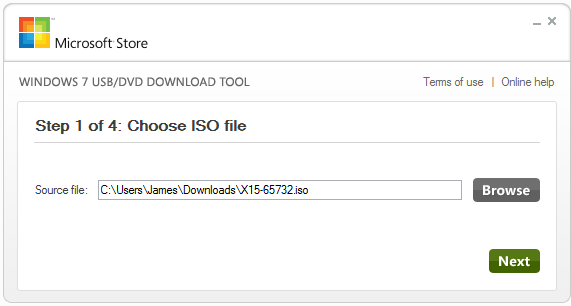
Then run it. On the first screen, find your ISO:

Screenshot of Windows 7 USB DVD Download Tool - choose ISO file

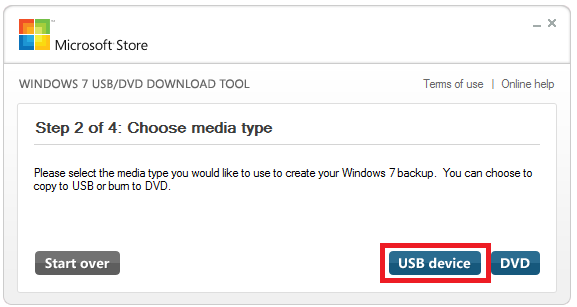
On the next screen, select USB.

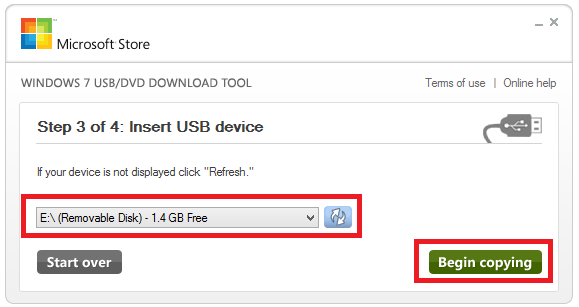
Screenshot of Windows 7 USB DVD Download Tool -  insert USB device

Insert your USB stick into the computer. Select your USB stick from the drop down list. (You may need to press refresh before you see your USB stick.)

Screenshot of Windows 7 USB DVD Download Tool -  choose media type

Finally, begin copying. This will take a while.

Step 3: Plug in the USB stick

Plug the USB stick into the computer you wish to install Windows on, and turn this computer on. Your computer may detect this USB stick automatically, and a Windows loading screen appears.

If not, you need to tell your computer to load from the USB stick. On the boot screen (the first screen that appears as soon as you hit the power button) look for something called ‘boot menu’ or similar. Look for the key next to this word – likely one of F2, F8, F10, F12 or DEL. (You may miss it the first couple of times!) Once you’ve found it, mash this key when you turn your computer on. On the next screen, use your keyboard to select the USB stick.

Step 4: Run the Windows recovery/installation tool

Wait a couple of minutes, and a menu should appear. Depending on which version of Windows you have selected, you may see something different to this below, but the method will be similar.

If you are running a fresh installation of Windows, it is now a matter of following the prompts on the screen. If you are trying to repair Windows, there are a number of features that can help you to repair or reinstall Windows while preserving as much of your data as possible.

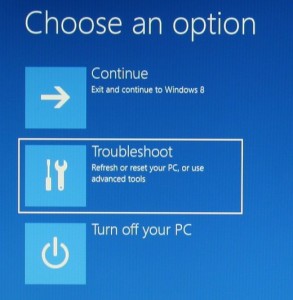
In the first screen, click ‘troubleshoot’.

Windows 8 recovery screen - continue, troubleshoot, turn off your PC

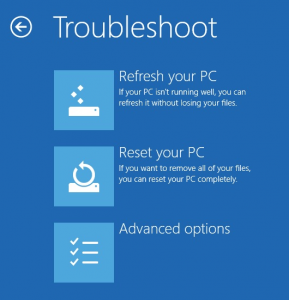
We then get the following options:

Windows 8 recovery screen - troubleshoot menu - options for refresh, reset and advanced options

You can choose either of these, depending on what exactly you need to do.

Refresh is useful for repairing existing installations of Windows. It reinstalls key parts of the operating system and removes programs whilst keeping personal files intact. The existing copy of Windows will be moved into a folder called ‘Windows.Old’ so you may still be able to recover any program files in here. ‘Refresh’ worked for me when Windows become corrupted and refused to boot. If you’re having problems and are considering reinstalling Windows, then I recommend you give this a go first!

Reset is a more drastic version and is essentially a full re-install of Windows.

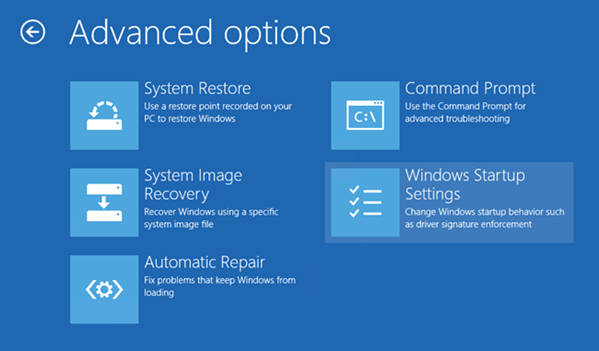
Within ‘advanced’ there are further options:

Windows 8 recovery screen - troubleshoot menu - advanced options

Useful options here are:

Automatic repair. If your computer is failing to boot, it’s worth trying this first. It will attempt to fix your computer with minimal time and no loss of data. Can’t guarantee it will work, but it’s worth trying first before doing anything more drastic.

System restore is another option for repairing your computer if ‘automatic repair’ did not work. This is dependent on there being a ‘restore point’ being saved on your computer. Again, it has minimal risk and is worth trying after ‘automatic repair’.

If I am having problems booting Windows, which option should I pick?

Go through the options in the following order:

Quick win? Needs restore point? Keeps programs? Keeps personal data?
1) Automatic repair Yes No Yes Yes
2) System restore Yes Yes Yes Yes
3) Refresh No No No Yes
4) Reset No No No No

Remember that ‘reset’ will erase all of your existing files as well as the programs. Before you choose to do this to repair your installation of Windows, you may want to try to connect your hard drive to another computer to try and rescue any files that you can.

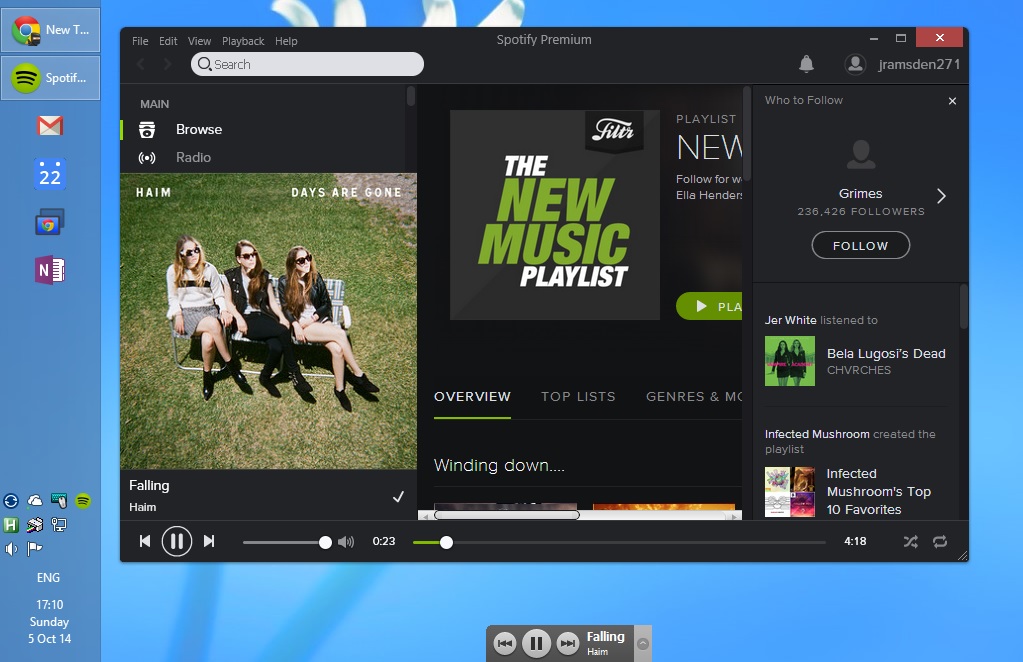
Spotify Mini: A desktop widget for Spotify

A desktop remote control for Spotify. Control Spotify from a convenient widget that sits at the bottom of your desktop.

SpotifyMini allows you to control Spotify from your desktop

With Spotify Mini, you can pause, play, change tracks, and view the current track, all without opening the main Spotify window. It is fully animated, and uses the 2010 Spotify skin.

This is a small project I made in 2010 using the Spotify-o-matic API wrapper to interact with Spotify. It is written in VB, and has largely been untouched since then. The source code is published at GitHub. Please note that this widget is entirely unaffiliated with Spotify itself.

Video via FlixGamez on Youtube

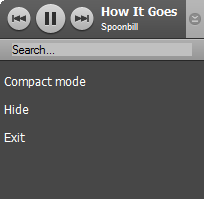
Dragging the title up (or clicking on the up button) for the context menu

Features

  • Play, pause and change tracks in Spotify from the desktop
  • Drag title to move into different positions on the desktop
  • Compact mode to hide the track title
  • Animated and skinned interface

Limitations

  • Assumes taskbar is positioned to the side or top of the desktop (as mine is…)
  • Ability to search and open the Spotify window is currently disabled (Spotify is now installed in the user directory, and I haven’t got round to properly updating it…)
  • Spotify should not be minimised (though it’s okay if it’s behind other windows)

Download

The source code is available here. If you just want to run it, click the link here:

Note that Windows may block the file for security. If you trust the file (i.e. if you trust me) and you are having problems, you may need to right-click on the file, go to properties, and click the ‘unblock’ button.

Credit to user yatiak on GitHub for bug fixes.

Using AutoHotKey for accelerated scrolling in Windows/Bootcamp

There exists already a third party driver for BootCamp to improve upon the terrible drivers for the trackpad in Windows provided by Apple. It’s called Trackpad++ and attempts to provide some of the key trackpad actions that Mac users have come not to be able to live without.

But, to be honest, it’s not the solution I was looking for. The accelerated scrolling does not feel anywhere as natural as on a Mac (or even my Chromebook for that matter) and many of the better shortcuts are still absent. There are some settings available in Trackpad++ but they’re too simplistic and don’t allow the level of control I feel that I need. To top it off, the free version must be reinstalled every week (a passive-aggressive technique to encourage you to pay) and I can’t bring myself to actually pay for software that doesn’t actually solve the problem I’m trying to solve. Which is a shame really.

Trackpad++ is the only software out there that attempts to completely re-write the driver, but are there any other ways of getting the trackpad’s functionality back? I’ve been investigating using AutoHotKey to simply use Apple’s driver in Windows more effectively. Two features that I miss are accessing middle-click with the trackpad – something I addressed in this post – and the other is accelerated scrolling. This is where, if you scroll quickly, the speed of scrolling also increases, making it easier to navigate long pages without having to use the scroll bar. Done right, as on OSX and ChromeOS, it feels very natural and you don’t even realise that the scroll is accelerated. Get used to this and move back to Windows with its non-accelerated scrolling, and it feels like you’re browsing the web through treacle. This is very annoying!

With my perceived failure of Trackpad++ in solving this problem, my search has yielded an alternative, using AutoHotKey.

http://www.autohotkey.com/board/topic/48426-accelerated-scrolling-script/

Download the ZIP file and extract it. There is an EXE if you don’t have AutoHotKey installed – it’s as easy as running this EXE to get accelerated scrolling. There is also the AHK source file that you can run with AHK – this is the version I recommend if you want to tweak the code.

Thoughts? It still doesn’t feel amazing – the acceleration seems to kick in unpredictably, like only a small difference in scrolling speed will take you between half a page down, and to the bottom of the page. If using BootCamp, I recommend going into the mouse settings in the control panel, and setting the scroll wheel to scroll 1 line per notch, otherwise it feels far to fast. It also lacks the ‘momentum’ on ChromeOS/OSX (where the page keeps moving and gradually slows down when you have stopped scrolling).

But the fact that it is an AHK file means that I can play with it and improve it. Out the box, it is already quite acceptable, and I’m looking forward to finding the time to make it work even better. Added to the fact that AHK is in principle much safer than allowing someone’s third party drivers to worm its way into the core of your fragile Windows system, this is definitely the path I would sooner recommend.

A trackpad middle-click hack for Bootcamp/Windows using AutoHotKey

A great feature of both my Mac and my Chromebook is that middle-clicks are built into the trackpad by tapping with 3 or 4 fingers at once. But in Bootcamp (and with most Windows trackpads too) there is no equivalent to a triple-finger tap built into the drivers. Among many uses, the middle click is a dead easy way of closing tabs in Chrome without worrying about that fiddly tiny little close button – a feature I miss when using Windows.

To solve this, it’s AutoHotKey to the rescue! Credit to Lifehacker reader Nakul – I have a slightly modified the script to turn a double-right-click into a middle click. Note that this might not be suitable if you use applications that have specific actions for double-right-clicks, but for the vast majority of people this shouldn’t be an issue.

~RButton::
If (A_PriorHotKey = A_ThisHotKey and A_TimeSincePriorHotkey < 500)
{
Click middle
}
Return

Simply install AutoHotKey, right click on the notification icon by the clock, click ‘Edit This Script’ and paste the above code. Save the notepad file and then reload the script.

The way that the script works is that, whenever the right mouse button is pressed, the code on the second line is called. If the code is called twice in a row, with 500ms between each call, then it simulates a middle-click. You can change the 500 value to a higher or lower value (in milliseconds) if you prefer.

To use the script with a trackpad, do a two-finger tap (as you would normally do for a right-click) twice quickly. It might make the right-click menu appear, but the second right-click should make it hide again.

An introduction to EnergyPlus

EnergyPlus is a program for analysing spaces in buildings for various qualities such as occupant comfort and energy consumption. The program itself seems to have no GUI and interacts using command prompts and text input and output files, but it is intrinsically designed to interact with third party programs in all aspects including input, output and data manipulation. This makes it a great candidate for acting as a core for innovative building design methods. E+ is produced by the US Department of Energy and is free to use.

EnergyPlus website

The fact that EnergyPlus is not an all-in-one packaged solution in the way that IES gives it a steeper learning curve, and thus less desirable for newcomers, or people already used to such programs. However, after speaking with many people, it seems that once you are used to this program, you are well rewarded with a very powerful and flexible tool. This page is an attempt to figure out how to get started with E+ and how to get it doing something useful.

EnergyPlus is not an analysis solution in itself

If we use EnergyPlus as it is for our analysis, the only way to interact with it is to manually type the geometry data as a text file. The results we get are also a text file – a list of numbers. This is obviously not very good.

In reality, we use software to treat EnergyPlus as a core calculation engine, and wrap it with more user-friendly tools that help us to create models we want to analyse, and to make sense of the results.

Common plugins for EnergyPlus

I still haven’t tried any of these – but after some browsing, these are things I’d like to try… Note that this is also a growing list as I find more interesting stuff. More can be found on the E+ site.

OpenStudio seems to be an attempt at an all-in-one solution that handles geometry manipulation, results viewer and parametric design. It also has a link directly into SketchUp for geometry.

Legacy OpenStudio Plugin for SketchUp is the historic equivalent of the SketchUp plugin within OpenStudio.

DesignBuilder, like OpenStudio, attempts to be an all-in-one design environment. It seems to be built at least partly upon EnergyPlus. Not free and not cheap either!

More interesting plugins

GenOpt (Generic Optimization) is a platform-neutral optimisation tool that can interact with any text input/output files, of which EnergyPlus is one.

Ladybug is a GH plugin for EnergyPlus

Competition to EnergyPlus

Related programs which attempt to analyse comfort and energy performance at a building scale include:

IES

Green Building Studio / Ecotect

TAS

Misc (tidy up later)

How to create and assign a new construction material in IES

Example: create a new window type and apply it to a window in an existing model

Create new construction

  • Go to Building Template Manager on the top bar
  • Click Constructions on the left
  • In the bottom, click Apache Constructions Database (small yellow button)
  • On the bottom, select the category, such as Glazed for adding a new window
  • Usually it’s easiest to create a new construction by duplicating an existing construction and then editing it. Right-click on a similar construction and select Duplicate Construction
  • On the new one (probably coloured purple), right click and select Edit construction
  • Create your construction in this window – each row in the table is one layer of material, outside to inside. Give it a name.
  • Press OK a couple of times when happy and return to the Building Template Manager. Save any changes if asked.
  • Under Select Construction on the right, for External Window, we should find our new window in the drop-down box. Select it.

Now, whenever we draw a new window, it will be assigned the properties of the window construction we just created.

If we already have a window drawn and we want to change its construction, we need to apply it.

Applying a construction to existing geometry

  • Go into Apache
  • Select your geometry which contains the windows you wish to edit – you can choose a wall or a whole room for example. This geometry should appear red when selected.
  • Click Assign Constructions (small yellow button, centre-top)
  • Under ‘Select construction category‘, select External glazing
  • Under ‘Assigned construction types’, we can select all windows made of one kind of glazing within the geometry we’ve selected. Choose the material the windows are made from at the moment.
  • Under ‘Possible replacement construction types‘ choose the material you wish to assign to.
  • Click Replace

To check, in the same window, if you select the new material under ‘assigned construction types’ the windows should now appear red in the preview.

Archive: How to install Windows 7 or Windows 8 from USB – clean install, no disc needed

This is an older guide I wrote a couple of years ago. Recently, the ISOs mentioned in the article have been removed and are now dead links. If you are still interested in installing or repairing Windows via USB, I have created a new guide, which you can read here.

This guide allows you to perform a completely fresh install of Windows 7 or Windows 8 on your PC. This guide:

Adding a messages function in VBA for Excel

A quick script for debugging in Excel. Works like a “print” command in a command line interface – just add Msg(~) comments in your VBA code where you want to know what it’s thinking, and the script will return a line. Newest comments appear at the top. Much more useful than using message boxes! Continue reading Adding a messages function in VBA for Excel