C#: Simple BackgroundWorker example

Here is a simple example on how to use the BackgroundWorker class in C#.

What is the BackgroundWorker?

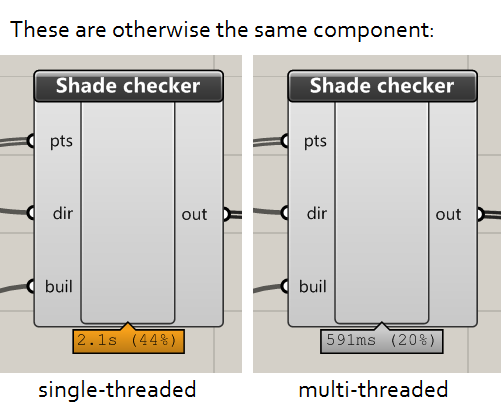
Are you writing a Windows program with some heavy calculations going on in the background? The BackgroundWorker class will take those calculations and put them in a separate thread, helping to prevent your UI from freezing up.

Multi-threaded programming is tricky at the best of times. The fundamental problem is that you don’t want two threads trying to access the same bit of memory at once. The BackgroundWorker simplifies a lot of the work you would otherwise need to do yourself, but it can still be difficult to set it up.

BackgroundWorker example

This example downloads an image from the Internet and saves it to the user’s desktop. It does this 10 times (so we can see how to monitor progress). The image address is provided by the user in a WPF form, and we report the number of files downloaded in a progress bar on that form.

The form stays responsive the whole time, and doesn’t lock up while the files are being downloaded – something which would happen if we didn’t create our own thread.

background worker c# example program UI

Example code

Create a new C# WPF project in Visual Studio.

XAML

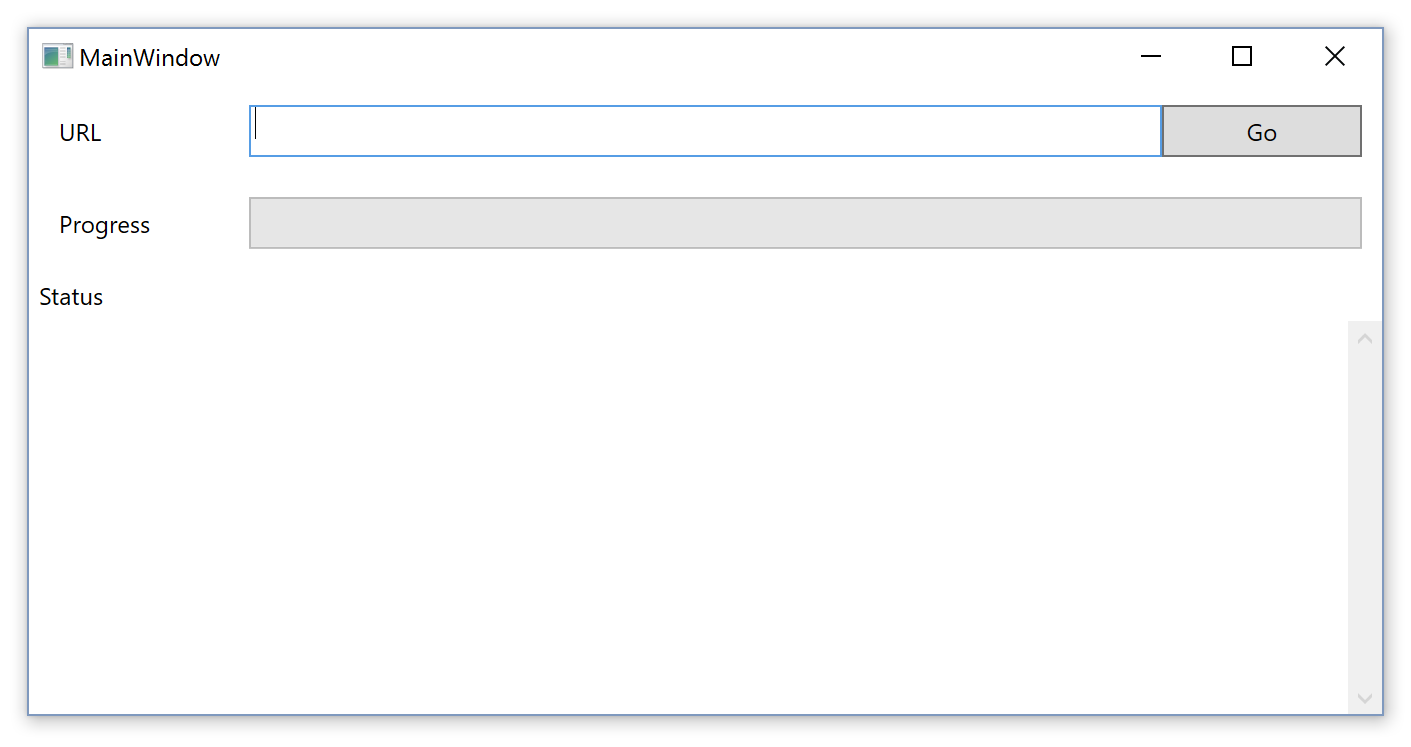
We need to create a form with a textbox, a button, a progress bar and a label. This isn’t essential to the BackgroundWorker, but it will help create our example program.

If you aren’t familiar with WPF or XAML, XAML is the markup language used to create interfaces in WPF, much like HTML to web development. Here is the contents of my MainWindow.XAML used to create the form above.

<Window x:Class="BackgroundWorkerExample.MainWindow"
        xmlns="http://schemas.microsoft.com/winfx/2006/xaml/presentation"
        xmlns:x="http://schemas.microsoft.com/winfx/2006/xaml"
        xmlns:d="http://schemas.microsoft.com/expression/blend/2008"
        xmlns:mc="http://schemas.openxmlformats.org/markup-compatibility/2006"
        xmlns:local="clr-namespace:BackgroundWorkerExample"
        mc:Ignorable="d"
        Title="MainWindow" Height="350" Width="525">
    
    <DockPanel>
        
        <DockPanel LastChildFill="True" DockPanel.Dock="Top" Margin="10">
            <Label DockPanel.Dock="Left" Width="100">URL</Label>
            <Button Name="btnGo" Click="btnGo_Click" DockPanel.Dock="Right" Width="100">Go</Button>
            <TextBox Name="tbURL"/>
        </DockPanel>
        
        <DockPanel LastChildFill="True" DockPanel.Dock="Top" Margin="10">
            <Label DockPanel.Dock="Left" Width="100">Progress</Label>
            <ProgressBar DockPanel.Dock="Bottom" Name="progBar" Value="0" />
        </DockPanel>

        <DockPanel LastChildFill="True">
            <Label DockPanel.Dock="Top">Status</Label>
            <ScrollViewer><Label Name="lblStatus" /></ScrollViewer>
        </DockPanel>
        
    </DockPanel>
    
</Window>

C# code

The actual code goes into MainApplication.xaml.cs. Here is the contents of my file.

It looks pretty long, but it’s not so bad. A lot of it is actually comments…

using System;
using System.Windows;
using System.ComponentModel;
using System.IO;

namespace BackgroundWorkerExample
{
    /// <summary>
    /// Interaction logic for MainWindow.xaml
    /// </summary>
    public partial class MainWindow : Window
    {
        public MainWindow()
        {
            InitializeComponent();
        }

        private void btnGo_Click(object sender, RoutedEventArgs e)
        {
            lblStatus.Content = "";

            BackgroundWorker worker = new BackgroundWorker();

            //BackgroundWorker is event-driven. We use events to control what happens
            //during and after calculations.
            //First, we need to set up the different events.
            worker.DoWork += Worker_DoWork;
            worker.ProgressChanged += Worker_ProgressChanged;
            worker.WorkerReportsProgress = true;
            worker.RunWorkerCompleted += Worker_RunWorkerCompleted;

            //Then, we set the Worker off. 
            //This triggers the DoWork event.
            //Notice the word Async - it means that Worker gets its own thread,
            //and the main thread will carry on with its own calculations separately.
            //We can pass any data that the worker needs as a parameter.
            worker.RunWorkerAsync(tbURL.Text);
        }

        private void Worker_DoWork(object sender, DoWorkEventArgs e)
        {
            //DoWork is the most important event. It is where the actual calculations are done.

            System.Net.WebClient client = new System.Net.WebClient();

            for (int i = 0; i < 10; i++)
            {
                //We pass data to the worker using the Argument property.
                //Don't try to read data from the form directly.
                string url = (string)e.Argument;

                //download image
                byte[] imageStream = client.DownloadData(url);
                MemoryStream memoryStream = new MemoryStream(imageStream);
                System.Drawing.Image img = System.Drawing.Image.FromStream(memoryStream);

                //save image to computer
                string desktop = System.Environment.GetFolderPath(Environment.SpecialFolder.Desktop);
                img.Save(desktop + @"\image " + i.ToString() + ".jpg", System.Drawing.Imaging.ImageFormat.Jpeg);

                //Now that the image is saved, we can update the Worker's progress.
                //We do this by going back to the Worker with a cast
                int progress = (i + 1) * 10; //Between 0-100
                ((BackgroundWorker)sender).ReportProgress(progress);
            }

            //When finished, the thread will close itself. We don't need to close or stop the thread ourselves.  
        }

        private void Worker_ProgressChanged(object sender, ProgressChangedEventArgs e)
        {
            //This method is called whenever we call ReportProgress()
            //Note that progress is not calculated automatically. 
            //We need to calculate the progress ourselves inside Worker_DoWork.
            //This method is optional.

            lblStatus.Content += e.ProgressPercentage.ToString() + "% complete. \n";
            progBar.Value = e.ProgressPercentage;
        }

        private void Worker_RunWorkerCompleted(object sender, RunWorkerCompletedEventArgs e)
        {
            //This method is optional but very useful. 
            //It is called once Worker_DoWork has finished.

            lblStatus.Content += "All images downloaded successfully.";
            progBar.Value = 0;
        }


    }
}

Running the program

Here is a picture of a satsuma.

satsuma-mandarin[1]

Here is its URL:

http://james-ramsden.com/wp-content/uploads/2016/05/satsuma-mandarin1.jpg

If we put this URL into this program, we should be able to download this image 10 times over onto our desktop.

backgroundworker c# example program running

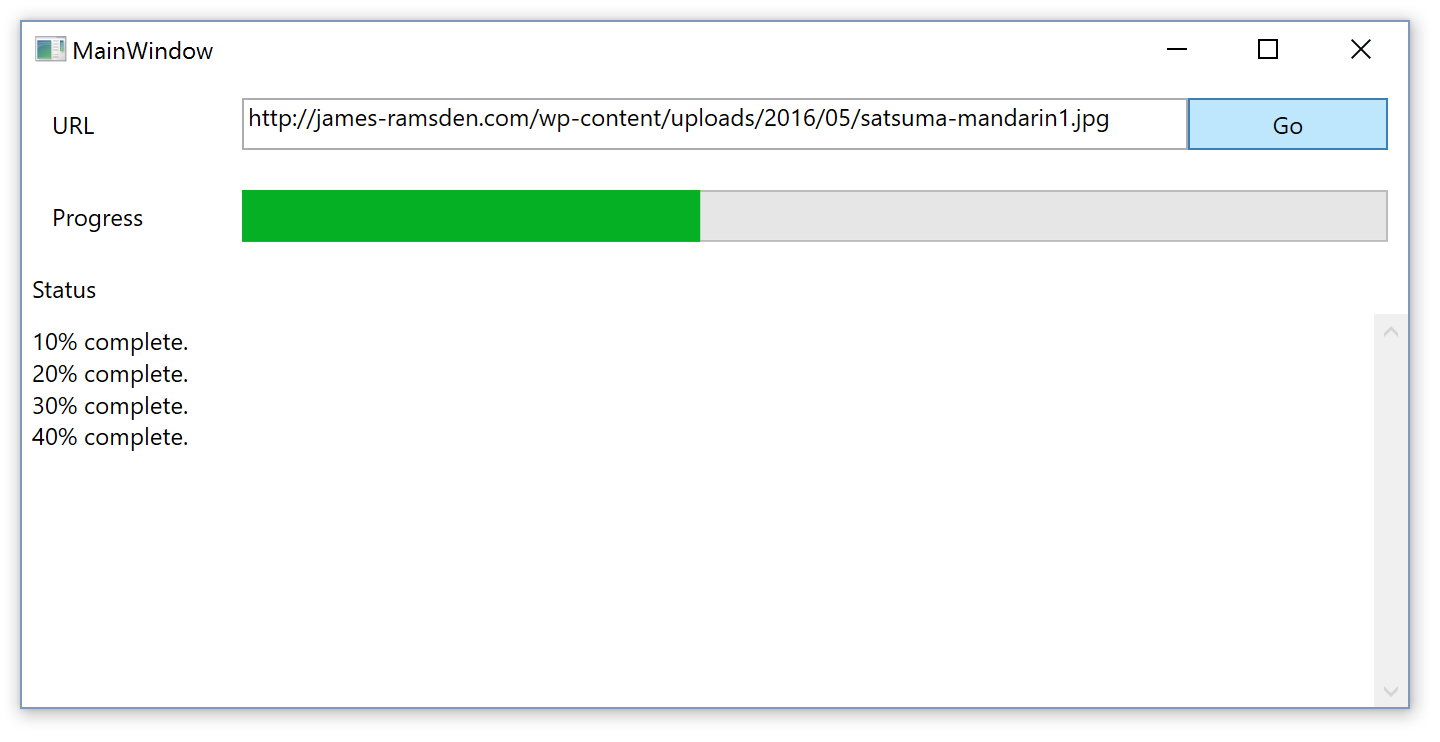
Here it is downloading the images, depositing lots of satsumas on my desktop. Or are they mandarins? I don’t really know.

mandarins satsumas

You may also want to try downloading some larger images that take longer to download. The BackgroundWorker works as expected. The interface is updated with each successful download. (If we didn’t use the BackgroundWorker, the interface would freeze until all 10 had been downloaded.) And the interface remains responsive the entire time.

Further reading

There are many ways to multithread in .NET, and the correct choice depends on what you are trying to do.

For instance, I recently had heavy calculations on a problem in Grasshopper, on entirely back-end code. This was dealt with by using Parallel.ForEach loops, which converts a ForEach loop into a multi-threaded equivalent.

If you’re looking to calculate something as quickly as possible using all the cores on your machine, then this is a good place to start. This approach depends on your task being able to be divided up into independent subtasks, so that each subtask can be calculated separately. (If one subtask depends on the output of another, it is going to be difficult to multithread.)

All in all, multithreading is a big topic, with many approaches possible, and there are many ways you can unfortunately get it wrong. It’s not something you are going to master in a day. But it’s worth spending the time on it, and it’s very rewarding when you do get it working 🙂

Multithreading a foreach loop in a Grasshopper component in C#

Grasshopper itself is a single-threaded process. That is, even if you have a very complicated calculation going on, and you have a powerful computer with many cores, it persists in using a single core. This is very frustrating when you end up waiting a long time for calculations to complete.

However, it doesn’t have to be the case that each component is single-threaded. Nearly all components are single-threaded, but when you create your own compiled component, there’s nothing to stop you from defying convention and making some lightning-fast multi-threaded components. And, as I have just found out, it’s very easy to set up.

While the code is simple, knowing when it is okay to use multi-threaded logic is a bit more challenging. Multi-threading works best when you have a single repetitive task. Rather than multithreading the entire component, you select bits of your code that are taking a long time to calculate, and set those up for multithreading.

Say you have a foreach loop. You might be looping through a list of 100000 points in a model, checking if they are intersecting a shape. You then build a list of true/false that describes if each point is intersecting that shape. In regular single-threaded programming, your loop would go through each point one at a time, doing the intersection result and saving the result to your list.

This is a prime candidate for multithreading. The task is repetitive, and very importantly, each loop is independent, i.e. any one loop’s action does not depend on the result of any other loop.

With multi-threading, instead of running one at a time, we can divide the task up for each core on your computer. For example, if you have 2 cores, one core does half of the loops and the other does the other half.

.NET has some very useful classes/methods that really simplify setting this up. There are many of these for different tasks, but here we will focus on one in particular. Note that, as far as I know, these parallelisation tricks only work for compiled components (such as those created in Visual Studio) and won’t work in the c# script component within Grasshopper.

How to convert a ‘foreach’ loop into a parallel foreach loop

Let’s say you have the following foreach loop, which sends an output of results to Grasshopper:

var results = new List<bool>(new bool[pts.Count]);
foreach (Point3d pt in pts)
{
    bool isIntersecting = CheckIntersection(pt, shape);
    results.Add(isIntersecting);
}

DA.SetDataList(0, results);

This code uses a method I wrote, CheckIntersection, to see if a list of points are interacting with an input shape.

We set up a list to take our results, we cycle through our points, do a calculation on each, and then save the result. When finished, we send the result as an output back to Grasshopper. Simple enough.

The best thing to do is I show you how to parallelise this, and then explain what’s happening. Here’s the parallel version of the above code:

var results = new System.Collections.Concurrent.ConcurrentDictionary<Point3d, bool>(Environment.ProcessorCount, pts.Count);
foreach (Point3d pt in pts) results[pt] = false; //initialise dictionary

Parallel.ForEach(pt, pts=>
{
    bool isIntersecting = CheckIntersection(pt, shape);
    results[pt] = isIntersecting; //save your output here
}
);

DA.SetDataList(0, results.Values); //send back to GH output

Going from ‘foreach’ to ‘Parallel.ForEach’

The Parallel.ForEach method is what is doing the bulk of the work for us in parallelising our foreach loop. Rather than waiting for each loop to finish as in single threaded, the Parallel.ForEach hands out loops to each core to each of them as they become free. It is very simple – we don’t have to worry about dividing tasks between the processors, as it handles all that for us.

Aside from the slightly different notation, the information we provide is the same when we set up the loop. We are reading from collection ‘pts’, and the current item we are reading within ‘pts’ we will call ‘pt’.

The concurrent dictionary

One real problem though with multithreading the same task is that sometimes two or more processes can attempt to overwrite the same piece of data. This creates data errors, which may or may not be silent. This is why we don’t use a List for the multithreading example – List provides no protection from multiple processes attempting to write into itself.

Instead, we use the ConcurrentDictionary. The ConcurrentDictionary is a member of the Concurrent namespace, which provides a range of classes that allow us to hold and process data without having to worry about concurrent access problems. The ConcurrentDictionary works just about the same as regular Dictionaries, but for our purposes we can use it much like a list.

It is a little more complicated to set up, as you need to specify keys for each value in the dictionary, as well as the value itself. (I have used dictionaries once before here.) Rather than having a collection of items in an order that we can look up with the index (the first item is 0, the second item is 1 and so on) in a dictionary we look up items by referring to a specific item. This specific item is called the ‘key’. Here, I am using the points as the key, and then saving their associated value (the results we are trying to calculate) as a bool.

How much faster is parallel computation?

Basic maths will tell you that you will that your code should increase at a rate of how many cores you have. With my 4-core machine, I might expect a 60 second single-threaded loop to complete in about 15 seconds.

However, there are extra overheads in parallel processing. Dividing up the work, waiting for processes to finish towards the end, and working with the concurrent dictionary, all take up processor power that would otherwise be used in computing the problem itself.

In reality, you will still likely get a substantial improvement compared to single-threaded performance. With 4 cores, I am finding I am getting a performance improvement of around 2.5 to 3.5 times. So a task that would normally take 60 seconds is now taking around 20 seconds.

Two Grasshopper components showing processing time difference between single-threaded and multi-threaded computation

References

Thanks to David Greenwood for getting me started with multithreading. Front image source under CC licence.