How to perform a clean install of Windows from USB without a disc, and how to repair a corrupted install of Windows.
For either of these tasks, we need a copy of the original media that was used to install Windows. This guide will show you how to get this media, how to put it onto a USB stick, and how to run the USB stick to install or repair your copy of Windows.
This method is also suitable for dualbooting Windows on a Mac via Bootcamp.
You will need the computer you wish to install Windows on, another computer with an internet connection and Windows already installed, and a spare 4GB USB stick. This guide will install a trial version of Windows – you will need a valid licence key from Microsoft in order to activate it.
Step 1: Download ISO
An ISO file is bit-for-bit copy of the contents of a disc. The method we are using involves copying an ISO to a USB disc so that your computer runs it as if it were a DVD.
If you have your own ISO (or your own Windows disc you can create an ISO from) then I would recommend you use this.
However, if you have lost your installation media, don’t worry! The website getintoPC appears to be clean, and offers ISOs of pretty much any version of Windows you might need. Click this link to browse for your version of Windows, or use one of the following:
Make sure you download the version of Windows according to your licence key, or activation may not work!
Step 2: Create bootable USB
To create the USB, we will use a program called Windows 7 USB DVD Download Tool. (Despite the name, it is good for creating USB sticks of any version of Windows.) Download it from here and install it on a working Windows PC.
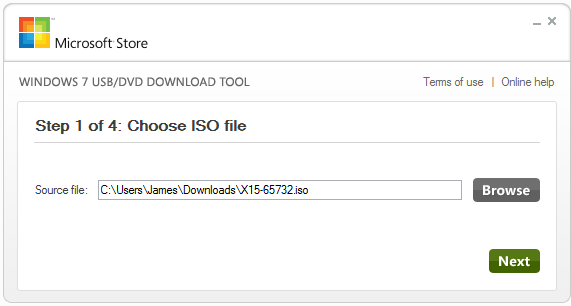
Then run it. On the first screen, find your ISO:
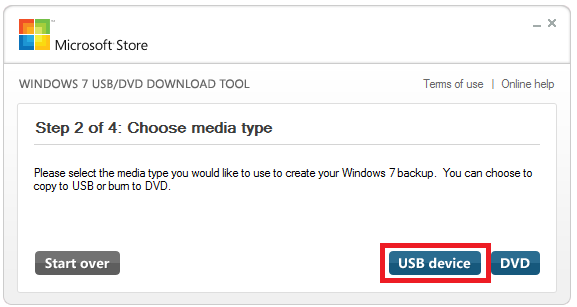
On the next screen, select USB.

Insert your USB stick into the computer. Select your USB stick from the drop down list. (You may need to press refresh before you see your USB stick.)
Finally, begin copying. This will take a while.
Step 3: Plug in the USB stick
Plug the USB stick into the computer you wish to install Windows on, and turn this computer on. Your computer may detect this USB stick automatically, and a Windows loading screen appears.
If not, you need to tell your computer to load from the USB stick. On the boot screen (the first screen that appears as soon as you hit the power button) look for something called ‘boot menu’ or similar. Look for the key next to this word – likely one of F2, F8, F10, F12 or DEL. (You may miss it the first couple of times!) Once you’ve found it, mash this key when you turn your computer on. On the next screen, use your keyboard to select the USB stick.
Step 4: Run the Windows recovery/installation tool
Wait a couple of minutes, and a menu should appear. Depending on which version of Windows you have selected, you may see something different to this below, but the method will be similar.
If you are running a fresh installation of Windows, it is now a matter of following the prompts on the screen. If you are trying to repair Windows, there are a number of features that can help you to repair or reinstall Windows while preserving as much of your data as possible.
In the first screen, click ‘troubleshoot’.
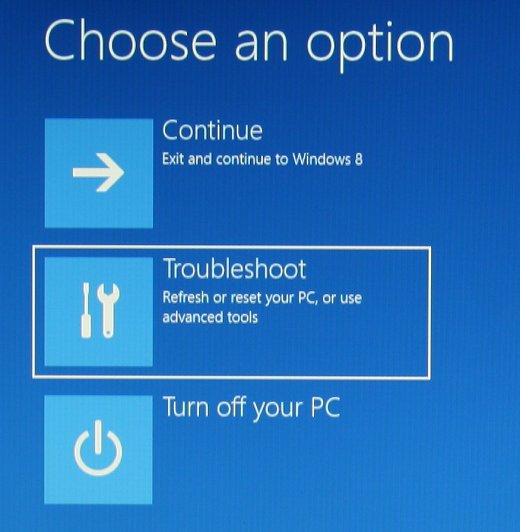
We then get the following options:

You can choose either of these, depending on what exactly you need to do.
Refresh is useful for repairing existing installations of Windows. It reinstalls key parts of the operating system and removes programs whilst keeping personal files intact. The existing copy of Windows will be moved into a folder called ‘Windows.Old’ so you may still be able to recover any program files in here. ‘Refresh’ worked for me when Windows become corrupted and refused to boot. If you’re having problems and are considering reinstalling Windows, then I recommend you give this a go first!
Reset is a more drastic version and is essentially a full re-install of Windows.
Within ‘advanced’ there are further options:
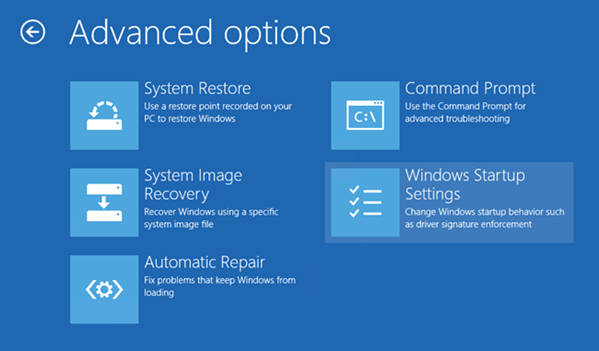
Useful options here are:
Automatic repair. If your computer is failing to boot, it’s worth trying this first. It will attempt to fix your computer with minimal time and no loss of data. Can’t guarantee it will work, but it’s worth trying first before doing anything more drastic.
System restore is another option for repairing your computer if ‘automatic repair’ did not work. This is dependent on there being a ‘restore point’ being saved on your computer. Again, it has minimal risk and is worth trying after ‘automatic repair’.
If I am having problems booting Windows, which option should I pick?
Go through the options in the following order:
| Quick win? | Needs restore point? | Keeps programs? | Keeps personal data? | |
|---|---|---|---|---|
| 1) Automatic repair | Yes | No | Yes | Yes |
| 2) System restore | Yes | Yes | Yes | Yes |
| 3) Refresh | No | No | No | Yes |
| 4) Reset | No | No | No | No |
Remember that ‘reset’ will erase all of your existing files as well as the programs. Before you choose to do this to repair your installation of Windows, you may want to try to connect your hard drive to another computer to try and rescue any files that you can.