Create 2D Delaunay triangulation mesh with C# in Grasshopper

How to perform a Delaunay triangulation on a list of points mapped in 2D, using the C# component in Grasshopper.

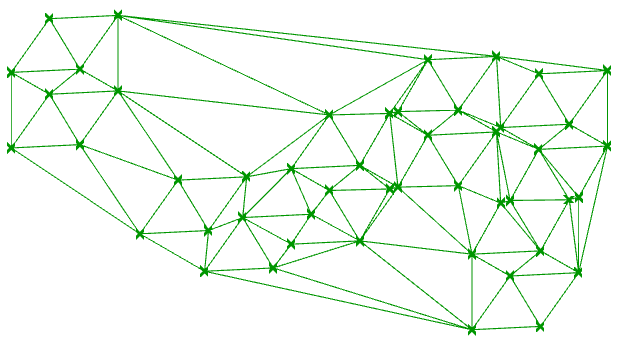
Delaunay triangulation is a highly efficient algorithm which creates a triangulated mesh from a collection of points. This page shows how to create a 2D mesh from a collection of points on the XY plane.

Input

A list of Point3d. These points should already be mapped onto a 2D plane – ideally onto the XY plane.

Points Grasshopper for Delaunay triangulation

If your points aren’t mapped onto a 2D plane, you’ll need to do this in advance. The reason for this is that the Delaunay triangulation algorithm below uses the Node2 type – essentially like a point, but only with X and Y coordinates – since this algorithm produces a 2D mesh.

Output

A regular, Grasshopper-friendly mesh.

Delaunay mesh in Grasshopper with C#

Steps

  1. Convert Point3d into Node2
  2. Add Node2 to Node2List (that’s a list of Node2s, not “node-to-list”!)
  3. Calculate connectivity of mesh faces
  4. Construct and return mesh

C# code

The code below uses Grasshopper.dll to perform the Delaunay triangulation.

    //input
    List<Point3d> pts;

    //convert point3d to node2
    //grasshopper requres that nodes are saved within a Node2List for Delaunay
    var nodes = new Grasshopper.Kernel.Geometry.Node2List();
    for (int i = 0; i < pts.Count; i++)
    {
      //notice how we only read in the X and Y coordinates
      //  this is why points should be mapped onto the XY plane
      nodes.Append(new Grasshopper.Kernel.Geometry.Node2(pts[i].X, pts[i].Y));
    }

    //solve Delaunay
    var delMesh = new Mesh();
    var faces = new List<Grasshopper.Kernel.Geometry.Delaunay.Face>();
    
    faces = Grasshopper.Kernel.Geometry.Delaunay.Solver.Solve_Faces(nodes, 1);
    
    //output
    delMesh = Grasshopper.Kernel.Geometry.Delaunay.Solver.Solve_Mesh(nodes, 1, ref faces);

What next?

Delaunay meshes are pretty amazing. They are quick to generate, quick to analyse and quick to render. They generate sensible triangulation and require no more information than the input points. Unless you absolutely must have smooth surfaces and edges, don’t use a surface, use a mesh.

This video uses Delaunay triangulation to power the graph in the bottom left. The graph was easily coloured by associating each node in the mesh with a value.

These posts will help you get started in making the most of your mesh:

References

Instantiate a Value List Grasshopper component with C#

In a previous post I instantiated a slider automatically using only C#. This means it is possible for a component to add components to your canvas automatically, potentially saving a lot of time in many repetitive workflows.

Here is a similar piece of code, but for the Value List:

C# code

  private void RunScript(bool x, List<object> y, ref object A)
  {
    if(x)
    {
      //instantiate  new value list
      var vallist = new Grasshopper.Kernel.Special.GH_ValueList();
      vallist.CreateAttributes();

      //customise value list position
      int inputcount = this.Component.Params.Input[1].SourceCount;
      vallist.Attributes.Pivot = new PointF((float) this.Component.Attributes.DocObject.Attributes.Bounds.Left - vallist.Attributes.Bounds.Width - 30, (float) this.Component.Params.Input[1].Attributes.Bounds.Y + inputcount * 30);

      //populate value list with our own data
      vallist.ListItems.Clear();
      var item1 = new Grasshopper.Kernel.Special.GH_ValueListItem("Red", "r");
      var item2 = new Grasshopper.Kernel.Special.GH_ValueListItem("Green", "g");
      var item3 = new Grasshopper.Kernel.Special.GH_ValueListItem("Yellow", "y");
      vallist.ListItems.Add(item1);
      vallist.ListItems.Add(item2);
      vallist.ListItems.Add(item3);

      //Until now, the slider is a hypothetical object.
      // This command makes it 'real' and adds it to the canvas.
      GrasshopperDocument.AddObject(vallist, false);

      //Connect the new slider to this component
      this.Component.Params.Input[1].AddSource(vallist);
    }
  }

This code is written for the C# component in Grasshopper. If you are writing components within Visual Studio, there is a little extra work to do in defining GrasshopperDocument and Component, otherwise it’s pretty much a copy-and-paste job too.

GrasshopperDocument and Component variables in Grasshopper from C# component to Visual Studio

In the C# component for Grasshopper, it is easy to perform functions on either itself or on the document you are in. For example:

Component.Params.Input[0].SourceCount;

…will give you the number of things connected to the first input of the particular C# component containing that line of code.

This is made possible by some variables that are pre-defined within all C# components. Start a new C# component and scroll to lines 49-61 and you should see:

#region Members
  /// <summary>Gets the current Rhino document.</summary>
  private readonly RhinoDoc RhinoDocument;
  /// <summary>Gets the Grasshopper document that owns this script.</summary>
  private readonly GH_Document GrasshopperDocument;
  /// <summary>Gets the Grasshopper script component that owns this script.</summary>
  private readonly IGH_Component Component;
  /// <summary>
  /// Gets the current iteration count. The first call to RunScript() is associated with Iteration==0.
  /// Any subsequent call within the same solution will increment the Iteration count.
  /// </summary>
  private readonly int Iteration;
#endregion

This is all well and good if you want to use the C# component, but what if you’re developing something a bit more meaty, and want to move over to Visual Studio?

I often use the GrasshopperDocument and Component properties in particular, and wanted to be able to use these in VS.

Can’t I just call GrasshopperDocument and Component in Visual Studio?

Within the C# component, some magic goes on that gives these variables their abilities. So copy and paste of the above variables isn’t going to work.

Instead, what we need to do is create our own variables with the same names as above, and manually give them their functionality.

How to set up GrasshopperDocument and Component

Like pretty much everything on this blog, I write about stuff as I learn it, and there may be a better way to do things! But the method below works for me.

Open or start a new Grasshopper component project as usual. (See here for setting up.)

At the very top of your class, create some class variables:

GH_Document GrasshopperDocument;
IGH_Component Component;

Then, within Solve_Instance, we can give meaning to these variables:

Component = this;
GrasshopperDocument = this.OnPingDocument();

Or alternatively,

GrasshopperDocument = Instances.ActiveCanvas.Document;

So, your whole component class should look like:

    public class GHtestComponent : GH_Component
    {
        GH_Document GrasshopperDocument;
        IGH_Component Component;

        public GHtestComponent()
            : base("GH test", "Nickname",
                "Description",
                "Category", "Subcategory")
        {
        }

        protected override void RegisterInputParams(GH_Component.GH_InputParamManager pManager)
        {
        }

        protected override void RegisterOutputParams(GH_Component.GH_OutputParamManager pManager)
        {
        }

        protected override void SolveInstance(IGH_DataAccess DA)
        {
            Component = this;
            GrasshopperDocument = this.OnPingDocument();
        }

        protected override System.Drawing.Bitmap Icon
        { //..
        }

        public override Guid ComponentGuid
        { //..
        }
    }

Notes

According to this GH forum post, it is possible for the OnPingDocument() to return null. I haven’t explored further on when this might happen, but you may wish to wrap this line in an ‘if’ or a ‘try catch’.

It seems unnecessary to me to have to assign values to the variables in the Solve_Instance, but this is a way I have working. I couldn’t get it to work when I put it in the constructor.

I still haven’t found the equivalent line for RhinoDoc, mostly because I haven’t needed to. When the time comes for me to figure it out (or if you happen to know yourself and would like to share it with the world!) I’ll update this page.

Update: RhinoDoc

Accessing the RhinoDoc variable is actually really easy – at the top of your C# file, just add a ‘using’:

using Rhino;

Then you can use the RhinoDoc variable like you would use it in the C# component. Simple!

Instantiate new Grasshopper objects automatically with C#

The code here is doing two things:

  • Creating a new slider automatically and positioning it on the canvas
  • Connecting this slider to the original component

This is possible with any Grasshopper object, assuming you can find the class necessary to instantiate the component you are interested in.

  private void RunScript(bool x, List<object> y, ref object A)
  {

    Random rnd = new Random();

    if(x)
    {
      //instantiate  new slider
      Grasshopper.Kernel.Special.GH_NumberSlider slid = new Grasshopper.Kernel.Special.GH_NumberSlider();
      slid.CreateAttributes(); //sets up default values, and makes sure your slider doesn't crash rhino
      
      //customise slider (position, ranges etc)
      int inputcount = this.Component.Params.Input[1].SourceCount;
      slid.Attributes.Pivot = new PointF((float) this.Component.Attributes.DocObject.Attributes.Bounds.Left - slid.Attributes.Bounds.Width - 30, (float) this.Component.Params.Input[1].Attributes.Bounds.Y + inputcount * 30);
      slid.Slider.Maximum = 10;
      slid.Slider.Minimum = 0;
      slid.Slider.DecimalPlaces = 2;
      slid.SetSliderValue((decimal) (rnd.Next(1000) * 0.01));
      
      //Until now, the slider is a hypothetical object.
      // This command makes it 'real' and adds it to the canvas.
      GrasshopperDocument.AddObject(slid, false);

      //Connect the new slider to this component
      this.Component.Params.Input[1].AddSource(slid);
    }

  }

Thanks to Nicolas Chaulet who uncovered a lot of the code above.

Create a list of Rhino geometry within a Grasshopper component using GeometryBase

How to create a generic, mixed list of geometry within a Grasshopper component, and send it to a single output:

class GeometryBuilder
{
    //constructor
    public GeometryBuilder()
    {
        //...
    }

    //property - declare our geometry list here
    private List<Rhino.Geometry.GeometryBase> geom = new List<Rhino.Geometry.GeometryBase>();
    public List<Rhino.Geometry.GeometryBase> Geom
    { get { return geom; } set { geom = value; }}

    //methods
    public BuildGeometry()
    {
        //add a line
        //lines don't inherit from GeometryBase, so we can't cast it to be in
        // our Geom list, but we can convert it to a NurbsCurve, which does.
        Rhino.Geometry.Line ln = new Line(new Point3d(0,0,0), new Point3d(1,1,0));
        Geom.Add((GeometryBase)(ln.ToNurbsCurve())); 

        //Meshes DO inherit from GeometryBase, so we can add them to Geom directly
        Rhino.Geometry.Mesh msh = someOtherMesh;
        Geom.Add((GeometryBase)msh);

        //Generally, things within Rhino.Geometry that are classes can be cast to GeometryBase.
        //Things which are structs can not, though there is usually a sensible way to convert them.

        //Point3d is a struct, so we can't cast it to GeometryBase.
        //The Rhino Point is a class, and it contains a constructor converting from Point3d
        Rhino.Geometry.Point3d pt3d = new Point3d(5,2,0);
        Rhino.Geometry.Point pt = new Point(pt3d);
        Geom.Add((GeometryBase)pt);
    }
}


class GrasshopperComponent : GH_Component
{
    //constructors etc...
    //...

    //set inputs
    //...

    //set outputs
    protected override void RegisterOutputParams(GH_Component.GH_OutputParamManager pManager)
    {
        //our output is created using the 'AddGeometryParameter' method. Remember to set 'access' to 'list'.
        pManager.AddGeometryParameter("My Geometry","my geom","This is a list of generic geometry", GH_ParamAccess.list);
    }

    protected override void SolveInstance(IGH_DataAccess DA)
    {
        //generate our list of geometry from the class we made
        var GeometryBuilder gb = new GeometryBuilder();
        gb.BuildGeometry();

        //the geometry is now saved within the Geom property of our gb instance of GeometryBuilder.
        //All we need to do now is send the geometry to the Grasshopper output
        DA.SetDataList(0, gb.Geom);
    }
}