Grasshopper without wires: Transmit data to any component

The philosophy of data in Grasshopper is quite simple: data flows from left to right, and it flows along the wires. That is, until you break it.

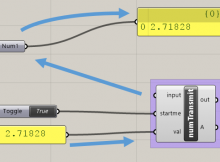
Based upon a slider permutation component created by David Rutten, and modified by Mostapha Roudsari, I have created a component that can transmit numbers to any component in your canvas, even when there is no wire connection.

grasshopper-transmit-data

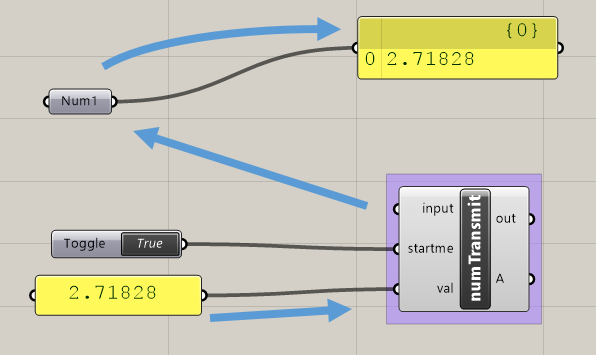
The value is entered in the bottom left. The component then looks for any ‘Num’ components, and send the value to them. If there are multiple components, it will find them and update them accordingly.

grasshopper-transmit-data-2

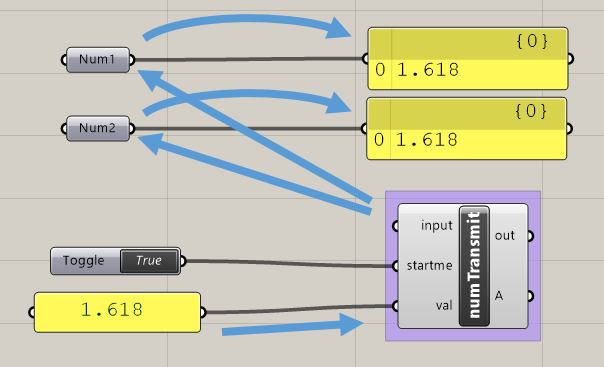
By default, if nothing is connected to that ‘input’ input, the component will update all Nums. If you only want to update certain components, connect these to ‘input’.

grasshopper-transmit-data-3

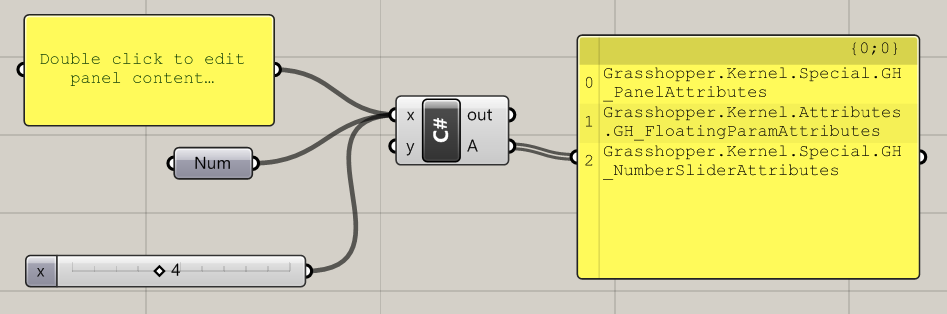
The component can potentially be created to work with any component. By finding the class of any component in Grasshopper, we can interact programmatically with it.

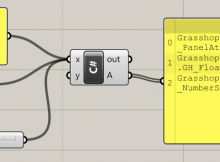
The component is written in the C# component and can be opened and edited directly within Grasshopper.

Download


Source code

    List<System.Guid> guids = new List<System.Guid>(); //connected components

    Grasshopper.Kernel.IGH_Param selNumsInput = Component.Params.Input[0];
    IList<Grasshopper.Kernel.IGH_Param> sources = selNumsInput.Sources;
    bool isAnythingConnected = sources.Any();

    if(isAnythingConnected && (bool) startme)
    {
      foreach (var source in sources)
      {
        IGH_DocumentObject component = source.Attributes.GetTopLevel.DocObject;

        //check if valid number
        bool validNumber = true;
        Grasshopper.Kernel.Parameters.Param_Number myNum = component as Grasshopper.Kernel.Parameters.Param_Number;
        if(myNum == null) validNumber = false; //check if it's a num component
        else if(myNum.DataType == Grasshopper.Kernel.GH_ParamData.remote) validNumber = false; //check if free
        if (validNumber)
        {
          guids.Add(myNum.InstanceGuid); //a list of free num component GUIDs
        }
      }


    }

    //this loop can probably be merged with the above, unless I'm missing something...
    List<Grasshopper.Kernel.Parameters.Param_Number> nums = new List<Grasshopper.Kernel.Parameters.Param_Number>();
    foreach (IGH_DocumentObject docObject in GrasshopperDocument.Objects) //for every GH component in document
    {
      Grasshopper.Kernel.Parameters.Param_Number num = docObject as Grasshopper.Kernel.Parameters.Param_Number; //try convert to num
      if(num != null) //if that component is a num
      {
        if(isAnythingConnected) //...and nums are connected to this C# component
        {
          if(guids.Contains(num.InstanceGuid)) nums.Add(num); //...then if that num is connected, add to 'nums'
        }
        else if (num.DataType != GH_ParamData.remote)
        {
          nums.Add(num); //else add all free num components
        }

      }
    }

    //nums is the list of all the components we want to update.

    Grasshopper.Kernel.Types.GH_Number ghnum = new Grasshopper.Kernel.Types.GH_Number(val);
    foreach (Grasshopper.Kernel.Parameters.Param_Number obj in nums)
    {
      if((bool) startme)
      {
        obj.PersistentData.Clear();
        obj.PersistentData.Append(ghnum);
        obj.ExpireSolution(true);
      }
    }

    A = nums;

Developing for Grasshopper in C#: Find the class for any Grasshopper component

Grasshopper components showing how the C# component can be used to access the namespace of component classes

When developing for Grasshopper, it is useful to be able to interact programatically with existing components.

The current SDK has patchy documentation and finding where and how to interact with different components can be challenging.

The script below can be used to find the namespace and class for any component. Use a default C# component. Set the first input (x) as a list, and connect your components to this.

    Grasshopper.Kernel.IGH_Param selNumsInput = Component.Params.Input[0];
    IList<Grasshopper.Kernel.IGH_Param> sources = selNumsInput.Sources;
    bool isAnythingConnected = sources.Any();
    var rtnlist = new List<object>();

    if(isAnythingConnected)
    {
      foreach (var source in sources)
      {
        IGH_DocumentObject component = source.Attributes.GetTopLevel.DocObject;
        rtnlist.Add(component.Attributes);
      }
    }
    A = rtnlist;

Once you have these namespaces, you can then dig into these components and access a wide range of properties. It’s quite fun to see what you can do with them.

A simple timer example for the Grasshopper C# component

grasshopper-timer

Create a simple timer in Grasshopper using the built-in C# component with this example script.

What this does

Set runtimer to true. The component will build a list of the current time and date, once per second.

When runtimer is set to false, the timer is turned off and the list is displayed.

Code

  private void RunScript(bool runtimer, bool reset, ref object A)
  {
    if(runtimer) Example.TurnOnTimer();
    if(!runtimer) Example.TurnOffTimer();
    A = rtnlist;
  }

  // <Custom additional code> 

  public static List<string> rtnlist = new List<string>();

  public class Example
  {
    public static System.Timers.Timer aTimer = new System.Timers.Timer(1000);

    public static void TurnOnTimer()
    {
      rtnlist.Clear();
      aTimer.Elapsed += OnTimedEvent;
      aTimer.Enabled = true;
    }

    public static void TurnOffTimer()
    {
      aTimer.Elapsed -= OnTimedEvent;
      aTimer.Enabled = false;
    }

    private static void OnTimedEvent(Object source, System.Timers.ElapsedEventArgs e)
    {
      rtnlist.Add(e.SignalTime.ToString());
    }
  }

Download

You can download the above code as a Grasshopper user object here


Further information

MSDN guide: timers in C#

Grasshopper timer using Python

If you are looking to add a timer to a Python component without using the timer component, have a look at Anders Deleuran’s code here.

How to automatically get the measurement units in Grasshopper/Rhino

How to automatically find out if your Rhino document is set to millimetres or metres:

private void RunScript(ref object scale)
  {
    int rtnval = 1;
    Rhino.RhinoDoc  doc = Rhino.RhinoDoc.ActiveDoc;
    Rhino.UnitSystem  system = doc.ModelUnitSystem;
    if(system.ToString() == "Meters") rtnval = 1;
    else rtnval = 1000;
    scale = rtnval;
  }

This script returns a value of 1 if the document is in metres, or 1000 otherwise. (I assume that the user will only be using mm or m.)

To use, create a C# component in Grasshopper and copy the part between the curly brackets to the code of the C# component. Make sure that the component has an output called ‘scale’.

mm or m component

…or download the component from below:

Download

How to install Honeybee for Grasshopper

Honeybee is a plugin for Grasshopper for daylight analysis, created by Mostapha Sadeghipour Roudsari. Honeybee links to third party analysis tools in order to do its calculations. So in order to install Honeybee, we also need to install these tools. This can be a little fiddly – this guide shows how I got round it. Continue reading How to install Honeybee for Grasshopper

How to install Ladybug for Grasshopper

Ladybug is a free plugin for Grasshopper that uses the EnergyPlus engine to provide a range of environmental calculations and visuals for input geometry. This guide will show you how to install Ladybug.

If you are looking to install the more recent Ladybug + Honeybee components for Grasshopper, this guide will help you too.

Check you have the right software

Firstly, you need Rhino 5. Rhino 4 won’t do! You can download a free trial here.

You also need Grasshopper, a free plugin for Rhino. Download the latest version here.

Then you need GHPython. Download it, and unzip it. In GH, open your components folder:

grasshopper special folders drop down menu

This should open a folder in a location like C:\Users\jramsden\AppData\Roaming\Grasshopper\Libraries. Paste GHPython.gha into this folder.

Install Ladybug

Visit the Ladybug page, take a read of it and have a look at the video. Then download the unlocked version from the page (or quicklink here). This should download a zip folder. Unzip this folder (the next step won’t work if you don’t unzip it first!).

Within the folder should be about 28 .ghuser files. Select them all and drag them directly into the GH window.

ladybug for grasshopper install components

Done! To double-check, go to your GH User Object folder under the Special Folders as above (e.g. C:UsersjramsdenAppDataRoamingGrasshopperUserObjects). The .ghuser folders should be in here.

Now a new tab should have appeared in your GH window called Ladybug.

ladybug ribbon icons grasshopper

There are 5 categories of components, labelled 0-4. In using Ladybug, these are run through roughly in order.