Add a new domain and WordPress installation through cPanel

If you have a website using webhost such as SiteGround, you are probably using the cPanel software to manage it. Many hosting packages allow multiple domains to be hosted. This short guide shows how to set up a second and a third domain on your hosting service through cPanel, and how to set up a WordPress installation on it.

I have such a package with SiteGround, and of course I am running james-ramsden.com on it. After a recent trip to Japan, I am wanting to create a new website called ski-hokkaido.com to document the trip (though we’ll see if that actually happens!), and to save costs I am going to run it from the same SiteGround hosting account. It’s been a while since I’ve done something like this, and it was a bit of a headache when I couldn’t remember how to do it, so hopefully this guide will jog both my memory if I need to do it again, as well as hopefully being useful for anyone else…?

This process is free of charge. It takes about 10 minutes of your time, though it will take between 2-48 hours for the servers to catch up and your new website to be live.

Step 0: What you need

  1. A new domain address that you want to set up
  2. A hosting account which uses cPanel as its management tool

In my case, I bought the domain from NameCheap, and I use SiteGround as my webhost.

Looking for a webhost? James-Ramsden.com is hosted by SiteGround, and I happily recommend it to others. If you are looking for a fast and good value web host, you can help support this site by signing up for SiteGround here.

Step 1: Point your domain to your webhost’s server

Your Domain Name Server (DNS) information is what turns human-readable website names (www.something.com) into a computer-readable address that helps your browser find which computer in the world it is supposed to be talking to. Your website is ‘saved’ physically on your webhost, so when a user types your web address into their browser, it needs to be able to find your webhost so that they can access your website.

Your domain is what allows this process to happen. The domain registrar essentially is the company that ‘points’ a browser towards the computer where a website is being hosted. When you have just bought a new domain, you have to make the link yourself between the domain and your website.

So how do we do this? Basically, have to find the DNS information for our webhost, and point our domain towards it.

Step 1a: Go to SiteGround (or your equivalent) and log in to cPanel. Under ‘My Accounts’, look for ‘Name Servers’ in the top left.

siteground

Keep this tab open.

Step 1b: We need to tell your domain registrar about the DNS addresses we found on our webhost, and the process may vary slightly depending on which company you use.

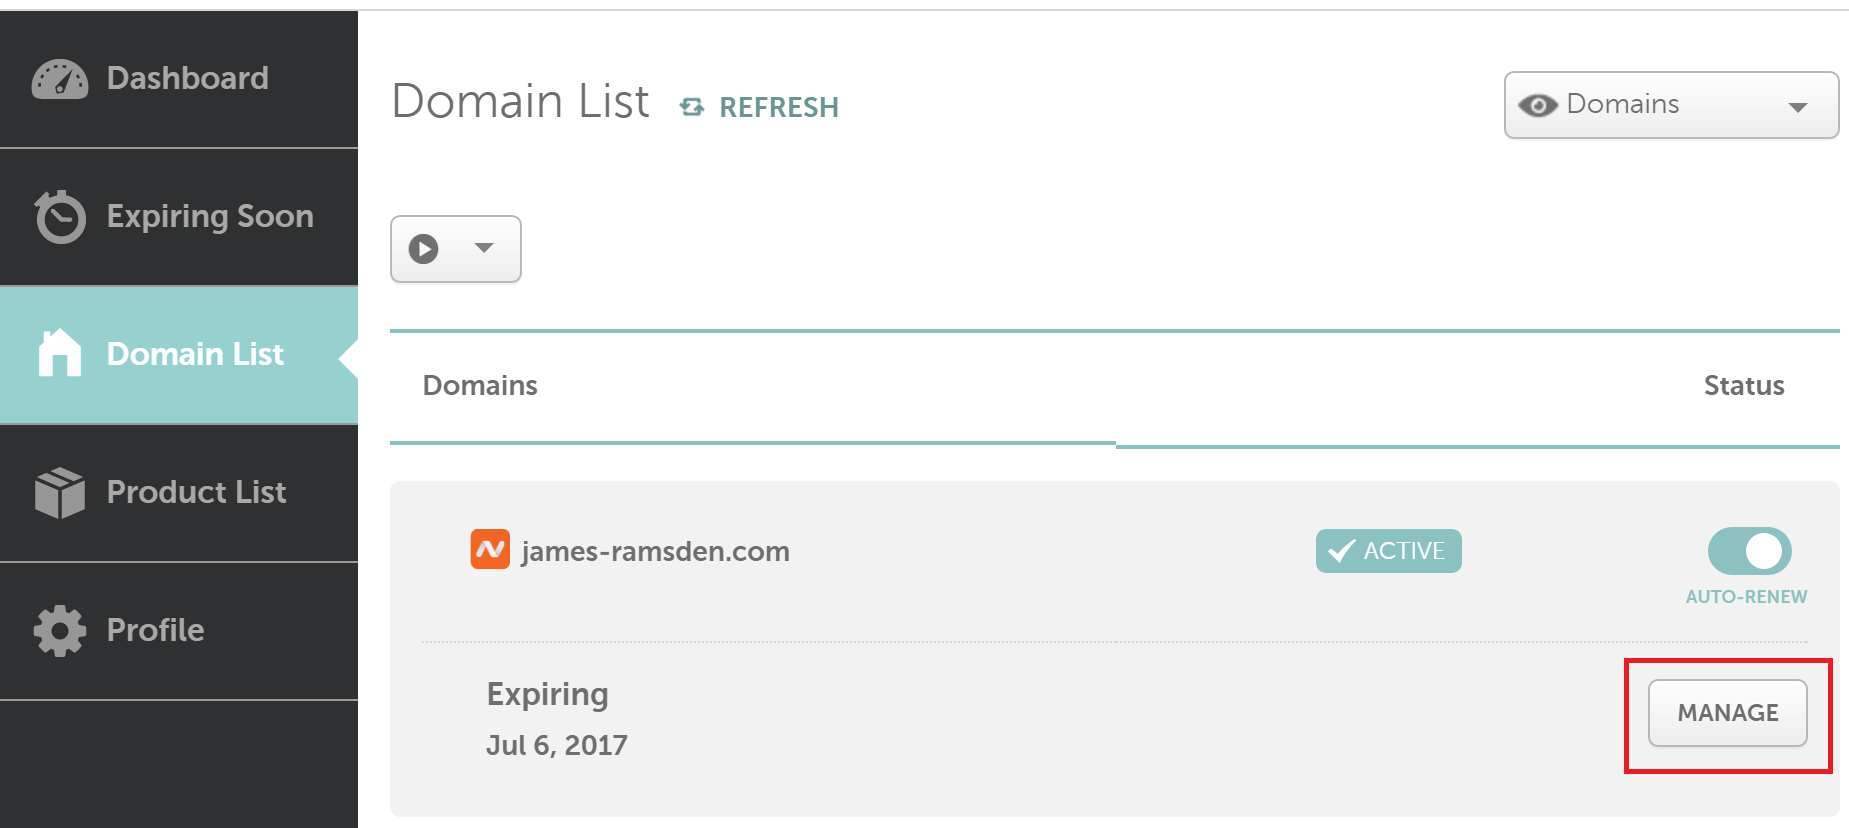
Open a new tab. Log in to Namecheap (or your own registrar) and go to ‘Domain List’.

namecheap1

Find your website and click the ‘Manage’ button.
namecheap2

Scroll down to the ‘Nameservers’ section.

Select ‘Custom DNS’ and copy the DNS information that you got from SiteGround into the textboxes.

namecheap3

Save changes.

Step 2: Set up your domain on your webhost’s server

We have now told your domain registrar to point to your webhost when someone enters your new domain into their browser, but we haven’t told the webhost what to do when they arrive. So now we need to set up our WordPress blog, and configure it so that it loads when someone comes to our webhost with this domain.

Firstly, you need to log in to your cPanel interface. I did this by going to SiteGround, logging in, going to ‘My Accounts’ and ‘Go to cPanel’.
dns6

Once inside, find ‘Addon Domains’.

dns7

Fill in the fields below.

dns8

The ‘New Domain Name’ is the domain you have just bought, exactly as you registered it, but without the http part. The next two fields should autofill to sensible values, or if not then replicate the patterns in the image. Finally, enter a password.

Step 3: Set up WordPress (optional)

The above step created a folder in our server space, but there’s nothing in it. You can of course do anything with this space, but here we’re going to install WordPress.

Many webhosts using cPanel make it easy to install WordPress through cPanel. Go back to your cPanel interface and find the WordPress installer.

dns9

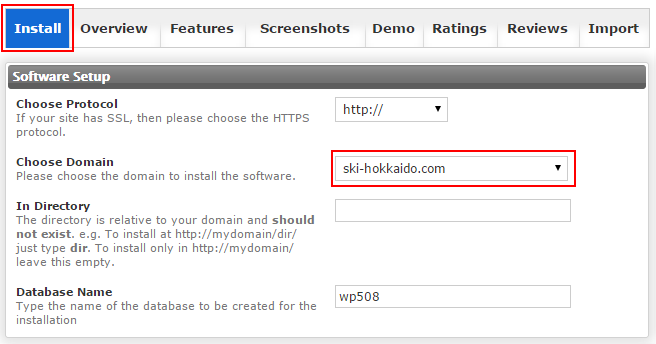
Select ‘Install’. A form will appear where we set up our WordPress blog. Find your domain in the drop-down box.

wp1

Give the site a name and a description. (You can change these later on from the WordPress dashboard.) Leave ‘multi-site’ off unless you know exactly what it is, even if you have multiple WordPress blogs. The username and the password is how you log in to the WordPress admin view, where you design your site and create content. You don’t want people hacking this, as it gives them full control of your WordPress site, so give it a secure username and password!

If you have email set up on your webhost, you can use something like has is given to you. Alternatively, you can use any email address you like. This address isn’t visible from anywhere on your site by default.

wp2

Everything else can be left as default. Click ‘install’ at the bottom, give it a few minutes, and you’re done!

So… where’s my website??

You would think now, that if we enter our address of our new website in our browser, we should see a tantalisingly empty blog, waiting to be filled. You may notice that something does load when we enter the address, but it’s a generic page filled with ‘NameCheap… website coming soon!’ with words to that effect, and no way of actually doing… anything!.

The answer is simply, relax! Transferring over domain names tends to take a while, and sometimes as long as 48 hours. With NameCheap and SiteGround, in my experience it does take a couple of hours.

And when it’s ready, you can start to edit your WordPress website in the usual way – just head to http://mydomain.com/wp-admin. Once there, enter the login details you gave when you created the WordPress installation.

Have fun!

A simple timer example for the Grasshopper C# component

grasshopper-timer

Create a simple timer in Grasshopper using the built-in C# component with this example script.

What this does

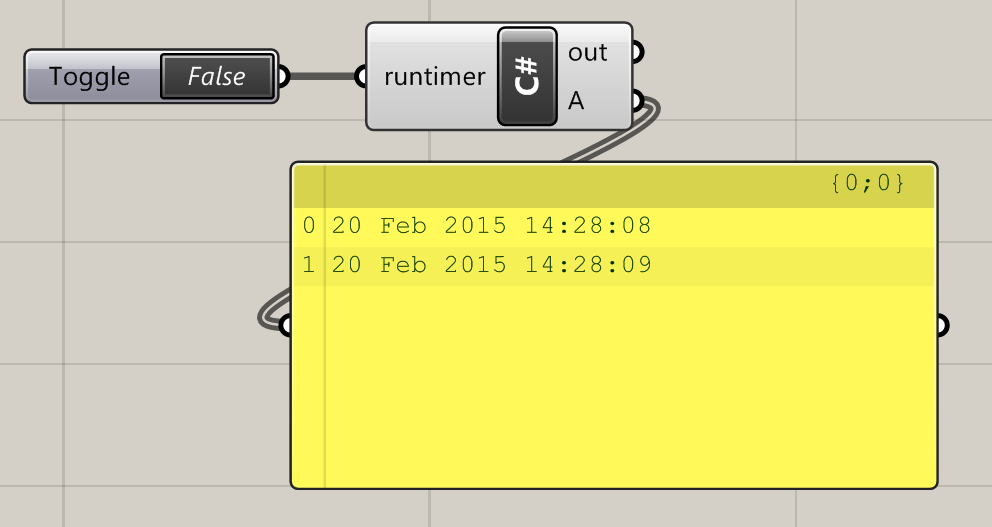
Set runtimer to true. The component will build a list of the current time and date, once per second.

When runtimer is set to false, the timer is turned off and the list is displayed.

Code

  private void RunScript(bool runtimer, bool reset, ref object A)
  {
    if(runtimer) Example.TurnOnTimer();
    if(!runtimer) Example.TurnOffTimer();
    A = rtnlist;
  }

  // <Custom additional code> 

  public static List<string> rtnlist = new List<string>();

  public class Example
  {
    public static System.Timers.Timer aTimer = new System.Timers.Timer(1000);

    public static void TurnOnTimer()
    {
      rtnlist.Clear();
      aTimer.Elapsed += OnTimedEvent;
      aTimer.Enabled = true;
    }

    public static void TurnOffTimer()
    {
      aTimer.Elapsed -= OnTimedEvent;
      aTimer.Enabled = false;
    }

    private static void OnTimedEvent(Object source, System.Timers.ElapsedEventArgs e)
    {
      rtnlist.Add(e.SignalTime.ToString());
    }
  }

Download

You can download the above code as a Grasshopper user object here


Further information

MSDN guide: timers in C#

Grasshopper timer using Python

If you are looking to add a timer to a Python component without using the timer component, have a look at Anders Deleuran’s code here.

Set the Rhino camera with Grasshopper and C#

Setting the camera in Rhino can be a bit fiddly. Often, dragging and orbiting doesn’t give you the camera view you need. It is possible to manually set the camera using the ViewportProperties command, but even this often isn’t ideal.

However, it is surprisingly easy to set the Rhino camera with a few lines of C# code in Grasshopper. The key part is understanding how the Rhino camera works. The camera location is defined by a Point3d. In order to get the view direction, a second point is used, called the target. So if you want to ‘look around’, keep the camera location constant, and move the target. If you want to orbit around an object, keep the target the same and move the camera location. If you want to ‘walk’ (like in Sketchup) then you need to move the location and the target together.

To use the code below, create a C# component in Grasshopper. Copy the script below into the component. The snippet gets the camera in the selected Rhino viewport.

Get camera

private void RunScript(bool getcamera)
{
    //get current viewport    
    vp = doc.Views.ActiveView.ActiveViewport;
    //save camera location and camera target
    loc = vp.CameraLocation;
    tar = vp.CameraTarget;
}
// <custom additional code>

Rhino.Display.RhinoViewport vp; //used to get and set rhino camera properties
Point3d tar;
Point3d loc;

…and this one sets the viewport. You’ll need to set two Point3d inputs called loc and tar to take the user’s desired camera location and target points.

Set camera

private void RunScript(Point3d loc, Point3d tar)
{
    //get current viewport    
    vp = Rhino.RhinoDoc.ActiveDoc.Views.ActiveView.ActiveViewport;
    //set new camera
    vp.SetCameraLocations(tar, loc);
}
// <custom additional code>

Rhino.Display.RhinoViewport vp; //used to get and set rhino camera properties

These examples are of course very simple, but you don’t have to stop here. Once you’ve got the gist of it, this approach reveals not only the ability to manipulate the view but it allows a huge range of creativity. For example, I rendered OpenStreetMap data in Grasshopper and manipulated the camera to follow a road.

You can download the Grasshopper file to set the camera along a curve like the above video from here.

Planning a ski trip to Japan: A ski map of Hokkaido

As part of my research into my first ski trip in Japan, I have been researching the different places to go.

I am a relative beginner with little over a week of experience, but I’m wanting somewhere with the best snow, a good mix of slopes, and away from the crowds. In Hokkaido, we’re spoilt for choice and it can be quite bewildering to know where to go, where to stay and how to get around.

I put together the map of Hokkaido ski resorts below as an evolving work to help understand the different regions in Hokkaido for skiing. I haven’t actually been to any of the places below yet, but it is quite a useful tool for putting together my plans. I have also saved piste maps into each of the resorts – zoom in and click a ski icon to take a look.

Full screen version: click here.

It seems that many of the most exciting and promising resorts can be accessed within a couple of hours of Sapporo by train, even the distant Tomamu in the east. With a JR pass, it’s very easy to get about by train, and it will likely be cheaper to stay in Sapporo and do day trips to lots of different resorts. Furano is the only significant exception that’s a little too far – maybe a couple of days at a hotel there?

The PowderHounds website (and their own ski map) was an excellent resource in my map and my own planning. I recommend you take a look, especially at their list of top resorts.

Anything I’ve missed out? Any other amazing places you can recommend?

Vastly improve Grasshopper component performance by NOT using data types??

Scripting components in Grasshopper can be a great way to get extra power and functionality for those comfortable with C# or VB. It can also be a much tidier way of doing certain tasks than using components, such as using mathematical formulae on a list of values.

Calculating the minimum value in a list of numbers is a great example of this – difficult to do using Grasshopper but dead easy with a few lines of script. The algorithm is simple – look through every item in the list, keeping track of the smallest item found. When we are at the end of the list, simply return this smallest value.

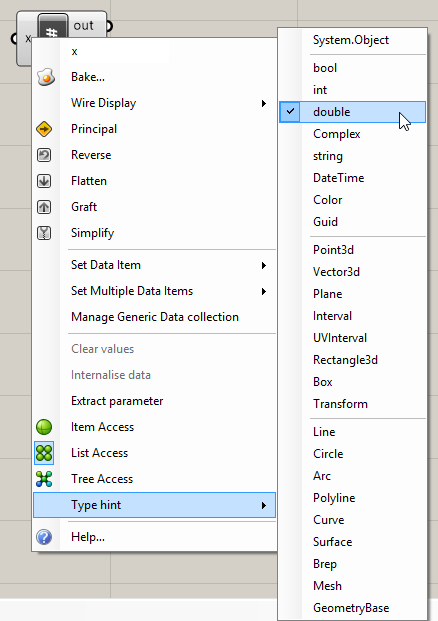
To implement this in Grasshopper, we can use the C# component. We’d start by specifying the input data types by right-clicking on the input, selecting ‘list’ and selecting ‘double’.

GH_component_right_click

Then we’d go into the component and add our code.

  private void RunScript(List<double> x, ref object A)
  {

    double minsofar = x[0];

    foreach(double val in x)
    {
      minsofar = Math.Min(val, minsofar);
    }

    A = minsofar;

  }

This works fine and gives the expected result.

But try and run this code for quite a large list, say 100000 items. This takes around a second to compute. Not an especially long time, but for such a simple calculation it still adds a noticeable lag to the canvas. I just accepted it for what it was, thinking maybe that’s simply how long it actually takes to run a bit of code.

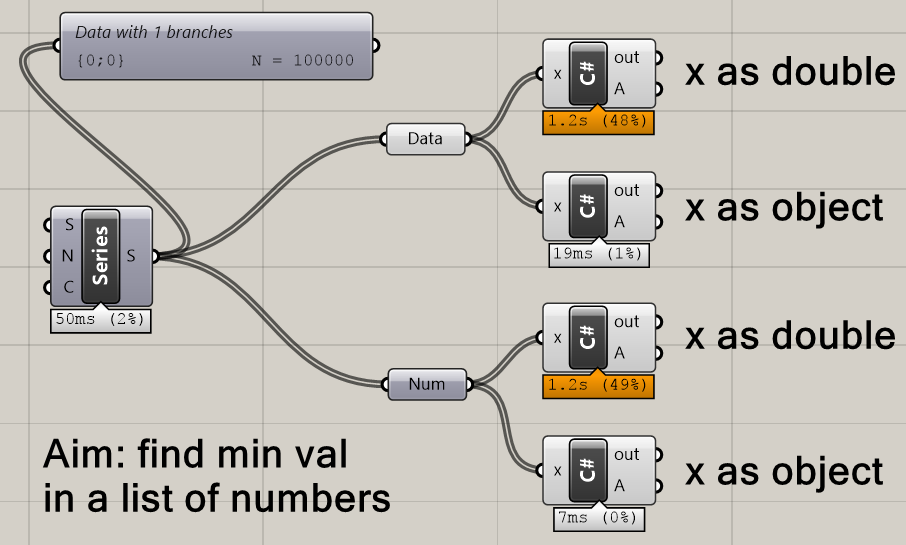
One day, I was writing another simple component and was feeling especially lazy. I couldn’t be bothered to do the right-clicking malarkey, and decided to just cast the data types in the Grasshopper component itself. Again, there was a large list going into the component, but to my surprise it calculated in mere milliseconds. Investigating further, I found that this speed difference occurs time and time again, and can be easily demonstrated:

GH_double_cast

Here, we have a list of 100000 numbers (a series of doubles) and we’re trying to find the smallest value among them. (Of course, with an ascending series it’s going to be the first value, but the algorithm doesn’t know that.) The code for the first C# component is:

    double minsofar = x[0];

    foreach(double val in x)
    {
      minsofar = Math.Min(val, minsofar);
    }

    A = minsofar;

This is the same as before – we have set the input data type (called x) as double, and assumed that x is a double in the code. This consistently takes 1.2s to calculate on my laptop.

The code for the second C# component is:

    double minsofar = (double) x[0];

    foreach(object val in x)
    {
      minsofar = Math.Min((double) val, minsofar);
    }

    A = minsofar;

The only difference here is that we don’t tell the component input to expect a particular data type – we leave it set as ‘object’. (We still have to tell it it’s going to be a list.) Then, in the code, whenever we want to do something with this list that can only be applied as numbers, we cast the item in the list we are looking at as a double, e.g. x[0] becomes (double)x[0].

The difference this makes is astonishing – we go from a calculation time of 1.2s to a tiny 7 milliseconds.

Why this is I don’t know. Whether it works for other data types I am still investigating, and it would be great to hear if this technique is repeated elsewhere in different scenarios.

In the meantime, the lesson is clear: if you are looking to optimise your canvas as much as possible, it is worth trying to cast your variables inside your component instead.

Download the example file:

Angle between two vectors

Something rather simple but I keep forgetting how to do it: what is the angle between any two vectors? It’s simple when you know how (as well as being an opportunity to try LaTeX for WordPress!):

cos\theta=\frac{\sum{uv}}{\left\{(\sum u^2)(\sum v^2)\right\}^{0.5}}=\frac{\textbf{u'v}}{\left\{(\textbf{u'u})(\textbf{v'v})\right\}^{0.5}}

Example

Find the angle between two vectors in 3D space:

\textbf{u}=\begin{bmatrix}5&0&0\end{bmatrix}
\textbf{v}=\begin{bmatrix}10&2&5\end{bmatrix}

cos\theta=\frac{\sum{uv}}{\left\{(\sum u^2)(\sum v^2)\right\}^{0.5}}=\frac{5\times10+0\times2+0\times5}{\left\{(5^2+0^2+0^2)(10^2+2^2+5^2)\right\}^{0.5}}=\frac{50}{\left\{25\times129\right\}^{0.5}}=0.880 \therefore\theta=28.3\textdegree

This technique can be used for any number of dimensions. For 2D space (e.g. vectors on a graph on a piece of paper) u and v will each contain two values instead of three, and the calculation is then done in the same way.

C# code example

  //returns angle between two vectors
  //input two vectors u and v
  //for 'returndegrees' enter true for an answer in degrees, false for radians
  double AngleBetween(Vector3d u, Vector3d v, bool returndegrees)
  {
    double toppart = 0;
    for (int d = 0; d < 3; d++) toppart += u[d] * v[d];

    double u2 = 0; //u squared
    double v2 = 0; //v squared
    for (int d = 0; d < 3; d++)
    {
      u2 += u[d] * u[d];
      v2 += v[d] * v[d];
    }

    double bottompart = 0;
    bottompart = Math.Sqrt(u2 * v2);


    double rtnval = Math.Acos(toppart / bottompart);
    if(returndegrees) rtnval *= 360.0 / (2 * Math.PI);
    return rtnval;
  }

Using Generics in C#

When we write a method in C#, we often want to specify an input and a return for it. Since C# is a strongly typed language, it likes to know exactly what data type these inputs and returns are.

Let’s take an example, which takes a 2D array of data and returns a specified row as a list:

public List<string> GetRowOf2dArray(string[,] array, int rowNo)
{
    List<string> rtnlist = new List<string>();
    for (int i = 0; i < array.GetLength(0); i++)
    {
        rtnlist.Add(array[i, rowNo]);
    }
    return rtnlist;
}

This is all well and good if we only want to use strings. But what happens if, later on, we want to use the function with a list of doubles?

We might decide to create a copy of the method:

public List<double> GetRowOf2dArray(double[,] array, int rowNo)
{
    List<double> rtnlist = new List<double>();
    for (int i = 0; i < array.GetLength(0); i++)
    {
        rtnlist.Add(array[i, rowNo]);
    }
    return rtnlist;
}

Now, at the interface level, we can extract a row whether we have a matrix of doubles or of strings, and return them in the correct data type.

string[,] branchPaths = new string[5, 5];
for (int i = 0; i < branchPaths.GetLength(0); i++)
{
    for (int j = 0; j < branchPaths.GetLength(1); j++)
    {
        branchPaths[i, j] = "I am cell " + i.ToString() + ", " + j.ToString() + ".";
    }
}

var rtnList = new List<string>();
rtnList = tst.GetRowOf2dArray(branchPaths, 0);

But, we’re already running into problems. We basically had to copy and paste the GetRow…() method above, which is already bad practice. What if we want to change something, or we find there’s a bug? We’d have to make the change in every copy of GetRow…(). And what if we want to use the method with yet another data type, such as an array of integers? We’d have to keep copying and pasting for every data type.

One way around this is instead to write the method using objects as the type. Since all types inherit from the object type, we can write the method once and cast the specific data types. A very simple example is:

public bool IsEqual(object v1, object v2)
{
    if (v1 == v2) return true;
    else return false;
}

double a = 2;
double b = 3;
bool areTheyEqual = IsEqual(a, b); //returns false

However, this gives a lot of problems, which are explained in more depth here. Basically, using objects means that we lose performance due to casting, and we lose control since all data types can be casted to and from objects. What we want is a way to create a method suitable for multiple data types, but where we still can feel safe that the user won’t break our method with a strange data type.

Generics

This is solved with generics. As well as feeding in parameters to our methods, we can also tell the method what kind of data type we want to use it with.

This will already be familiar if you have worked with lists:

List<double> myList = new List<double>();

myList.Add(1.5);
myList.Add(5.232);

The bit in the angle brackets is the type – we can’t create a list without telling it what kind of data the list will contain. By writing <double>, we are saying that every item in the list will be a double. And if we wanted to create a list of strings, we don’t need to call a different method or different class, but we can still do it by calling the same class by specifying the type as string.

In short, using generics allows you to write your method once for a wide range of data types.

Back to the matrix example – in our class:

public List<T> GetRowOf2dArray<T>(T[,] array, int rowNo)
{
    List<T> rtnlist = new List<T>();
    for (int i = 0; i < array.GetLength(0); i++)
    {
         rtnlist.Add(array[i, rowNo]);
    }
    return rtnlist;
}

int[,] branchPaths = new int[5, 5];
for (int i = 0; i < branchPaths.GetLength(0); i++)
{
    for (int j = 0; j < branchPaths.GetLength(1); j++)
    {
        branchPaths[i, j] = i*100 + j;
    }
}

var rtnList = new List<int>();
rtnList = tst.GetRowOf2dArray<int>(branchPaths, 2);

T is the placeholder for the type. When the user calls the method, T will hold a data type, such as string or int. In this example, both an input (T[,]) and the return type (List<T>) have data types that must be carried by the user. The place where the user specifies the data type carried by T is in GetRowOf2dArray<T>. So when the user calls the method, they only need to specify T once. T can then be used wherever necessary throughout the method.

References

MSDN – An introduction to C# generics
MSDN – Generics (C# programming guide)

Changing input names for custom C# Grasshopper components

Edit input names of a GH component

The two components above look similar but are actually the same. What’s the difference? When a single item is connected to the first input, saving is enabled in the bottom input. When a list is connected to the first input, saving is disabled.

When we are writing custom Grasshopper components in C# in Visual Studio, this is very easy. All we do is, somewhere within the SolveInstance method, modify the input properties to change the name, then manually add some code to allow for our desired saving behaviour.

protected override void SolveInstance(IGH_DataAccess DA)
{
   if(Input0.Count == 1)
   {
       Params.Input[6].NickName = "save";
       Params.Input[6].Name = "Save";
   }
   else if (Input0.Count > 1)
   {
       Params.Input[6].NickName = "----";
       Params.Input[6].Name = "Save (Disabled)";
   }
}

In fact, by going to

Params.Input[i].something

where i is the index of the input we are interested in, we can access lots of interesting properties and methods to bring new interesting behaviour to our Grasshopper components. We can even do the same to our outputs with Params.Output[i].

And it’s not just limited to the parameter inputs and outputs either. By using

this.something

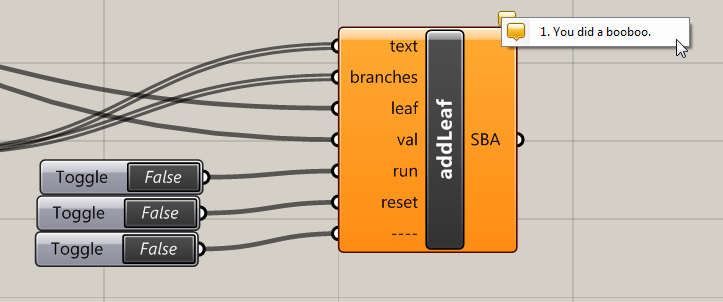
we can browse the properties and methods which affect the whole component. For example, we can add a warning to our component by adding the line below to our SolveInstance code:

this.AddRuntimeMessage(GH_RuntimeMessageLevel.Warning, "You did a booboo.");

Custom error message on a Grasshopper component

Keyboard reader for Grasshopper

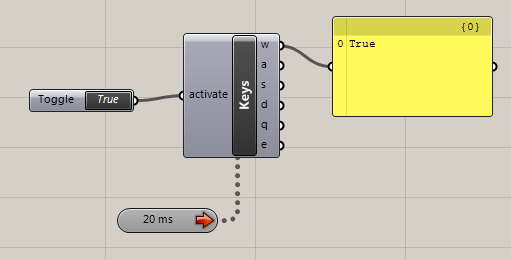
A prototype way of interacting with Grasshopper with the keyboard. Press any character key on the keyboard to send true/false values to Grasshopper.

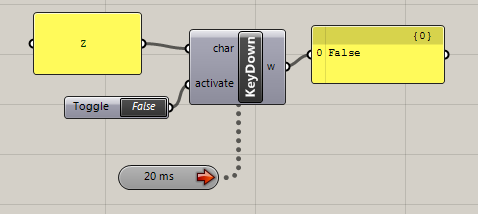
It uses the Global Mouse and Keyboard Hook classes by George Mamaladze to intercept key up/down events. I have written two components that turns these key events into true/false commands – if a key is raised, ‘false’ is sent, and if pressed, ‘true’ is sent.

Keyboard reader with 6 pre-filled keys

In the component above, 6 keys have been hard-coded. (I have been using this as part of video game-like WASD camera control in Rhino.) The component below accepts any character (and possibly any key on the keyboard if you’re lucky enough to find the correct character code for each key.)

Keyboard reader with any letter of the keyboard

Install

To install, download the file at the bottom of this page. Unzip and copy the two files (one GHA and one DLL) into your Grasshopper components folder. To use, set up as in the images above, and remember to attach a timer with a short interval. You may need to unblock the file within Windows if you are having problems. (Right click each of the two files in Windows Explorer, click Properties, and click Unblock.)


Source code

The source code of the Grasshopper components is available at GitHub.

The classes for interacting with the keyboard must (at least for the moment) be downloaded separately, and are available here.

Adding names and descriptions to C# components in Grasshopper

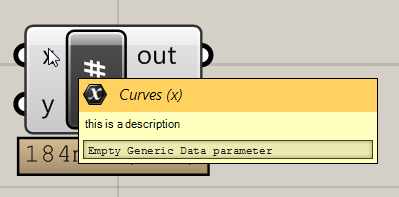
Adding names and descriptions to inputs in custom components makes it easier for other users to understand your component. You can add these even within the C# component within Grasshopper by adding a few lines somewhere within your code:

componentdescription

Then, when the user hovers over an input, it should look like this:

descriptionpreview