C#: Convert an Image to a BitmapImage

How to convert a System.Drawing.Image to a System.Windows.Media.Imaging.BitmapImage.

using System.Windows.Media.Imaging;
using System.Drawing;
using System.Drawing.Imaging;
using System.IO;

//...

public BitmapImage Convert(Image img)
{
    using (var memory = new MemoryStream())
    {
        img.Save(memory, ImageFormat.Png);
        memory.Position = 0;

        var bitmapImage = new BitmapImage();
        bitmapImage.BeginInit();
        bitmapImage.StreamSource = memory;
        bitmapImage.CacheOption = BitmapCacheOption.OnLoad;
        bitmapImage.EndInit();

        return bitmapImage;
    }
}

This and other approaches to solving this problem can be found on this StackOverflow page.

How to implement IEnumerable in C#

When you create your own class, you may want an easy way to cycle though the data within the class.

Ever wondered how the ‘foreach’ works?

foreach (double val in MyClass)
{
    //do something with val
}

Something like this is only possible if we tell MyClass what values within MyClass we want to cycle through.

This is possible by implementing IEnumerable.

An example

Let’s say MyClass looks like this:

using System.Collections.Generic;

namespace MyNameSpace
{
    public class MyClass
    {
        public MyClass()
        {
            myData = new List<double>(new double[] { 3.4, 1.2, 6.2 });
        }

        private List<double> myData;
    }
}

What if we create an instance of MyClass, and want to run a foreach loop on it?

What we’d like is for the foreach to loop through the three values contained in myData.

But it doesn’t work yet. What’s missing?

error enumerator

The error reads: foreach statement cannot operate on variables of type ‘MyNamespace.MyClass’ because ‘MyNamespace.MyClass’ does not contain a public definition for ‘GetEnumerator’.

So how do we add the definition for GetEnumerator?

How to implement IEnumerable in C#

We do this by implementing the IEnumerator interface to our class.

using System.Collections.Generic;
using System.Collections;

namespace MyNamespace
{
    public class MyClass : IEnumerable
    {
        public MyClass()
        {
            myData = new List<double>(new double[] { 3.4, 1.2, 6.2 });
        }

        private List<double> myData;

        public IEnumerator GetEnumerator()
        {
            foreach(double val in myData)
            {
                yield return val;
            }
        }
    }
}

We have done three things:

  1. Added using System.Collections;
  2. Added : IEnumerable to let the compiler know that there’s something in the class we can iterate through
  3. Added method GetEnumerator(). This is what is called when we try to iterate through an instance of the class.

Note the use of the special keyword yield. This allows us to return an enumerated value without breaking from the GetEnumerator method.

So, how does this look now?

working-enumerator

Perfect!

Specify a return type with IEnumerable

Notice how we never specified anywhere that the enumerator would be returning a double?

By default, the enumerator returns an object. When we run our foreach loop, it is clever enough to implicitly cast each enumerated output as a double, since we specified that we wanted each item to be of type double.

What if another programmer, using our class, doesn’t know to expect a double, and they just use a var (or something else)?

We get an object instead – and an error.

enum-error-var

Can we tell GetEnumerator which data type it should be returning?

In your class, implement IEnumerable<T> instead. Then, there are two methods (not one) to implement.

using System.Collections.Generic;
using System.Collections;

namespace MyNamespace
{
    public class MyClass : IEnumerable<double> //Specify your return type in the angle brackets.
    {
        public MyClass()
        {
            myData = new List<double>(new double[] { 3.4, 1.2, 6.2 });
        }

        private List<double> myData;

        //Put your enumerator code in this method. Specify your return type in the angle brackets again here.
        public IEnumerator<double> GetEnumerator()
        {
            foreach(double val in myData)
            {
                yield return val;
            }
        }

        //This method is also needed, but usually you don't need to change it from this.
        IEnumerator IEnumerable.GetEnumerator()
        {
            return GetEnumerator();
        }
    }
}

Now, we should find that, even if we type ‘var’, Visual Studio knows what type to expect.

var-enum-working

This is the way that I would recommend. Specify your data types – it will help reduce bugs and mistakes later on in your project.

C#: Get DPI of screen

It used to be the case that most monitors had a screen resolution of 96DPI. When developing software, this meant developers could hard-code values when designing their interfaces.

This is no longer the case. The latest generation of screens and laptops are likely to have very high resolutions, perhaps greater than 200DPI (dots per inch).

At this resolution, fonts and windows would become uselessly small. This is my 13″ laptop display at 3200×1800:

desktop

As you can see, it is quite unusable. Windows can therefore scale up window elements to a more natural size.

Here is my screen at 200% scaling:

desktop2

What this means for developers

When we develop software, we must make sure it works well across a range of user environments, and this now includes testing for a range of screen resolutions.

Fortunately, modern UI libraries will automatically scale built-in elements according to the screen. For example, if you specify the width of a button to be 100 pixels in WPF, on my screen with a scaling of 200%, this button would automatically be rendered at 200 pixels.

However, you may find that some custom elements do not scale properly. You may also be using some ‘fudge factors’ in your code-behind (such as the C# file associated with a XAML file in WPF) that are constant. These may be written in such a way that your UI library doesn’t scale them.

For example, say you have a margin of 10 pixels written in your code-behind. How do you tell your program to scale up this value to any scaling factor?

Get the scaling factor in C#

This is quite easy. Simply calculate the following value in your code:

double factor = System.Windows.PresentationSource.FromVisual(this).CompositionTarget.TransformToDevice.M11;

Then, wherever you have a constant value in your code-behind, multiply it by factor, e.g.

button.Left = 10 * factor;

Output

The code above returns a value that is usually between 1 and 2.5. If the user’s system DPI settings are set to 200%, a value of 2.0 should be returned.

To calculate the scaling factor in terms of DPI, multiply by 96. For example, if the system settings are at 200%, the DPI is 196DPI. Note that this value can be changed by the user if they want the screen to appear smaller or larger, so the concept of an ‘inch’ doesn’t always rigorously apply.

How to move the Picasa database to another drive

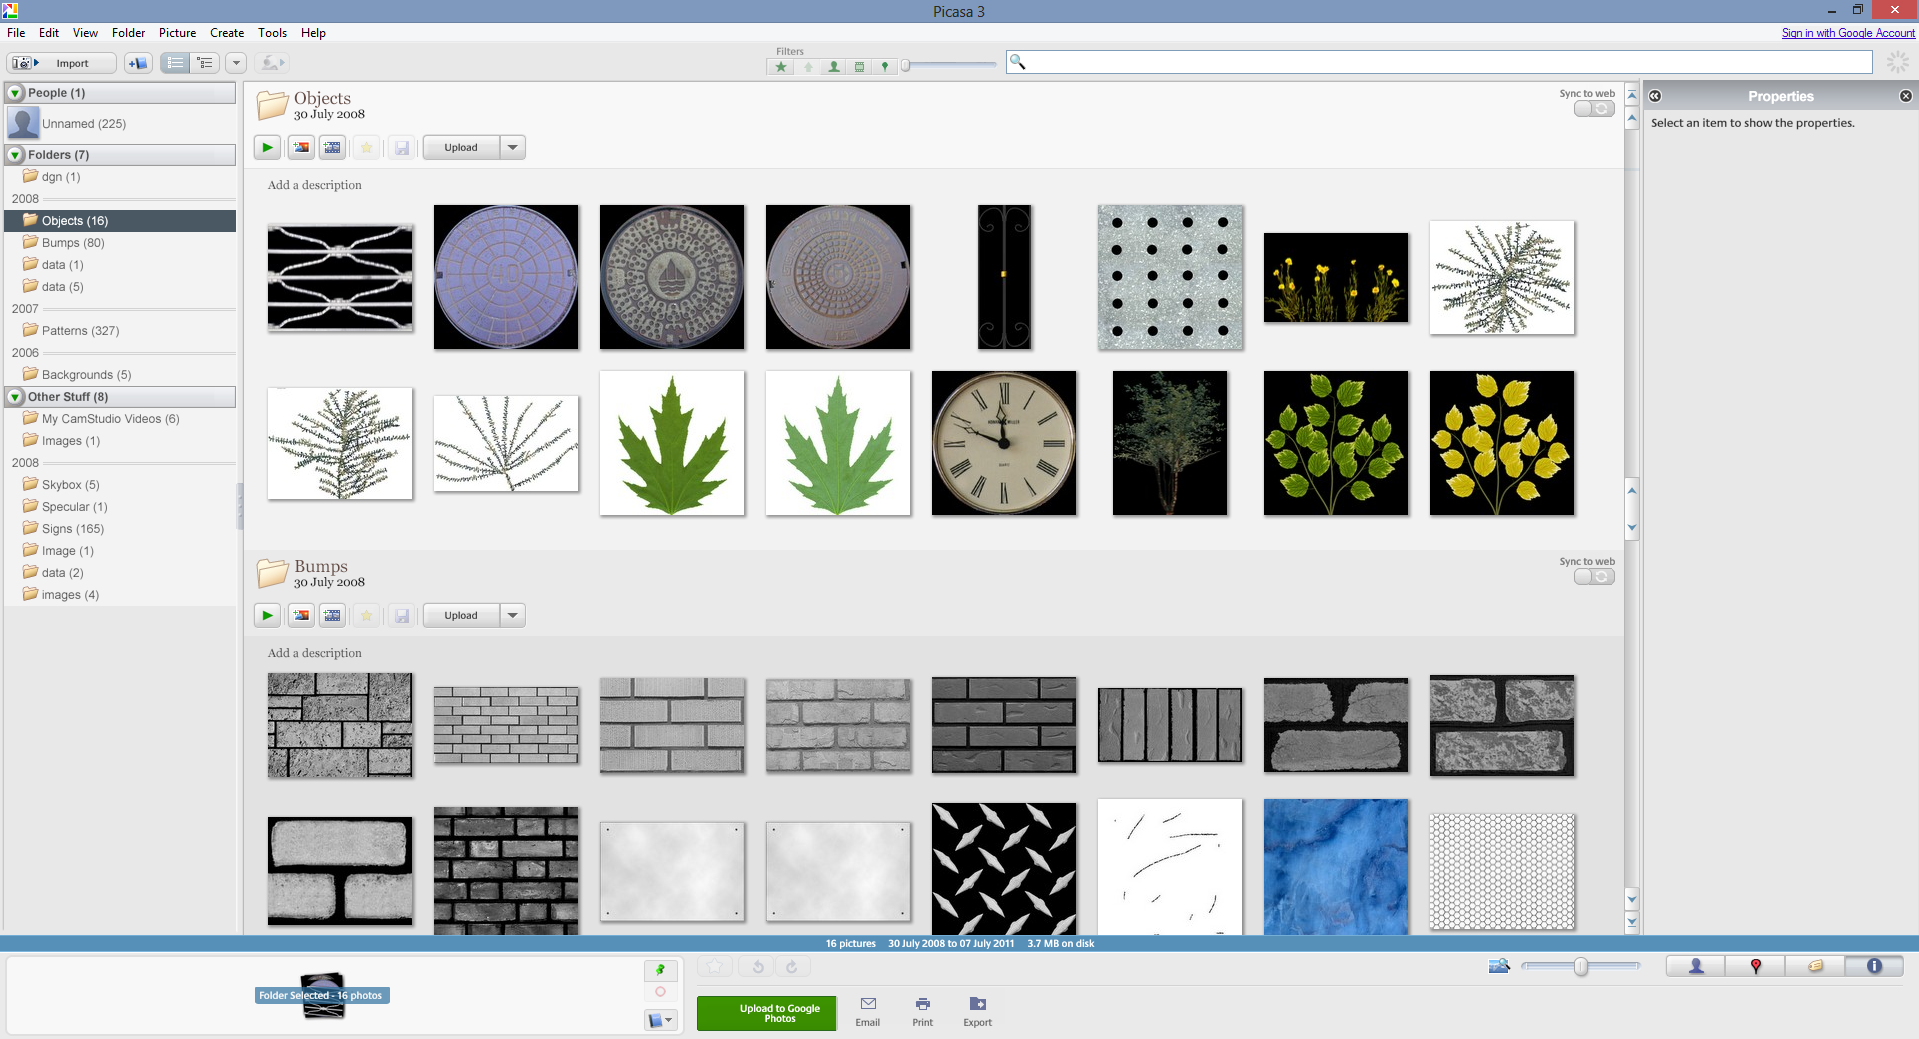
Picasa is an excellent photo library and batch photo editor. In the background, it uses a database to store information about your library. This article looks at the Picasa database, the problems with it, and how you can move the database anywhere else on your computer.

The Picasa database

In order to feel snappy, Picasa uses a database to cache the thumbnails and metadata of all the photos in your library. This data is saved in a folder in your AppData folder, called db3. To open the db3 folder:

  1. Open the Run dialog (Win+R), type %LocalAppData%, and press enter.
  2. Go to Google\Picasa2\db3

Troubleshooting the database (aka I ran out of space!)

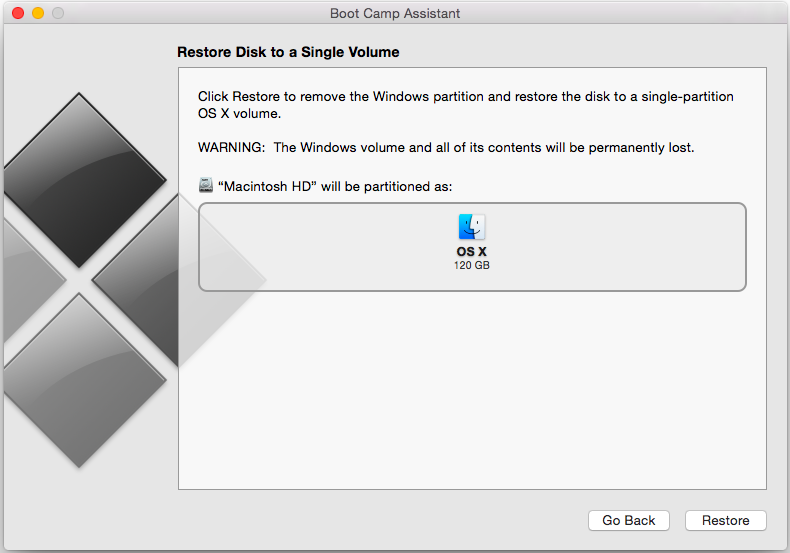
This database also saves thumbnails for all the faces found when Picasa scans for faces. The trouble is that, with large libraries, the database can grow to several gigabytes or even more. My computer’s C drive is only a 120GB SSD, and this space matters.

The other day, Picasa finally gave up on me. Every time I started it, it was sluggish, and crashed within minutes. Contemplating a full reinstall, I headed to Windows Explorer, and noticed that the ‘free space’ bar on the C drive had actually disappeared. This is what apparently happens when your drive is full, and my C drive was full. As in 0kB-free-full. My computer was somehow still running. I didn’t even know that was possible.

It was with some help from WinDirStat that I found the problem – the db3 folder was the only data hog I couldn’t account for. It would make sense that Picasa was crashing. It was trying to update the database into a full drive.

The solution therefore was to try and move the db3 folder to my second drive. But with no settings in Picasa to choose the database location, how can I do this (without breaking anything!)?

How to move the database

The Picasa db3 folder is saved within the LocalAppData folder. It is technically possible to change the location of this, but not recommended.

The solution instead is to use symbolic links.

What is a symbolic link?

A symbolic link is a ‘super shortcut’. Whereas regular shortcuts, take you to another location on your computer, a symbolic link will open the shortcut as if it’s not a shortcut at all.

We can move our db3 folder anywhere we want, and put a symbolic link in its place. When Picasa tries to access the contents of db3, Windows points Picasa to the actual location of db3 without Picasa actually knowing that it’s been redirected. So Picasa still works, and we have a spacious C drive. Win-win!

How to set up a symbolic link

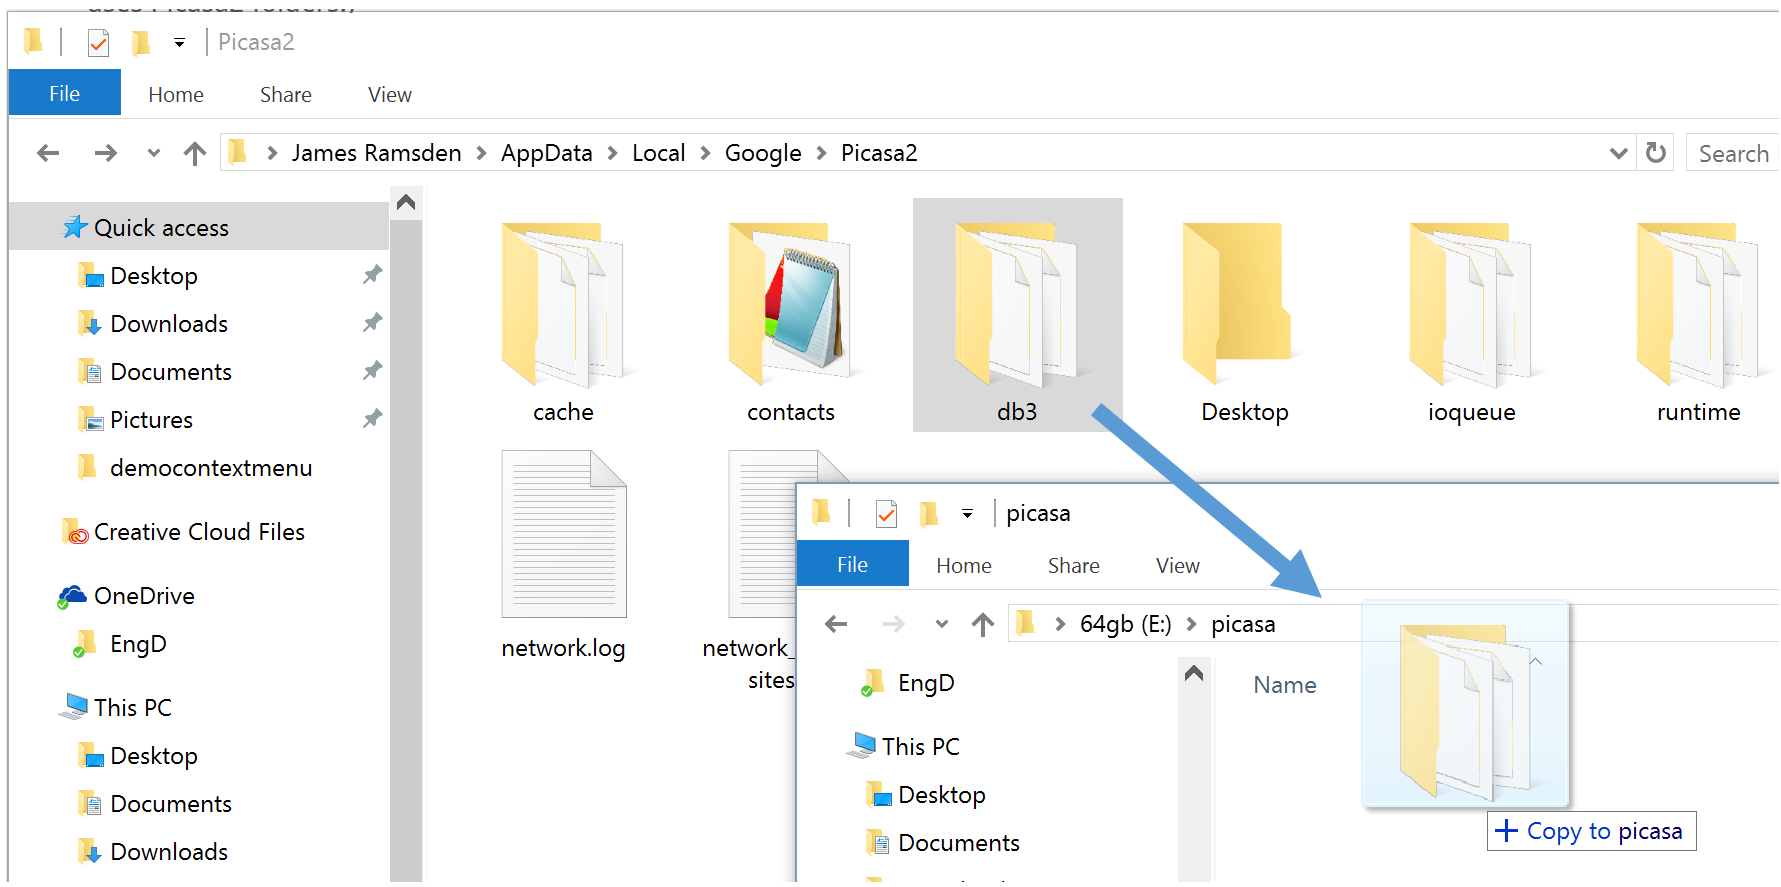
  1. Find your db3 folder. Open the Run dialog (Win+R), type %LocalAppData%, and press enter. Open Google\Picasa2. (That’s not a typo – Picasa 3 uses Picasa2 folders.)
  2. windows run dialog localappdata

  3. Copy the db3 folder to its new location.
  4. copy database files to new location

  5. When it’s finished copying, either delete or back-up the original db3 folder. Make sure there’s nothing called db3 in the Picasa2 folder anymore.
  6. In your start menu, type cmd. Command Prompt should appear. Now, right-click it, and select Run as administrator.
  7. command prompt run as administrator from start menu

  8. This is the hard bit! In Command Prompt, I would type the following command:
    mklink /J %LocalAppData%\Google\Picasa2\db3 E:\picasa\db3

    You would type something similar. The only bit that should change is the last bit, which is the location of where you have moved the db3 folder to.

  9. create symbolic link in command prompt
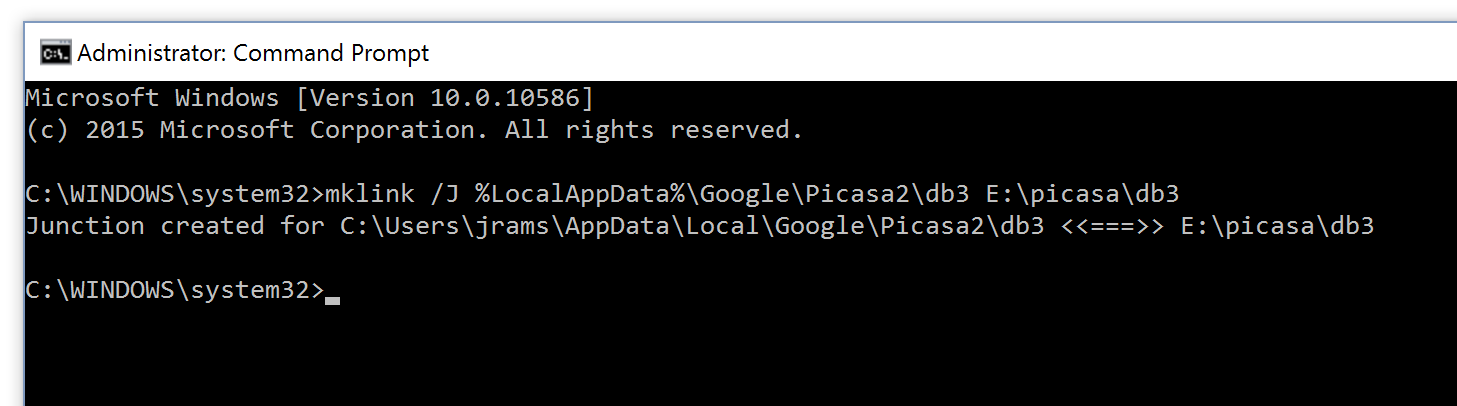
    Hit enter to create the link.

All set up – let’s check it’s working

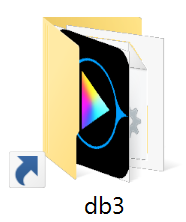
And that’s it! In your Picasa2 folder, you should see that db3 has reappeared, but with a small arrow.

symbolic link folder icon

And if we go into this folder, watch what happens…

successful symbolic link folder address to Picasa database

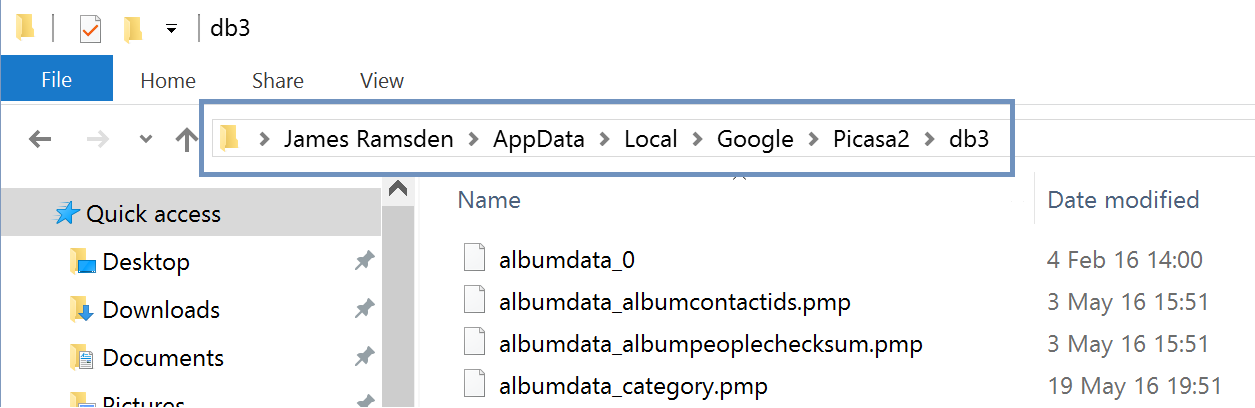
Notice how the file address mimicks the db3 folder actually being within the Picasa2 folder. This is why it works for Picasa – because Picasa is now able to reference the files it needs in the place it thinks it needs them.

We can now load Picasa and carry on as normal. Nice!

picasa-screenshot

What if it didn’t work?

For a more detailed guide on symbolic links, I recommend the How To Geek’s guide.

If you are struggling to set up the symbolic link, there are programs available which provide a nicer user interface than the Command Prompt. Check the above guide for more information.

How do I delete the symbolic link?

To put things back to how they were, it’s as easy as deleting the symbolic link.

  1. Find your Picasa2 folder again. Delete the symbolic link called db3.
  2. Copy the folder called db3 from your other drive back into the Picasa2 folder.

Back up your Picasa database

Needless to say, when you’re moving all this data around, you want to keep a backup of db3 safe. Especially, odds are if you’re reading this guide, you’re not quite sure what you’re doing…

If something goes wrong, just copy your backed-up copy of db3 back into the Picasa2 folder.

If something goes really wrong, it’s not the end of the world if you lose your db3 folder. All it means is Picasa has lost its database, but you haven’t lost your photos.

The only real inconvenience is that Picasa will be ‘like new’ when you start it again. So it will have to rebuild its database, and this takes time. Especially the facial recognition, which can take days or even weeks for a large library.

If you have a very large library, you might want to periodically back-up your db3 folder. On occasion, when Picasa crashes, the db3 folder can become corrupted, and it’s more likely to crash with a large library. A corrupted library can cause Picasa to fail completely, but it can also result in performance and stability issues. If this happens, try replacing the db3 folder with your backup of db3. This means that, if you do have to delete and replace your db3 folder, it doesn’t have to rebuild the database from scratch.

Why is the db3 folder so large?

I have to admit, I thought my computer was having a blip when it showed the folder in the gigabytes. But it does actually make sense.

For every file in the Picasa library, it stores thumbnails of different sizes. This means we can move through Picasa at lightning speed because the program doesn’t have to open every file it wants to render in its library. These thumbnails are images in themselves, and this does soon add up.

But what really seems to take up space is the facial recognition. The logic is the same – for every face it recognises, it creates a thumbnail. There is also further work to do in building up a profile for each person, so that Picasa can try to match future faces found against existing people.

Picasa can allegedly function with libraries right into the millions. I would hate to see the database size for this though. Because of the overheads of facial recognition, both in terms of storage space and processing, it has been advised that facial recognition is turned off for very large libraries.

And you still use Picasa because…?

Google have decided to drop Picasa in favour of Google Photos. While the web is great for sharing and access-anywhere, it will never replace the performance and functionality that you get with native programs.

Without shelling out for Adobe Lightroom, I haven’t found an alternative to Picasa that I like.

If Google also decide to stop publishing the Picasa installer, I have archived a copy here.

C#: Simple BackgroundWorker example

Here is a simple example on how to use the BackgroundWorker class in C#.

What is the BackgroundWorker?

Are you writing a Windows program with some heavy calculations going on in the background? The BackgroundWorker class will take those calculations and put them in a separate thread, helping to prevent your UI from freezing up.

Multi-threaded programming is tricky at the best of times. The fundamental problem is that you don’t want two threads trying to access the same bit of memory at once. The BackgroundWorker simplifies a lot of the work you would otherwise need to do yourself, but it can still be difficult to set it up.

BackgroundWorker example

This example downloads an image from the Internet and saves it to the user’s desktop. It does this 10 times (so we can see how to monitor progress). The image address is provided by the user in a WPF form, and we report the number of files downloaded in a progress bar on that form.

The form stays responsive the whole time, and doesn’t lock up while the files are being downloaded – something which would happen if we didn’t create our own thread.

background worker c# example program UI

Example code

Create a new C# WPF project in Visual Studio.

XAML

We need to create a form with a textbox, a button, a progress bar and a label. This isn’t essential to the BackgroundWorker, but it will help create our example program.

If you aren’t familiar with WPF or XAML, XAML is the markup language used to create interfaces in WPF, much like HTML to web development. Here is the contents of my MainWindow.XAML used to create the form above.

<Window x:Class="BackgroundWorkerExample.MainWindow"
        xmlns="http://schemas.microsoft.com/winfx/2006/xaml/presentation"
        xmlns:x="http://schemas.microsoft.com/winfx/2006/xaml"
        xmlns:d="http://schemas.microsoft.com/expression/blend/2008"
        xmlns:mc="http://schemas.openxmlformats.org/markup-compatibility/2006"
        xmlns:local="clr-namespace:BackgroundWorkerExample"
        mc:Ignorable="d"
        Title="MainWindow" Height="350" Width="525">
    
    <DockPanel>
        
        <DockPanel LastChildFill="True" DockPanel.Dock="Top" Margin="10">
            <Label DockPanel.Dock="Left" Width="100">URL</Label>
            <Button Name="btnGo" Click="btnGo_Click" DockPanel.Dock="Right" Width="100">Go</Button>
            <TextBox Name="tbURL"/>
        </DockPanel>
        
        <DockPanel LastChildFill="True" DockPanel.Dock="Top" Margin="10">
            <Label DockPanel.Dock="Left" Width="100">Progress</Label>
            <ProgressBar DockPanel.Dock="Bottom" Name="progBar" Value="0" />
        </DockPanel>

        <DockPanel LastChildFill="True">
            <Label DockPanel.Dock="Top">Status</Label>
            <ScrollViewer><Label Name="lblStatus" /></ScrollViewer>
        </DockPanel>
        
    </DockPanel>
    
</Window>

C# code

The actual code goes into MainApplication.xaml.cs. Here is the contents of my file.

It looks pretty long, but it’s not so bad. A lot of it is actually comments…

using System;
using System.Windows;
using System.ComponentModel;
using System.IO;

namespace BackgroundWorkerExample
{
    /// <summary>
    /// Interaction logic for MainWindow.xaml
    /// </summary>
    public partial class MainWindow : Window
    {
        public MainWindow()
        {
            InitializeComponent();
        }

        private void btnGo_Click(object sender, RoutedEventArgs e)
        {
            lblStatus.Content = "";

            BackgroundWorker worker = new BackgroundWorker();

            //BackgroundWorker is event-driven. We use events to control what happens
            //during and after calculations.
            //First, we need to set up the different events.
            worker.DoWork += Worker_DoWork;
            worker.ProgressChanged += Worker_ProgressChanged;
            worker.WorkerReportsProgress = true;
            worker.RunWorkerCompleted += Worker_RunWorkerCompleted;

            //Then, we set the Worker off. 
            //This triggers the DoWork event.
            //Notice the word Async - it means that Worker gets its own thread,
            //and the main thread will carry on with its own calculations separately.
            //We can pass any data that the worker needs as a parameter.
            worker.RunWorkerAsync(tbURL.Text);
        }

        private void Worker_DoWork(object sender, DoWorkEventArgs e)
        {
            //DoWork is the most important event. It is where the actual calculations are done.

            System.Net.WebClient client = new System.Net.WebClient();

            for (int i = 0; i < 10; i++)
            {
                //We pass data to the worker using the Argument property.
                //Don't try to read data from the form directly.
                string url = (string)e.Argument;

                //download image
                byte[] imageStream = client.DownloadData(url);
                MemoryStream memoryStream = new MemoryStream(imageStream);
                System.Drawing.Image img = System.Drawing.Image.FromStream(memoryStream);

                //save image to computer
                string desktop = System.Environment.GetFolderPath(Environment.SpecialFolder.Desktop);
                img.Save(desktop + @"\image " + i.ToString() + ".jpg", System.Drawing.Imaging.ImageFormat.Jpeg);

                //Now that the image is saved, we can update the Worker's progress.
                //We do this by going back to the Worker with a cast
                int progress = (i + 1) * 10; //Between 0-100
                ((BackgroundWorker)sender).ReportProgress(progress);
            }

            //When finished, the thread will close itself. We don't need to close or stop the thread ourselves.  
        }

        private void Worker_ProgressChanged(object sender, ProgressChangedEventArgs e)
        {
            //This method is called whenever we call ReportProgress()
            //Note that progress is not calculated automatically. 
            //We need to calculate the progress ourselves inside Worker_DoWork.
            //This method is optional.

            lblStatus.Content += e.ProgressPercentage.ToString() + "% complete. \n";
            progBar.Value = e.ProgressPercentage;
        }

        private void Worker_RunWorkerCompleted(object sender, RunWorkerCompletedEventArgs e)
        {
            //This method is optional but very useful. 
            //It is called once Worker_DoWork has finished.

            lblStatus.Content += "All images downloaded successfully.";
            progBar.Value = 0;
        }


    }
}

Running the program

Here is a picture of a satsuma.

satsuma-mandarin[1]

Here is its URL:

http://james-ramsden.com/wp-content/uploads/2016/05/satsuma-mandarin1.jpg

If we put this URL into this program, we should be able to download this image 10 times over onto our desktop.

backgroundworker c# example program running

Here it is downloading the images, depositing lots of satsumas on my desktop. Or are they mandarins? I don’t really know.

mandarins satsumas

You may also want to try downloading some larger images that take longer to download. The BackgroundWorker works as expected. The interface is updated with each successful download. (If we didn’t use the BackgroundWorker, the interface would freeze until all 10 had been downloaded.) And the interface remains responsive the entire time.

Further reading

There are many ways to multithread in .NET, and the correct choice depends on what you are trying to do.

For instance, I recently had heavy calculations on a problem in Grasshopper, on entirely back-end code. This was dealt with by using Parallel.ForEach loops, which converts a ForEach loop into a multi-threaded equivalent.

If you’re looking to calculate something as quickly as possible using all the cores on your machine, then this is a good place to start. This approach depends on your task being able to be divided up into independent subtasks, so that each subtask can be calculated separately. (If one subtask depends on the output of another, it is going to be difficult to multithread.)

All in all, multithreading is a big topic, with many approaches possible, and there are many ways you can unfortunately get it wrong. It’s not something you are going to master in a day. But it’s worth spending the time on it, and it’s very rewarding when you do get it working 🙂

Git: Create a new branch and push to Bitbucket

For a team project, we are using Git and Bitbucket to manage our repository.

The setup

Somebody else has started a new project in a new repository. This repository can be seen on BitBucket, with a single master branch.

I want to download this repository to my own computer. I want to work on the project in my own branch, periodically saving the branch back to the repository for safety. When I’m finished, I want to merge my branch back with the master branch.

How do I do this?

Here is my cheatsheet for creating a new branch from the master branch on an existing project, working on it, then pushing my branch back to the repository.

Git cheatsheet

In Windows Explorer, create or open a folder to hold your various Git projects. In it, right-click and Git Bash Here.

Clone from the server to your computer:

git clone https://bitbucket.org/your-teamname/project-name

This will create a new folder on your computer with the repository files inside.

Change directory to go inside the newly created project folder:

cd project-name

Create a branch:

git branch JR-branch

Use checkout to switch to a branch:

git checkout JR-branch

Add any new files:

git add * 

Commit any changes. Note that nothing is uploaded yet!

git commit -m "comment"

Upload (“push“) your changes to the repository:

git push origin JR-branch

You should now see your branch on your Bitbucket project.

References

The ‘no deep shit’ guide to Git – highly recommended

Restore a Mac with Windows installed to factory settings

Are you looking to wipe your Mac back to factory settings, and have a Windows installation you also want removing? This guide will show you how to restore a Mac back to its as-new state, with the Bootcamp Windows installation and its partition gone.

This will obviously remove all of your personal data, so make sure you’ve backed everything up you want to keep, because it will all be gone by the end. This is a drastic solution that I only recommend if, for example, you are selling your computer.

There is no one-click solution to wipe and restore your Mac. Instead, here are the steps you need.

This process assumes you have OS X Yosemite installed, though the process should be similar for other modern versions of OS X.

Step 1: Remove Windows

We can use Boot Camp Assistant to remove Windows first. This will remove the Windows partition, and restore your Mac back to its one-partition state. Your Mac data and istallation will be untouched, and the free space created will be added to the Mac partition.

Boot OS X. Run Boot Camp Assistant. Click through to the following screen.

Boot camp remove windows installation option

Select Remove Windows 7 or later version and click Continue.

The next screen should show how your hard drive will look once the Windows partition has been returned to the Mac partition. Click Restore.

Screen Shot 2016-05-11 at 14.13.33

This should not take long – it took seconds on my Air.

Screen Shot 2016-05-11 at 14.14.52

And that’s it! Windows is now gone.

Step 2: Erase your Mac partition

We want to force OS X to do a clean installation, not to just ‘repair’ or ‘restore’ itself. The best way to do this is to erase OS X and then re-install it.

Erasing your partition is quite safe – you’re not going to brick your machine. This is because your Mac should have a separate hidden ‘recovery’ partition, so even when you erase your Mac partition, your computer will still be able to re-install itself with a fresh copy of OS X later on.

To erase your Mac partition, restart your computer, and hold Cmd+R while it restarts. The following screen should appear:

yosemite-restart-recovery_mode-reinstall_os_x-1188x804

Select Disk Utility.

On the left, select your Mac partition – i.e. the partition where OS X is installed. Select the Erase tab towards the right. Then, under Format, select Mac OS Extended (Journaled). Finally, click Erase.

This should only take a few seconds. Once finished, we can then install a clean copy of OS X on our Mac partition.

Step 3: Reinstall OS X

You will need an internet connection for this, as OS X will be downloaded as it installs. (Older versions of OS X may require physical media.) You will also need your Apple ID.

Quit the Disk Utility. You should be returned back to the OS X Utilities screen from above. Select Reinstall OS X.

Click through the next few windows. Then, the process should start. On my (not very fast) connection, it took a few hours to download and reinstall OS X.

Done!

The installer should automatically restart your Mac once finished.

Having problems? Here are a few guides that explain the process in more detail:

Digital Trends: How to restore a mac to factory settings
BleepingComputer.com: forum post
MacWorld: How to restore your Mac
Apple support: remove Windows from your Mac

C#: Recursively get all files in a folder and its subfolders

How to recursively get all files in a folder, including files contained within subfolders.

Or, in other words, how to find every file contained within a parent folder, and within any folders inside the parent folder.

The easy way

There is a method built into .NET, though it is buried as an overload, so you may not have known it was there until someone points it out to you…

foreach (string file in System.IO.Directory.GetFiles(
    parentDirectory, "*",SearchOption.AllDirectories))
{
    //do something with file
}

This loops through every file contained within the folder, including all files contained within any subfolders. Each loop returns a string of the address of each file.

The second parameter is a search filter. The value above of "*" simply means “return anything”. We could filter for Word documents by changing this to "*.docx", for example.

The alternative way

Microsoft offered a solution of their own in this old article, which provides an interesting iterative approach.

I have modified the above method slightly to also include files immediately within the parent directory. Microsoft’s solution currently doesn’t do this

The code below adds all filepaths to a List. If you wish to do something else, you need to change what happens within DoAction(). You might actually want to give DoAction a more sensible name too, depending on what your action is.

        List<string> files = new List<string>();

        private void getFilesRecursive(string sDir)
        {
            try
            {
                foreach (string d in Directory.GetDirectories(sDir))
                {
                    getFilesRecursive(d);
                }
                foreach (var file in Directory.GetFiles(sDir))
                {
                    //This is where you would manipulate each file found, e.g.:
                    DoAction(file);
                }
            }
            catch (System.Exception e)
            {
                MessageBox.Show(e.Message);
            }
        }

        private void DoAction(string filepath)
        {
            files.Add(filepath);
        }

Get file types supported by BitmapImage

The BitmapImage class is the preferred way of handing image files in a WPF application.

A great advantage of BitmapImage is that it can open and handle a wide range of image types. It uses the Windows Imaging Component, which allows third parties to incorporate custom image formats into BitmapImage.

Ultimately, what this means is that, quite amazingly, I am able to open fancy file types like Nikon’s NEF raw format in a way that feels native in my C# applications.

But this presents a challenge. If a user wants to open an image in my application, how do I know if BitmapImage can handle it?

I could use a try-catch, but this is quite inefficient. And since BitmapImage is extensible, I can’t just check the file extension against a hard-coded list. I need to be able to check what file types are supported on a particular machine.

I presented this problem on this Stack Overflow post, where NineBerry provided a solution.

How the solution works

The gist of NineBerry’s solution is that we look in the registry for any third party codecs that help BitmapImage to open any additional file types. Once we have found them, we can then read which file extensions are typically associated with these file types.

NineBerry’s solution doesn’t find natively supported file types. We can use Microsoft’s documentation to hard-code these natively-supported types.

Then, when a user wants to open a file, we can compare its file extension with the extensions we found above.

Note that this isn’t fool-proof. A file with a supposedly valid extension may still not open. The file may be corrupted, have an incorrect extension, or the extension may have multiple uses. Still, this method should catch the vast majority of unsuitable files, and help to speed up your program.

How to use the class in your program

I took NineBerry’s code and turned it into a class with a few useful methods and properties. Here you can…

Check if a filename contains a BitmapImage-suitable file extension

string path = "myImage.jpg";
BitmapImageCheck bic = new BitmapImageCheck();
bool imageValid = bic.IsExtensionSupported(path); //returns true

path can be a file name with extension, an extension by itself, or a full address.

Get a list of supported file extensions

Get a list of file extensions provided natively, provided by third party decoders, or these two lists combined.

BitmapImageCheck bic = new BitmapImageCheck();
string[] supportedExtensions = bic.AllSupportedExtensions;

Get information about the decoders found on your system

Use the ToString() method to get information about where support for different file extensions is coming from.

BitmapImageCheck bic = new BitmapImageCheck();
MessageBox.Show(bic.ToString());

bitmapimage image extensions messagebox

C# class to get supported file types

Copy the code below into a new C# file in your project. The only thing you might want to change is the namespace.

using System;
using System.Collections.Generic;
using System.Linq;
using Microsoft.Win32;

namespace WpfApplication1.Classes
{
    /// <summary>
    /// Provides methods for checking whether a file can likely be opened as a BitmapImage, based upon its file extension
    /// </summary>
    public class BitmapImageCheck : IDisposable
    {
        #region class variables
        string baseKeyPath;
        RegistryKey baseKey;
        private const string WICDecoderCategory = "{7ED96837-96F0-4812-B211-F13C24117ED3}";
        private string[] allExtensions;
        private string[] nativeExtensions;
        private string[] customExtensions;
        #endregion

        #region constructors
        public BitmapImageCheck()
        {
            if (Environment.Is64BitOperatingSystem && !Environment.Is64BitProcess)
            {
                baseKeyPath = "Wow6432Node\\CLSID";
            }
            else
            {
                baseKeyPath = "CLSID";
            }
            baseKey = Registry.ClassesRoot.OpenSubKey(baseKeyPath, false);
            recalculateExtensions();
        }
        #endregion

        #region properties
        /// <summary>
        /// File extensions that are supported by decoders found elsewhere on the system
        /// </summary>
        public string[] CustomSupportedExtensions
        {
            get
            {
                return customExtensions;
            }
        }

        /// <summary>
        /// File extensions that are supported natively by .NET
        /// </summary>
        public string[] NativeSupportedExtensions
        {
            get
            {
                return nativeExtensions;
            }
        }

        /// <summary>
        /// File extensions that are supported both natively by NET, and by decoders found elsewhere on the system
        /// </summary>
        public string[] AllSupportedExtensions
        {
            get
            {
                return allExtensions;
            }
        }
        #endregion

        #region public methods
        /// <summary>
        /// Check whether a file is likely to be supported by BitmapImage based upon its extension
        /// </summary>
        /// <param name="extension">File extension (with or without leading full stop), file name or file path</param>
        /// <returns>True if extension appears to contain a supported file extension, false if no suitable extension was found</returns>
        public bool IsExtensionSupported(string extension)
        {
            //prepare extension, should a full path be given
            if (extension.Contains("."))
            {
                extension = extension.Substring(extension.LastIndexOf('.') + 1);
            }
            extension = extension.ToUpper();
            extension = extension.Insert(0, ".");

            if (AllSupportedExtensions.Contains(extension)) return true;
            return false;
        }
        #endregion

        #region private methods
        /// <summary>
        /// Re-calculate which extensions are available on this system. It's unlikely this ever needs to be called outside of the constructor.
        /// </summary>
        private void recalculateExtensions()
        {
            customExtensions = GetSupportedExtensions().ToArray();
            nativeExtensions = new string[] { ".BMP", ".GIF", ".ICO", ".JPEG", ".PNG", ".TIFF", ".DDS", ".JPG", ".JXR", ".HDP", ".WDP" };

            string[] cse = customExtensions;
            string[] nse = nativeExtensions;
            string[] ase = new string[cse.Length + nse.Length];
            Array.Copy(nse, ase, nse.Length);
            Array.Copy(cse, 0, ase, nse.Length, cse.Length);
            allExtensions = ase;
        }

        /// <summary>
        /// Represents information about a WIC decoder
        /// </summary>
        private struct DecoderInfo
        {
            public string FriendlyName;
            public string FileExtensions;
        }

        /// <summary>
        /// Gets a list of additionally registered WIC decoders
        /// </summary>
        /// <returns></returns>
        private IEnumerable<DecoderInfo> GetAdditionalDecoders()
        {
            var result = new List<DecoderInfo>();

            foreach (var codecKey in GetCodecKeys())
            {
                DecoderInfo decoderInfo = new DecoderInfo();
                decoderInfo.FriendlyName = Convert.ToString(codecKey.GetValue("FriendlyName", ""));
                decoderInfo.FileExtensions = Convert.ToString(codecKey.GetValue("FileExtensions", ""));
                result.Add(decoderInfo);
            }
            return result;
        }

        private List<string> GetSupportedExtensions()
        {
            var decoders = GetAdditionalDecoders();
            List<string> rtnlist = new List<string>();

            foreach (var decoder in decoders)
            {
                string[] extensions = decoder.FileExtensions.Split(',');
                foreach (var extension in extensions) rtnlist.Add(extension);
            }
            return rtnlist;
        }

        private IEnumerable<RegistryKey> GetCodecKeys()
        {
            var result = new List<RegistryKey>();

            if (baseKey != null)
            {
                var categoryKey = baseKey.OpenSubKey(WICDecoderCategory + "\\instance", false);
                if (categoryKey != null)
                {
                    // Read the guids of the registered decoders
                    var codecGuids = categoryKey.GetSubKeyNames();

                    foreach (var codecGuid in GetCodecGuids())
                    {
                        // Read the properties of the single registered decoder
                        var codecKey = baseKey.OpenSubKey(codecGuid);
                        if (codecKey != null)
                        {
                            result.Add(codecKey);
                        }
                    }
                }
            }

            return result;
        }

        private string[] GetCodecGuids()
        {
            if (baseKey != null)
            {
                var categoryKey = baseKey.OpenSubKey(WICDecoderCategory + "\\instance", false);
                if (categoryKey != null)
                {
                    // Read the guids of the registered decoders
                    return categoryKey.GetSubKeyNames();
                }
            }
            return null;
        }

        #endregion


        #region overrides and whatnot

        public override string ToString()
        {
            string rtnstring = "";

            rtnstring += "\nNative support for the following extensions is available: ";
            foreach (var item in nativeExtensions)
            {
                rtnstring += item + ",";
            }
            if (nativeExtensions.Count() > 0) rtnstring = rtnstring.Remove(rtnstring.Length - 1);

            var decoders = GetAdditionalDecoders();
            if (decoders.Count() == 0) rtnstring += "\n\nNo custom decoders found.";
            else
            {
                rtnstring += "\n\nThese custom decoders were also found:";
                foreach (var decoder in decoders)
                {
                    rtnstring += "\n" + decoder.FriendlyName + ", supporting extensions " + decoder.FileExtensions;
                }
            }

            return rtnstring;
        }

        public void Dispose()
        {
            baseKey.Dispose();
        }
        #endregion
    }
}

Get more information about the decoders on your system

The public methods implemented were intended to make available a basic level of file extension information.

For more advanced tasks, some of the private methods in the class could be made public. It is possible to expose further information about each codec, such as their locations in the registry.

Map: How I got from the UK to China by train

This slideshow requires JavaScript.

This is quite cool – just going through some old files and I found this map from my travels back in 2010. It’s a map of the route I took to get from York in the UK to Beijing near the Chinese coast – entirely by train.

The map is an enormous PNG file. I travelled with no technology (how much things have changed now!) and used an A4 folder to carry all of my information with me. The map is nothing more sophisticated than lots of screen grabs of Google Maps stitched together, then I drew the route on the resulting image in Paint. The red line shows the route. Red dots are stopping stations. Black dots are where I changed trains. The map may not look flashy, but it served its purpose, and it showed the route clearly when printed at 300dpi.

The entire journey took about three weeks including around 7 days of sight-seeing along the way. The bulk of the journey mileage was handled by the Trans-Mongolian train, which is a 6-night direct service between Moscow and Beijing. Travelling through Europe was done with a combination of day and night trains. The Man in Seat 61 provides an excellent introduction to the different ways to get to Moscow from the UK – I chose the slightly awkward route via St Petersburg to avoid needing an expensive Belarusian visa.

We normally think of the world as a very big place, where the only way to travel long distance is by air. There is something very humbling about going by train though, to think that there are two strips of carefully engineered steel running almost continuously half way around the world. To see every town along the way, see the timezones, climates, geography and flora changing along the way, really gives a sense of scale of the world that can’t be felt when travelling by plane.

Here is the map. To see the full-size version, it’s best to open it on your computer. Right-click here, and choose ‘save image as’. (Note it’s a 10MB image if you’re on a slow connection!)

Map of Europe to Asia train route