Something I’ve found in my archives – one of the first projects I did when starting my EngD in 2013. We had received a domed roof from the architect, and we had been asked to optimise the form and experiment with different gridding options.
The problem was that the model we received was nothing more than a collection of lines arranged into one grid pattern and lots of little mesh faces between these lines – no NURBS surfaces or anything else nice to work with! The challenge was therefore threefold: recreate the NURBS surface, manipulate the surface into a structurally more efficient form (think lots of non-zero Gaussian curvature) and then apply a range of grids to it.
In hindsight, the methodology presented below certainly isn’t the most efficient or effective, but the important thing (as is usually the case in engineering) is that it got the job done!


Steps:
Use ‘DupBorder’ to extract edge.

In top view, manually draw a series of guidelines (‘Curve’) in the same plane as the extracted edge curve.

Use ‘Project’ to project these lines up to the surface of the original model. You should now have roughly recreated the 3D shape of the dome. Split the base curve into two halves such that all lines are open curves and form a series of arches. Rebuild each line to sensible values. (I.e. 20 points is much more sensible than 279!)


‘Loft’ all these curves to create a surface. Ensure to select arches in order.


If you want to make tweaks to the surface, select ‘PointsOn’ and adjust the shape by hand. If the points aren’t in suitable places, you can either delete the curve and re-loft with a different number of control points, or you can ‘Rebuild’ the surface.

We now have our surface!
Create a new layer, “Edge”, and copy the two halves of the edge curve to it. Join them back into one curve. Create a second layer, “NURBS”, and copy the lofted surface to it.
Turn everything off except the Edge layer. Using 3DFace, manually draw some triangles to create a basic topology for the grid layout. Use PointsOn to move them about. Join them together.

There is no right answer on how you should arrange the triangles. The arrangement of these triangles dictates the layout of the eventual panelisation, and it will take a couple of attempts to get something that you like. Try arranging them roughly into hexagons (i.e. clusters of 6), or in areas of high curvature, into pentagons (i.e. clusters of 5).
To convert this coarse grid into a fine one, install WeaverBird for Grasshopper. I wrote a script that splits the triangles into small triangles, then joins them to the edges. Take a look at the image below (click for larger version).
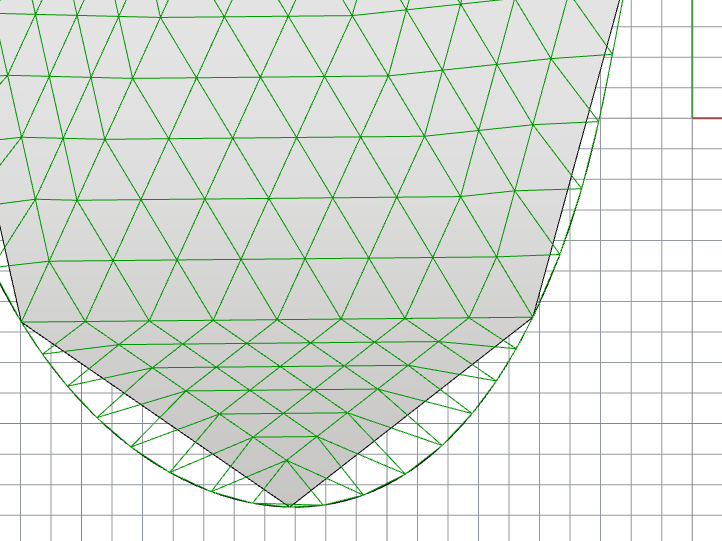
In the above file, there’s a C# component that does the jump between the second and third images below, where the fine triangles are ‘stretched’ to meet the edge. You can try and recreate this yourself, or if you message/comment, I’ll try and dig it out and upload it here 🙂


We now have our grid, but it’s a little flat! Create a new layer, “Flat grid” and bake this new mesh to it. Now we’ll use some software we’ve developed in SMART Solutions to inflate this grid onto the lofted surface we created earlier.
Install and run SMART Form. Under Geometry, add “Flat Grid”. Under constraints, add “Edge” and “NURBS”. Under Advanced, set slack length to “Average…”. Under ‘Relax’ turn the damping to around 0.1. If there are areas that fail to form, turn the slack length down or turn up the damping.
Enjoy watching it bounce around, and eventually you should get something like…
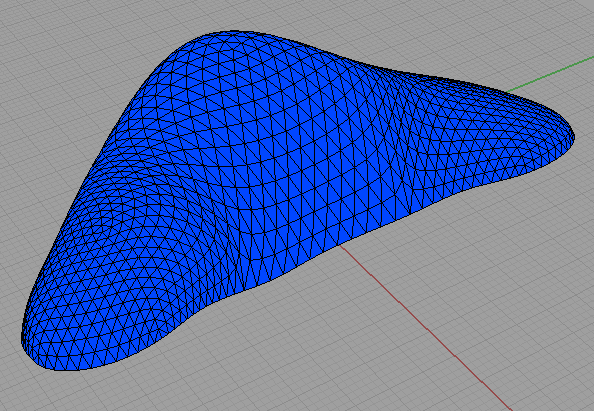
Nice!
As I mentioned earlier, on the first attempt you’ll probably have something that doesn’t look ‘right’. Maybe the triangles in some areas are too big while in others they clump up, when what we probably want is something that looks a little more uniform. The trick I found was to play with different configurations of the large grid, especially with locations of ‘hexagons’ and ‘pentagons’.
can you send me the grasshopper file?
Ask and you shall receive – I’ve just found it!
http://james-ramsden.com/download/snap-grid-to-curve-grasshopper/
I’ve made a token attempt at tidying it up, but if you have any questions please don’t hesitate to ask.