This script allows you to render Grasshopper objects without baking, and also to create a batch of frames in one go. Very handy, and works well!
http://www.grasshopper3d.com/forum/topics/renderanimation-by-giulio-piacentino-updated
This script allows you to render Grasshopper objects without baking, and also to create a batch of frames in one go. Very handy, and works well!
http://www.grasshopper3d.com/forum/topics/renderanimation-by-giulio-piacentino-updated
Honeybee is a plugin for Grasshopper for daylight analysis, created by Mostapha Sadeghipour Roudsari. Honeybee links to third party analysis tools in order to do its calculations. So in order to install Honeybee, we also need to install these tools. This can be a little fiddly – this guide shows how I got round it. Continue reading How to install Honeybee for Grasshopper
A quick guide to reading Excel files into Grasshopper for Rhino.
1) Install the LunchBox plugin for Grasshopper
2) Open the Excel file you want to read, and minimise it to the taskbar.
3) In Grasshopper, find the component called Excel Reader. Add your worksheet, column and row values in numerical format. Set ‘read’ to true.
Ladybug is a free plugin for Grasshopper that uses the EnergyPlus engine to provide a range of environmental calculations and visuals for input geometry. This guide will show you how to install Ladybug.
If you are looking to install the more recent Ladybug + Honeybee components for Grasshopper, this guide will help you too.
Firstly, you need Rhino 5. Rhino 4 won’t do! You can download a free trial here.
You also need Grasshopper, a free plugin for Rhino. Download the latest version here.
Then you need GHPython. Download it, and unzip it. In GH, open your components folder:
This should open a folder in a location like C:\Users\jramsden\AppData\Roaming\Grasshopper\Libraries. Paste GHPython.gha into this folder.
Visit the Ladybug page, take a read of it and have a look at the video. Then download the unlocked version from the page (or quicklink here). This should download a zip folder. Unzip this folder (the next step won’t work if you don’t unzip it first!).
Within the folder should be about 28 .ghuser files. Select them all and drag them directly into the GH window.
Done! To double-check, go to your GH User Object folder under the Special Folders as above (e.g. C:UsersjramsdenAppDataRoamingGrasshopperUserObjects). The .ghuser folders should be in here.
Now a new tab should have appeared in your GH window called Ladybug.
There are 5 categories of components, labelled 0-4. In using Ladybug, these are run through roughly in order.
A quick guide for setting up Visual Studio Express for developing Grasshopper components for Rhino 5. Continue reading Setting up Visual Studio Express 2012 and 2013 to write your own Grasshopper components in C#
Understanding how Grasshopper handles data is crucial for taking full advantage of GH’s capabilities. For collections of data, they can either be in the form of lists or trees.
A list is a collection of items of data, in a particular order, but with no hierarchical structure. Here is a list of numbers:
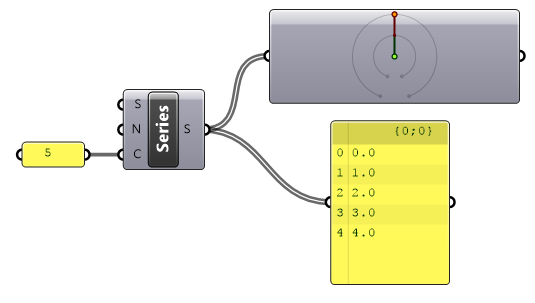
The component in the top-right is the param viewer. Double click it to see this:
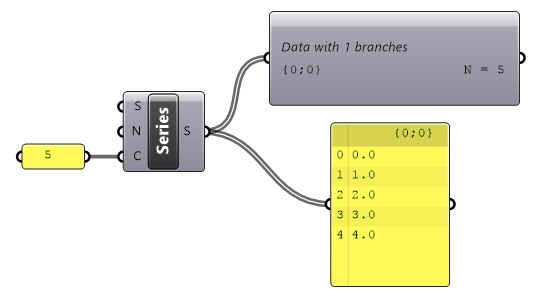
The ‘N’ denotes a list with N items. A list can be thought of as a tree with a single branch {0}. So here, we are looking at a single list, with address {0}, containing 5 items.
A tree is any data structure in GH with multiple branches. In other words, it’s a data structure with multiple lists. Each list has its own address.
Now, let’s make a grid of points. We can do this with our list of numbers and the ‘construct point’ component.
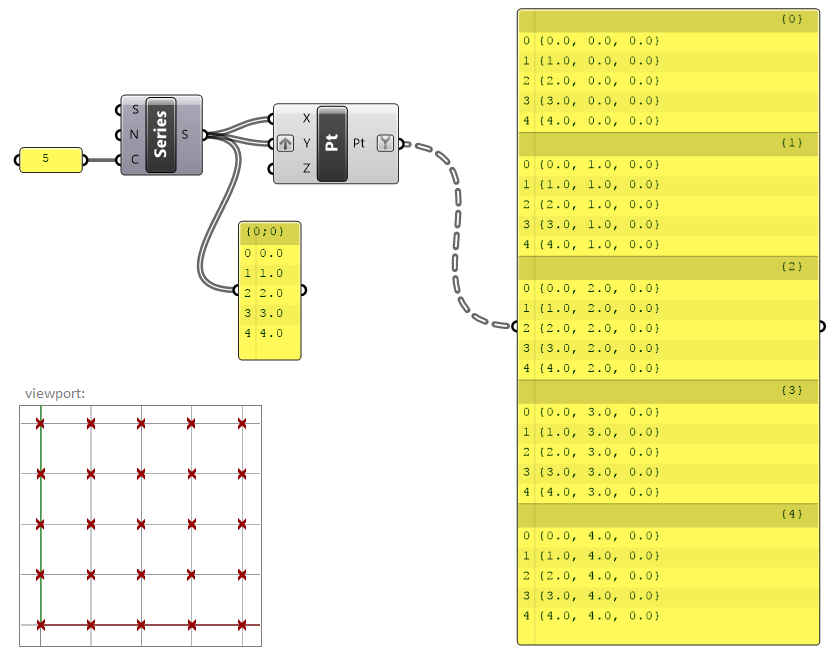
Here, we have cleverly grafted the Y input to coerce Grasshopper into giving us 25 points for our list of 5 numbers. But the output looks a little different. Instead of a list of 25 points, we have 5 groups of 5 points each.
What’s happened here is that Grasshopper has created 5 branches. Each branch contains a list of 5 points. Each branch has its own address {0} to {4}, shown in the panel.
We can verify this using the param viewer.

Trees can be created and manipulated in C# components too. When we add data to a tree in C#, we need two pieces of information:
The path is declared as a list of numbers denoting the sequence of the branches needed to access the list we are interested in. As some examples:
DataTree<Point3d> myTree = new DataTree<Point3d>();
GH_Path pth = new GH_Path(2);
myTree.Add(P, pth);
point P will be written to the list at the end of branch 2.
GH_Path pth = new GH_Path(i,j)
point P will go down branch i, then be added to the list at the end of branch j
You can either add to a tree on the fly – if you know that the data in the tree will be in the same order that you’ll be adding to it. But a more flexible way is to create a blank tree of the size you want, and then edit the values later.
Setting up a tree called boolTree (I am creating a tree based upon another tree called pts):
//declare tree
DataTree<bool> boolTree = new DataTree<bool>();
//set up tree
 for(int i = 0; i < pts.BranchCount;i++)
 {
   GH_Path pth = new GH_Path(i);
   for (int j = 0; j < pts.Branch(0).Count;j++)
   {
     boolTree.Add(false, pth);
   }
 }
This has now created a tree filled with ‘false’.
boolTree.Branch(1,2)[5] = true;
This edits the 5th value of the list at the end of branch 1, sub-branch 2 to ‘true’.