In this post, we saw how you can apply colours to a mesh using Grasshopper components.
Sometimes we would rather use C# code – in certain cases it can be a lot faster than clicking around the Grasshopper canvas, and it can give us a lot more control. How can we apply colour to a mesh using C#?
How coloured meshes work in Grasshopper
If we understand the mesh structure in Grasshopper, we know that meshes are defined by nodes and faces. We create a list of nodes, and then ‘join them up’ into faces of 3 or 4 nodes.
When we colour a mesh in Grasshopper, we do not colour the faces themselves. Instead, we set each node to a colour. So, if we have a simple mesh of one face and four nodes, we must define four colours, one for each node.
We can set the same colour to every node to get a uniform colour. But a nice thing that we can do is set different colours to each node. Rhino will automatically render the mesh with smooth colour gradients – nice!
As an aside, if you want one uniform colour per face, as in the second example here, we must again explode the mesh into multiple meshes, one per face. Alternatively, instead of exploding, you could duplicate the nodes at points where faces of different colours meet.
An example
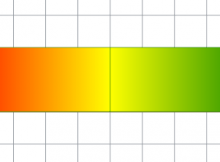
Let’s say you want to create a mesh with a 3-colour gradient of red, yellow and green, as below:
We can create this with a mesh of 2 faces and 6 nodes. Create a C# component within Grasshopper with default input/outputs, and copy the code below:
    //declare an empty mesh
    var mesh = new Mesh();

    //create vertices
    mesh.Vertices.Add(0, 0, 0);
    mesh.Vertices.Add(5, 0, 0);
    mesh.Vertices.Add(5, 2, 0);
    mesh.Vertices.Add(0, 2, 0);
    mesh.Vertices.Add(10, 0, 0);
    mesh.Vertices.Add(10, 2, 0);

    //create colour list. The vertex [i] is coloured by the value at VertexColors[i]
    //the VertexColors list MUST be the same length as the vertices list
    mesh.VertexColors.Add(Color.Red);
    mesh.VertexColors.Add(Color.Yellow);
    mesh.VertexColors.Add(Color.Yellow);
    mesh.VertexColors.Add(Color.Red);
    mesh.VertexColors.Add(Color.Green);
    mesh.VertexColors.Add(Color.Green);

    //create faces using vertex indices
    mesh.Faces.AddFace(0, 1, 2, 3);
    mesh.Faces.AddFace(1, 4, 5, 2);

    //return mesh
    A = mesh;
A few notes
The colours are saved as a list in VertexColors. Note that this list must either be completely empty (if you are not interested in colouring your mesh) or it should be exactly the same length as the Vertices list. Fail to do this, and your mesh will have a nasty habit of disappearing with no word of warning!
Since VertexColors is a list, once you have added colours, you can edit them in the usual way with VertexColors[i] where i is some index number. But, like a list, you cannot add a new colour using VertexColors[i] – you must use the VertexColors.Add() method.
Colours are normally defined using RGB values, for example:
Mesh.VertexColors.Add(255,0,0);
But a useful shortcut if you don’t know/can’t be bothered to look up colour codes is to use shortcuts like Color.Red instead of RGB values.


This would have been useful to me a year ago…
Given that the vertices and colours need to be linked in order, would it not make sense to pair them (I forget the c# notation for a pair but in c++ something like std::pair) so that you could keep them together. Obviously a little more implementation than just a pair would be needed but I suspect it would help if you ever needed to re-order the points later on?
I’d say it depends on the complexity of what you’re trying to do. For a simple case like this I would prefer not to waste time overthinking it. But in something more involved, you could either define a class to pair nodes with colours, or use tuples in C#