Bake and delete objects in Rhino with RhinoCommon

A very basic implementation of baking and deleting objects in Rhino through Grasshopper.

Rhino ObjectTable

Rhino objects are accessed through the object table – a container object which holds information about all objects in a Rhino document.

Rhino.DocObjects.Tables.ObjectTable ot = Rhino.RhinoDoc.ActiveDoc.Objects;

Add an object

Within the ObjectTable is a range of methods for adding objects. There is a method for each kind of geometry (meshes, lines, points and so on).

For example, to add a line:

ot.AddLine(new Point3d(0, 0, 0), new Point3d(1, 1, 1));

Deleting the most recent object

The Object Table appears to be sorted in order that objects were added, most recent first. So, to delete the most recent object, we need to delete object 0:

//get guid of the most recent object
Guid id = ot.ElementAt(0).Id;

//deletes this object
if(z) ot.Delete(id, true);

Get the number of objects

Unless there’s a better way to do it, the method below works. This returns the number of objects in the object table.

var sf = new Rhino.DocObjects.ObjectEnumeratorSettings();
int count = ot.ObjectCount(sf);

References

FastMesh v2: The stupidly easy way of creating efficient meshes from polylines

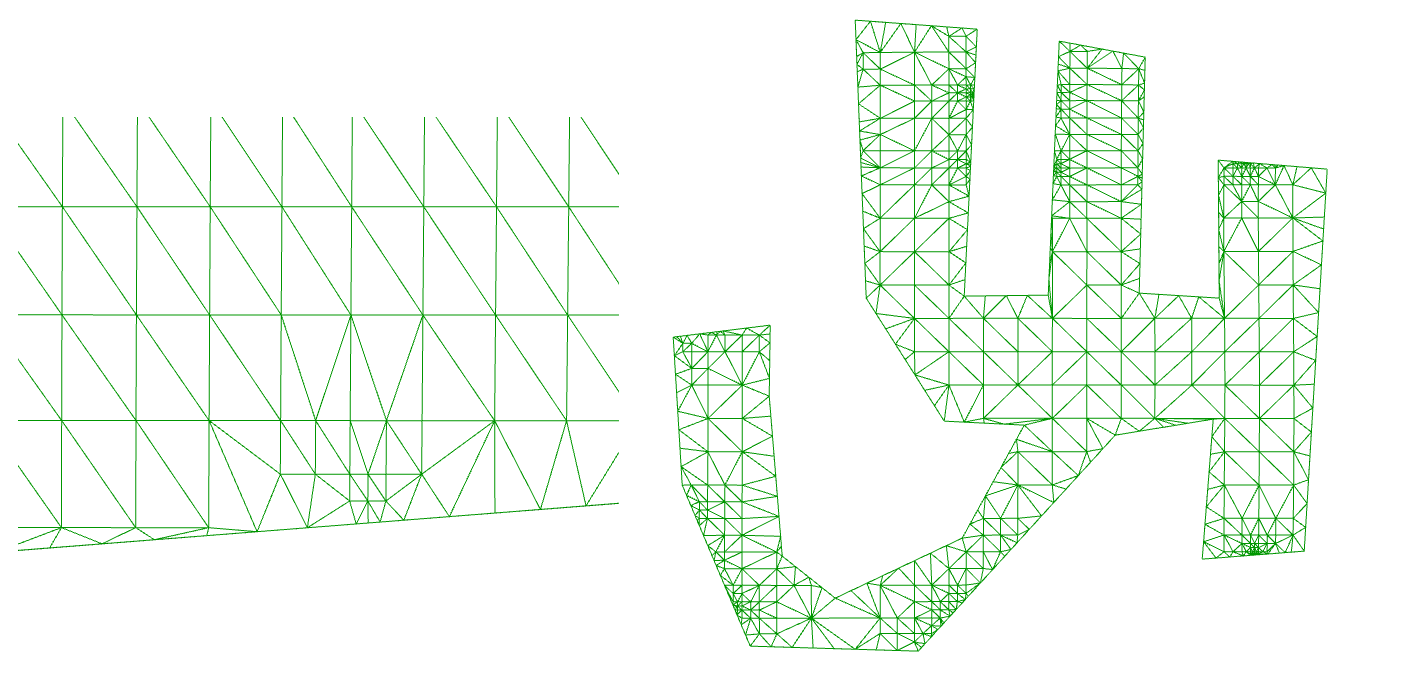
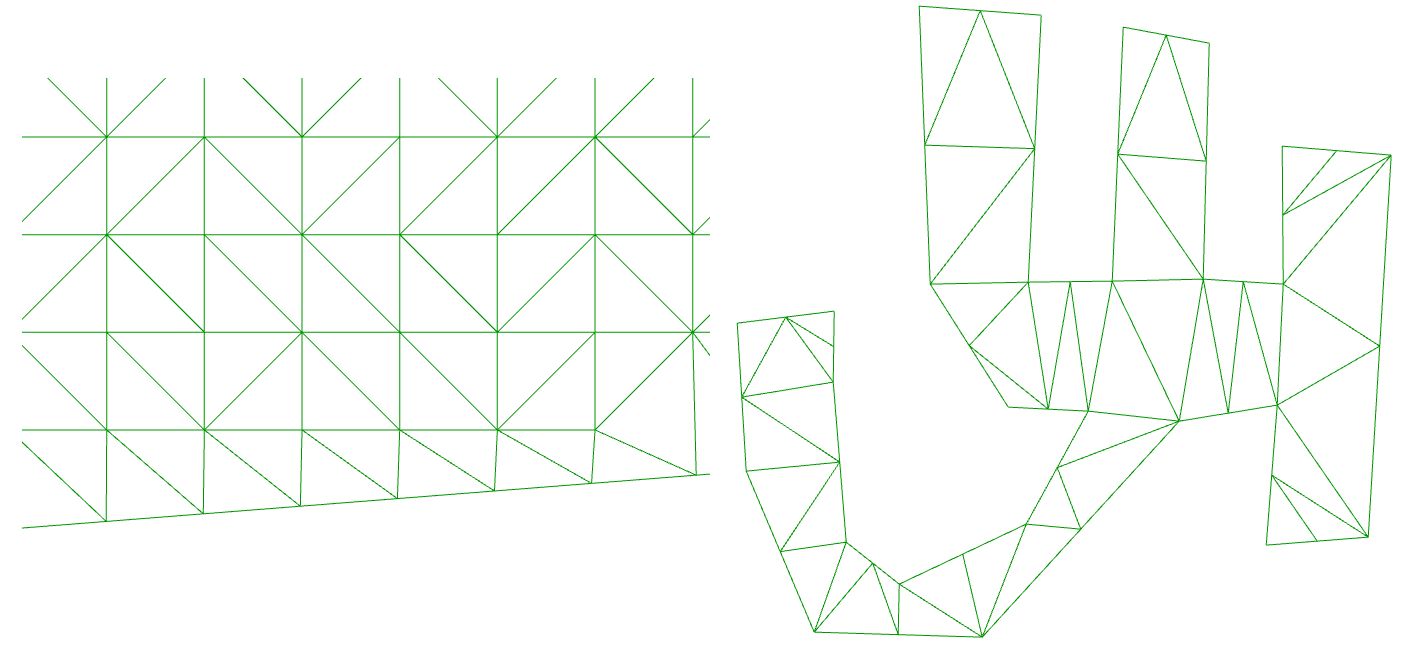
In a recent post, I found that converting polylines to meshes in Grasshopper can be problematic. Using a patch to create a mesh from a curve is slow, and directly converting from a curve to a mesh resulted in an inefficent mesh with too many faces.

curve-to-mesh

Mesh in Grasshopper

It seemed that in Grasshopper, there was no easy way to create efficient meshes from closed polylines, so I set about creating my own component. It produced meshes like this:

A simple mesh in Rhino, created in Grasshopper

But in cases with more complicated geometry, it didn’t always work – in the details, it would sometimes miss out triangles, or the mesh edge didn’t quite line up with the original boundary.

Revisiting the problem today, my colleague David Greenwood pointed me towards a method he’d found within the Rhino API – and we can access it in both the C# component and through visual studio. This method produces a mesh from a closed polyline – but amazingly, it returns the kind of efficient mesh we were wanting all along. And as a bonus, it’s really fast too!

The command you need is very simple:

A = Rhino.Geometry.Mesh.CreateFromClosedPolyline(pline);

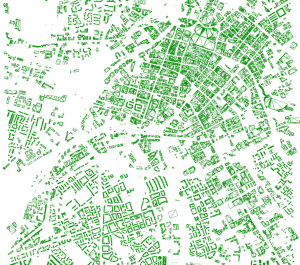
We tried this method to create the roof tops of a whole city centre, with over 11000 building outlines as polylines. This is the result:

manchester-roof-mesh

Click the image above for full size.

Zooming in on an image, we can see that, bearing in mind that mesh faces like to be in triangles, the meshes seem to be roughly as efficient as we could imagine:

manchester-roof-mesh-close

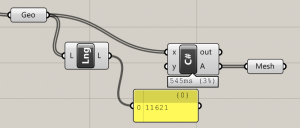
And how long did these 11000 meshes take to generate? About half a second!

mesh-from-curve-timer

And if, instead of using the C# component, we write the code into a compiled component, such as when we create components with Visual Studio, the time is less than 300ms.

And if that is still too slow, we could also parallelise it, potentially bringing that time under 100ms.

So much for ripping out my hair trying to write my own algorithm or dig around for one elsewhere – I needn’t have bothered because it’s already implemented in Rhino!

Remotely change the value of any number slider in Grasshopper with C#

The slider in Grasshopper doesn’t have an input. That means that only a user with a mouse can change it, right?

grasshopper-connect-slider

A slider with some kind of input is an ongoing topic on the Grasshopper forum. I know myself I’ve been in the position many times where I’ve defined a number with a slider, only to realise I later need Grasshopper to be changing that number for me. In lieu of an updated slider, I have come up with a solution…

Following on from my earlier post on adding a coloured progress bar to Grasshopper sliders, it became apparent that it’s in fact very easy to change the values of a slider with a bit of code. Watch the video below to see what I mean:

The only hard bit is figuring out how to ‘connect’ to the slider you want to modify. Basically, we look at the objects connected to our C# component, and try to convert them to a slider. If this is successful, then we know we have a slider, and we can start changing its properties.

Modify the slider value

This is the same code as what was in the video above. It simply reads in a value, finds a slider connected to x, and changes the ‘x’ slider to the ‘y’ value.

  private void RunScript(object x, double y, ref object A)
  {
    var input = Component.Params.Input[0].Sources[0]; //get the first thing connected to the first input of this component
    var slider = input as Grasshopper.Kernel.Special.GH_NumberSlider; //try to cast that thing as a slider

    if(slider != null) //if the component was successfully cast as a slider
    {
      slider.SetSliderValue((decimal) y);
    }
  }

Change the slider min and max values

Changing the minimum and maximum values on the slider is also easy. To do this, we need to dig into the slider a little more. Inside slider.Slider, there are lots more hidden properties which are fun to play with:

  private void RunScript(object x, double y, ref object A)
  {
    var input = Component.Params.Input[0].Sources[0]; //get the first thing connected to the first input of this component
    var slider = input as Grasshopper.Kernel.Special.GH_NumberSlider; //try to cast that thing as a slider

    if(slider != null) //if the component was successfully cast as a slider
    {
      slider.Slider.Minimum = 0;
      slider.Slider.Maximum = y;
    }
  }

Change the appearance of a slider

There are lots of options hidden away for changing the appearance of a slider – my last post being one, adding progress bar by changing the slider’s ‘rail’.

There are lots of further options for changing the background colour, adding a border, or adding shadows.

Change the background and border of a slider in Grasshopper with the C# component

  private void RunScript(object x, double y, ref object A)
  {
    var input = Component.Params.Input[0].Sources[0]; //get the first thing connected to the first input of this component
    var slider = (Grasshopper.Kernel.Special.GH_NumberSlider) input; //try to cast that thing as a slider

    if(slider != null) //if the component was successfully cast as a slider
    {
      slider.Slider.DrawControlBackground = true;
      slider.Slider.DrawControlBorder = true;
      slider.Slider.ControlEdgeColour = Color.Blue;
      slider.Slider.ControlBackColour = Color.Aquamarine;
    }
  }

However, like changing the rail type, these changes are always lost when a user manually changes the slider. Obviously, what’s happening in the background is there is a separate process being called to ‘clean’ the slider whenever the slider value is changed via the UI. Finding it is a challenge though. If anyone knows the solution, I’d be glad to hear!

Cool Grasshopper hack: Set the slider rail colour

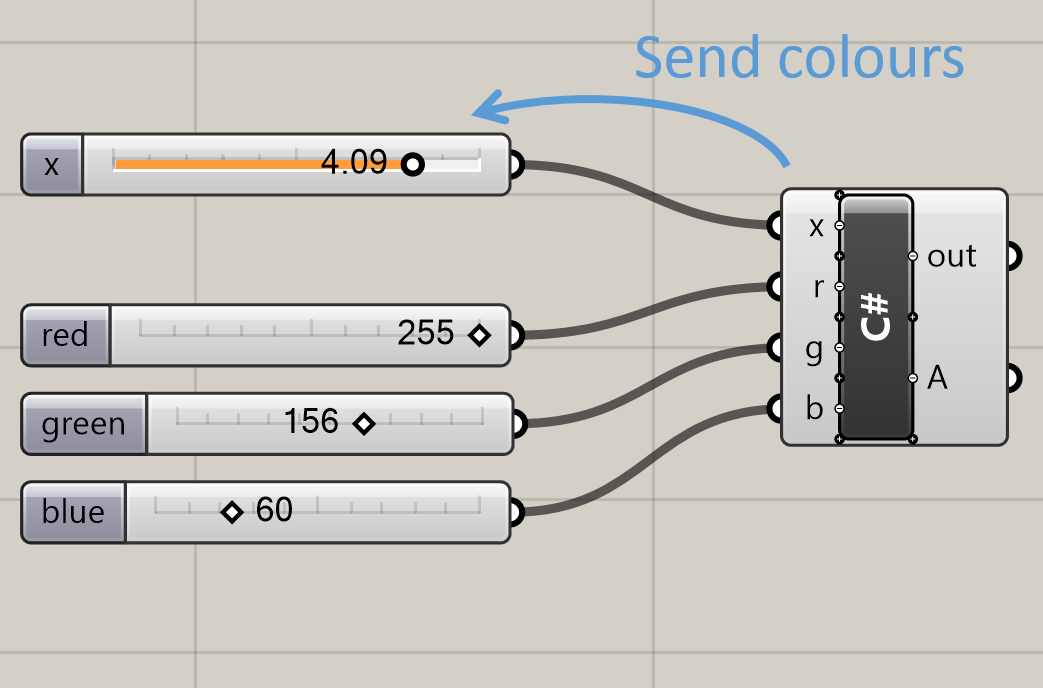
I’ve just discovered a cool feature for the Grasshopper number slider: You can add a ‘progress bar’ rail colour directly within the slider itself!

Using three sliders in grasshopper with RBG red green blue colours to add a progress bar to a number slider in Grasshopper

This is a feature built into Grasshopper itself. As far as I know, it is not accessible using the GUI, and the only way to get to it is using the API, such as by writing a bit of C#.

How to add a progress bar to a Grasshopper slider

The basic idea is that we use C# to find the slider we are interested in. Once we have found it, we can access the slider properties in the API. It was here I found the ‘rail’ property.

There are two key things we need to know, which I have covered in previous posts:

  • How to access the properties of any component in the Grasshopper canvas (link to post)
  • How to send data ‘backwards’ along a wire (link to post)

We also need the Color.FromArbg() method to define a new colour.

C# code

We can implement this with the C# component in Grasshopper. Set r, g, and b as integers.

  private void RunScript(object x, int r, int g, int b, ref object A)
  {
    var input = (Component.Params.Input[0].Sources[0]); //get the first thing connected to the first input of this component
    var slider = (Grasshopper.Kernel.Special.GH_NumberSlider) input; //try to cast that thing as a slider

    if(slider != null) //if the component was successfully cast as a slider
    {
      decimal max = slider.Slider.Maximum;
      Color c = Color.FromArgb(255, r, g, b);
      slider.Slider.RailDisplay = Grasshopper.GUI.Base.GH_SliderRailDisplay.Filled; //add progress bar
      slider.Slider.RailFullColour = c; //set progress bar colour
    }
  }

Watch the colour update in real time

Limitations

This is shamelessly a hacky bit of Grasshoppery fun. As much as I like it, this implementation is still not perfect. Whenever you directly change the slider you have edited the colour of, the progress bar disappears. It seems that in the slider.SetSliderValue() method, Grasshopper is setting the slider rail back to the Simple value (the default).

This perhaps points towards the idea that the colour bar was never meant to be implemented at all, and why it can’t be found in the user interface. Or it could point to the possibility that I have just done something wrong, and there is something else I need to implement!

Force a component to re-compute in Grasshopper

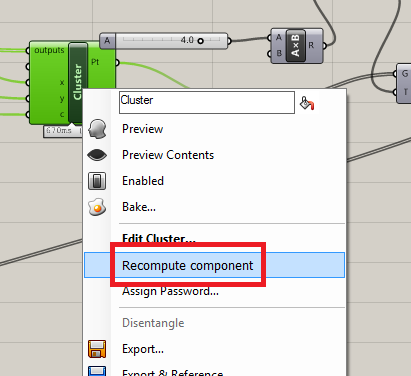
Wouldn’t something like this be useful in Grasshopper?

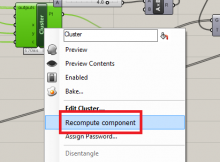
recompute-component-grasshopper

Often, I am working with data files on my computer through Grasshopper. When those data files change, there may be no easy way for dependent Grasshopper components to update. One solution is to disconnect and re-connect a wire into that component. This is quite tedious though, especially in large documents. It is also possible to recalculate the entire canvas with right click, recompute. But this is not feasible if you have components in your canvas which take a long time to calculate.

You may want to read this post which talks a bit about the nitty-gritty of how Grasshopper does calculations. Basically, for each component, in the background there is a property called ‘expired’. If ‘expired’ is true, then Grasshopper that it has to recalculate that component. So if we can manually set this property for components we want to update, we can force a recalculation on only these components (and the components directly downstream of them).

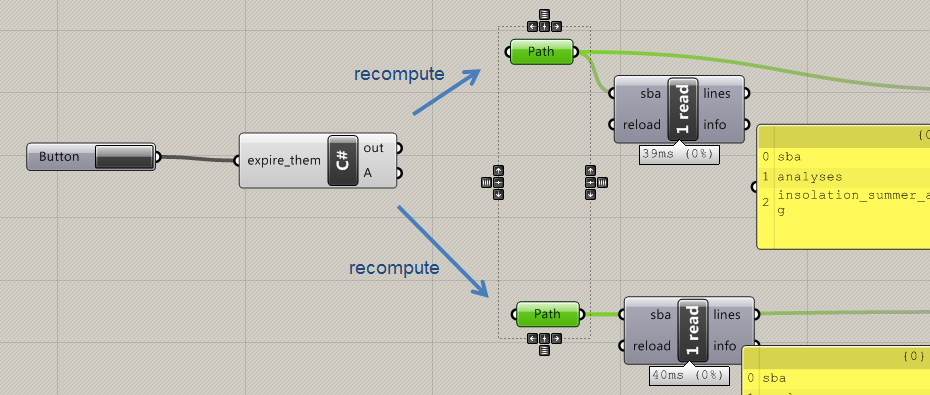
The following C# script does exactly this. Set up a C# component as in the image with the code at the bottom.

expire-components-grasshopper

Then, select components you want to recompute. (Here, I have selected two path files, which links to files I want to re-read.) Finally, hit the button on the left. The result is that the paths recompute, which then triggers a recalculation of the components downstream. The rest of the document (including some very heavy components) remains untouched.

It’s not quite the right-click option I showed above, but in the meantime it’s a pretty effective solution which I hope is useful.

Code

  private void RunScript(bool expire_them, ref object A)
  {
    
    //fore each component on the canvas
    foreach (IGH_DocumentObject obj in GrasshopperDocument.Objects)
    {
      //if that component is selected
      if(obj.Attributes.Selected)
      {
        //...and if expire_them = true, then expire that component and ask it to recompute
        if(expire_them) obj.ExpireSolution(true);
      }
    }

  }

C#: Sort dictionary by key

How to sort dictionary by key in C#, and return a sorted list of values.

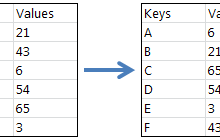
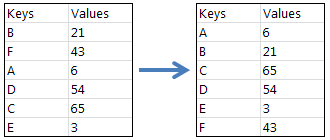
Let’s say you have some values. Each value is associated with a string, called a key. We want to sort the values such that their corresponding keys are in order.

c# sort dictionary by key

The basic idea is that we want to sort our keys, and then look up the dictionary according to the sorted keys.

But we have to be careful – we need to sort the keys without damaging the original dictionary. A good solution is to create a copy of the keys before you sort them.

See below for a full example:

Option 1: C# code to sort dictionary by key

  public List<object> SortDictionary()
  {
    //Create the data we want to sort.
    //In the data below, we are saying that "B corresponds to 21", "F corresponds to 43" and so on.
    //Normally, you would probably be feeding this data from somewhere else in your program.
    List<string> Keys = new List<string>();
    List<object> Values = new List<object>();
    Keys.Add("B");
    Keys.Add("F");
    Keys.Add("A");
    Keys.Add("D");
    Keys.Add("C");
    Keys.Add("E");
    Values.Add(21);
    Values.Add(43);
    Values.Add(6);
    Values.Add(54);
    Values.Add(65);
    Values.Add(3);

    //Declare new dictionary, where the key is a string and the corresponding data is an object
    var dict = new Dictionary<string, object>();
    //populate dictionary with data created above
    for (int i = 0; i < Keys.Count; i++) dict.Add(Keys[i], Values[i]);

    //Separately, sort our keys into alphabetical order
    //You need your keys in their own list. You may need to create this yourself if you don't already have it.
    Keys.Sort();

    //Now look up our dictionary according to our sorted keys
    List<object> sortedVals = new List<object>();
    for (int i = 0; i < Keys.Count; i++)
    {
      sortedVals.Add(dict[Keys[i]]);
    }
    return sortedVals;
  }

Thanks to Fraser Greenroyd for helping me with the code snippet above.

Option 2: Use SortedDictionary to sort a dictionary in C#

If you require that your dictionary is always going to be sorted, it might be better to use a SortedDictionary rather than just a Dictionary.

Whenever you add an item to a SortedDictionary, the item will be inserted into the correct location.

Note that there is a performance penalty for some SortedDictionary operations, so you should consider whether a SortedDictionary is best for you.

    var sdict = new SortedDictionary<string, object>();
    for (int i = 0; i < Keys.Count; i++) sdict.Add(Keys[i], Values[i]);
    return sdict.Values.ToList();

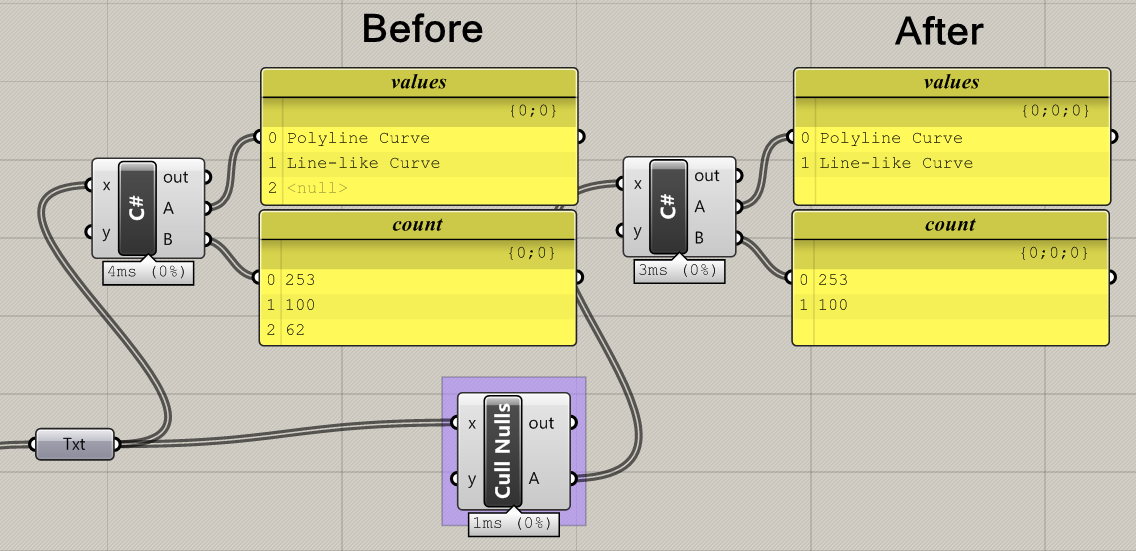
Remove nulls from a list using the C# component in Grasshopper

This simple script removes nulls from a list in Grasshopper. It preserves all data types and other data that you pass through it.

remove-nulls-grasshopper

To set up, copy the code below into a standard C# component in Grasshopper. Set input x as a list. Feed your list into x. The return ‘A’ will return the list x with nulls removed.

    var rtnlist = new List<object>();

    foreach (object obj in x)
    {
      if (obj != null) rtnlist.Add(obj);
    }

    A = rtnlist;

The other C# (counting nulls) in the image came from this post.

Count the number of repeated strings in a list in Grasshopper

This script takes in a list of strings. It consolidates repeated values and tells you how many times equal strings are repeated.

string-histogram-grasshopper

To use, copy the code below into a standard C# script component in Grasshopper. Add an additional output called B. Output A will show all the different values found in the list, and B will show the count for each item in A for the number of times that item was found.

    var names = new List<string>();
    var counts = new List<int>();

    foreach (string str in x)
    {
      bool exists = false;
      for (int i = 0; i < names.Count; i++)
      {
        if(str == names[i])
        {
          exists = true;
          counts[i]++;
        }
      }
      if (!exists)
      {
        counts.Add(1);
        names.Add(str);
      }

    }
    A = names;
    B = counts;

Access any component properties in C# using the Grasshopper API

In previous posts, I have touched upon the idea that it is possible to connect remotely to any component in the Grasshopper canvas and read or edit it, even when there are no wires connecting them. And in this recent post where I accessed the draw order of all components on the canvas, I found it was very easy to build a list of every component on the canvas.

So how far can we take this – is it possible to access any piece of information about any component of the entire canvas? How much can we learn and edit about components just using a bit of C#?

The code below is my attempt to find out. It is my attempt to write a code that, given any component in the canvas, will tell you as much as possible about it. For lack of a better name, I call it the Interrogator.

The Interrogator

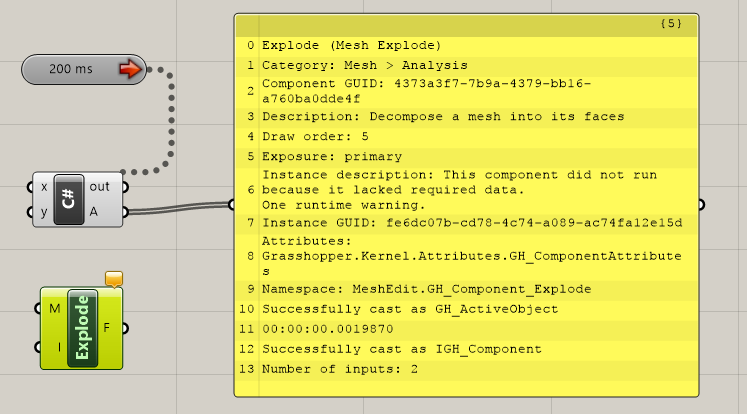
The Interrogator is currently not very smart, but is a good start. It is a WIP and I may update this page as I teach the Interrogator more tricks. Set it up with a panel and a timer, then click on any component in the canvas. The Interrogator will tell you all it can about that component.

grasshopper-interrogator

As I learn more about the class structure of Grasshopper, I learn more about where different pieces of information are hiding, and how to access them. (Short story – the class hierarchy of Grasshopper is more a tangled web of inheritance and it’s easy to get lost!) Eventually, I want to be able to know how to access and modify everything about any component, which will help greatly in my ability to develop new and interesting Grasshopper components.

Code

For now, the limited information I can access is presented in the code below, in all its partially-commented glory. Just copy into a standard C# component, and let the Interrogator pick the brains of your components…

    var rtnlist = new List<string>();
    var rtntree = new DataTree<string>();

    //get all guids in doc - this is used to find the draw order
    var guids = new List<System.Guid>(); //guids of all componets
    foreach (IGH_DocumentObject docObject in GrasshopperDocument.Objects)
    {
      guids.Add(docObject.InstanceGuid);
    }
    //A = guids;

    foreach (IGH_DocumentObject obj in GrasshopperDocument.Objects)
    {
      if(obj.Attributes.Selected)
      {
        //find this object in the list of guids
        int loopno = 0;
        bool endloop = false;

        while (!endloop)
        {
          GH_Path pth = new GH_Path(loopno);
          //if object is selected, let's display its properties
          if(guids[loopno] == obj.InstanceGuid)
          {

            //build our component info list here!

            rtntree.Add(obj.NickName + " (" + obj.Name + ")", pth);
            rtntree.Add("Category: " + obj.Category + " > " + obj.SubCategory, pth); //the category in the GH tab
            rtntree.Add("Component GUID: " + obj.ComponentGuid.ToString(), pth);
            rtntree.Add("Description: " + obj.Description, pth);
            rtntree.Add("Draw order: " + loopno.ToString(), pth); //used for calculation order. New objects go to the end of the list by default
            rtntree.Add("Exposure: " + obj.Exposure, pth); //what is this?
            //you can  access the icon under obj.Icon
            rtntree.Add("Instance description: " + obj.InstanceDescription, pth);
            rtntree.Add("Instance GUID: " + obj.InstanceGuid.ToString(), pth);
            rtntree.Add("Attributes: " + obj.Attributes.ToString(), pth); //namespace and class in DLL

            rtntree.Add("Namespace: " + obj.Attributes.DocObject.ToString(), pth);


            //inputs
            //IList < Grasshopper.Kernel.IGH_Param > things = GrasshopperDocument.Objects as IList<Grasshopper.Kernel.IGH_Param>[0];
            //A = things;
            var para = obj as Grasshopper.Kernel.GH_ActiveObject;
            if(para != null)
            {
              rtntree.Add("Successfully cast as GH_ActiveObject", pth);
              rtntree.Add(para.ProcessorTime.ToString(), pth);
            }
            var para2 = obj as Grasshopper.Kernel.IGH_Component;
            if(para2 != null)
            {
              rtntree.Add("Successfully cast as IGH_Component", pth);
              rtntree.Add("Number of inputs: " + para2.Params.Input.Count().ToString(), pth);
            }
            //var para3 = obj as Grasshopper.Kernel.GH_PersistentParam<Grasshopper.Kernel.Types.IGH_Goo>;
            //rtntree.Add(para3.PersistentData[0].ToString(), pth);
            //var para4 = obj as Grasshopper.Kernel.Parameters.
            //if(para4 != null) rtntree.Add("yay", pth);


          }
          loopno++;
          if(loopno >= guids.Count) endloop = true;
        }
        A = rtntree;
      }
    }

How the draw order affects calculation order in Grasshopper

Usually, calculation in Grasshopper goes from left to right along the wires. The components on the left get calculated first, then they trigger components downstream to the right. This continues until the canvas has been fully calculated. After many months using Grasshopper, this is so obvious that it doesn’t even need thinking about.

Until, that is, you try to use Grasshopper contravening this fundamental logic. I recently had a task where I needed to calculate the glare using Honeybee. The glare calculation component uses the Rhino camera, meaning that the camera has to be moved into the correct position if the glare is going to be calculated correctly.

I decided to use the Horster camera control to adjust the camera. This gave me something like this:
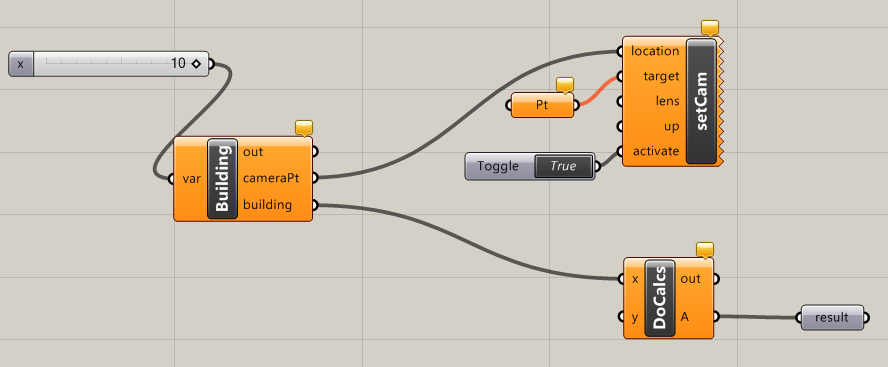
Grasshopper component order problem with horster camera control and Honeybee glare calculation

The calculations are dependent upon the camera having already been placed in the correct position here. In other words, the camera must be set before the calculations are done. See the problem? Without an output on the camera component, the calculation geometry must come from the ‘building’ component. It’s therefore impossible to ensure that the camera is moved before the calculations are done.

Which component does Grasshopper calculate first?

A bit of background first. When Grasshopper calculates components, it has a property called expired. If a component needs calculating, it is marked as expired=true. If it is up to date and doesn’t need calculating, it is marked as expired=false. When you make a change to a component (such as changing its input values) it is marked as expired. And when a component is marked as expired, everything downstream (i.e. to the right) is also marked as expired.

In short, ‘expired’ means that the component is waiting to be re-calculated.

Once Grasshopper has a list of expired components, it must then choose how it is going to re-calculate them. It does this by working from left to right, starting with a component that has no un-expired inputs.

For most Grasshopper documents, this explanation is quite sufficient. But, in reality, there is a much more complicated algorithm going on. Notice in my diagram that there is more than one valid order it can choose to calculate the components:

  • Building, setCam, DoCalcs, result
  • Building, DoCalcs, setCam, result

So Grasshopper has two possible choices in what it wants to calculate first. And since, at the end of the day, it does choose one option, there must be some kind of further logic in the background on how it chooses calculation order. Without much else to go on, I head to the Grasshopper forums, where I read this older post and also asked this post.

What the calculation order does NOT depend on

The calculation order in Grasshopper does not depend on any of the following:

  • Component position (i.e. its x and y coordinates)
  • Order of inputs or outputs
  • The data contained within a component
  • The type of component *

So what does the calculation order depend on?

The draw order in Grasshopper

The calculation order is driven by one key thing: the draw order. In the background, Grasshopper saves a copy of all the components in your document in a list. The order of this list is the draw order.

It is called the ‘draw order’ as it is this that governs which components are ‘drawn’ on top of each other. See how the panels below are drawn one on top of the other? That’s the draw order in action.
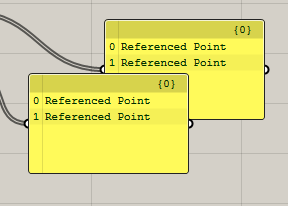
Grasshopper draw order shown by two panels

You can easily change the draw order by using keyboard shortcuts:

  • CTRL+B sends the component to the back
  • CTRL+F sends the component to the front
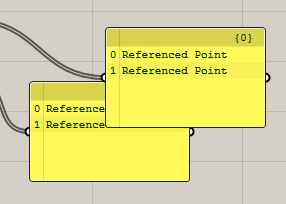
Grasshopper draw order shown by two panels

How Grasshopper does calculations using the draw order

The draw order does more than help to prettify your Grasshopper canvas – it is a primary driver in the calculation order too. Essentially, when Grasshopper is solving the canvas, what is happening is:

  1. Grasshopper makes a list of all components in your canvas. The order of these is the same as the draw order. The component drawn at the back of everything else is item 0 in the draw order, and the draw order increases to the front as you go down the list.
  2. Grasshopper finds the back-most expired component. It asks this component to solve itself.
  3. Before this component actually calculates anything, first it looks to see if any of its inputs are also expired. If they are, it asks these to solve themselves too.
  4. Again, these components also check their inputs before doing any calculations. This continues until a component is found which is expired, but which has no expired inputs. This component then calculates itself and marks itself as not expired.
  5. Go back to number 2. Repeat until nothing is expired.

How to check the draw order

The easiest way to check the draw order, and thus the calculation order, is simply to drag the components each other and see what appears on top. The component on the bottom will be calculated first. And if we aren’t happy with the order, we can use CTRL+B and CTRL+F to change them.
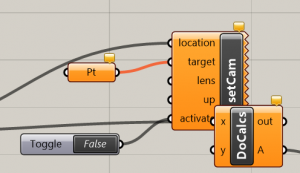
horster-order-test-grasshopper

Looks like setCam is being calculated first. Yay!

But wait – it’s not quite as simple as that! What if the setCam component is behind DoCalcs, but ‘result’ is behind both setCam and DoCalcs? ‘Result’ will be triggered first by Grasshopper, and this will then trigger DoCalcs to solve itself. So what will happen is that, even though setCam is behind doCalcs, setCam will be calculated after doCalcs because of the influence of ‘result’.

We need to be completely sure that setCam is therefore behind everything, not just DoCalcs. We can use the CTRL+B shortcut to do this, but how can we be sure it’s working properly? There’s no visual feedback that the shortcut has sent the component behind everything else without checking manually for every component.

How to check the draw order – for geeks

And again, it’s C# to the rescue! With a quick C# component, we can get a list of all objects in the Grasshopper document – all in the draw order. And with a timer and a panel attached, we can add a bit of extra functionality – click on any component and it will be shown as ‘selected’ in the panel.

grasshopper-get-draw-order

To use this yourself, copy the code below into a C# component, and set up as in the diagram. To use, turn on the timer and select any component (or components) in your Grasshopper document.

    var rtnlist = new List<string>();

    foreach (IGH_DocumentObject obj in GrasshopperDocument.Objects)
    {
      if(obj.Attributes.Selected) rtnlist.Add(obj.NickName + " (" + obj.Name + ") SELECTED");
      else rtnlist.Add(obj.NickName + " (" + obj.Name + ")");
    }
    A = rtnlist;

Using this component, we can verify that we have successfully moved our setCam to the back of the draw order list:
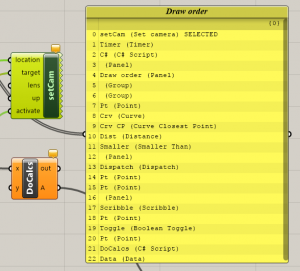
grasshopper-check-draw-order

Our selected component is item 0 in the list, and so is right at the back of all components in the canvas. Great news!