Send files to your cPanel web host via FTP

If you have a webhosting account, you will find that you need to send files to it from time to time.

Many webhosting accounts use cPanel for users to interact with their online account. This comes with a File Manager, which you can use to send and browse the files in your online space.

This is fine for the odd file, but if you want to move many files, it’s very difficult to do this quickly. There has to be a better way!

FTP (File Transfer Protocol) is the answer. Without getting technical, it’s a way of easily sending files between your computer and a server.

You may have heard of FTP before, but you’re not really sure how to use it. If so, this guide is for you!

Here, I will show you how to setup FTP to easily send files to your webhost.

Step 1: Install FileZilla (or your client of choice!)

Firstly, we need to install an FTP client. This is a program which is installed on your computer, which uses FTP to communicate with your server.

There are many FTP clients available. I use FileZilla for the simple reasons that it’s widely used, free, and works. I will be using FileZilla for this guide. You can download and install it from here.

Step 2: Get FTP configuration file in cPanel

Next, log in to your webhosting account, and open cPanel. (I am using SiteGround, so yours may look a little different, but the process should be similar.)

Under cPanel home, find Files, and open FTP Accounts:

You should now see a list of FTP accounts you can use, for example:

Now, you need to decide which account you want to use. If you are the administrator or the only user of the account, you should look at the account that has the same name as your username. (This is the root account – look for the one with the most data.) But if you are creating an account for someone else, and you only want to give them access to a specific folder, you should use the option to add an FTP account.

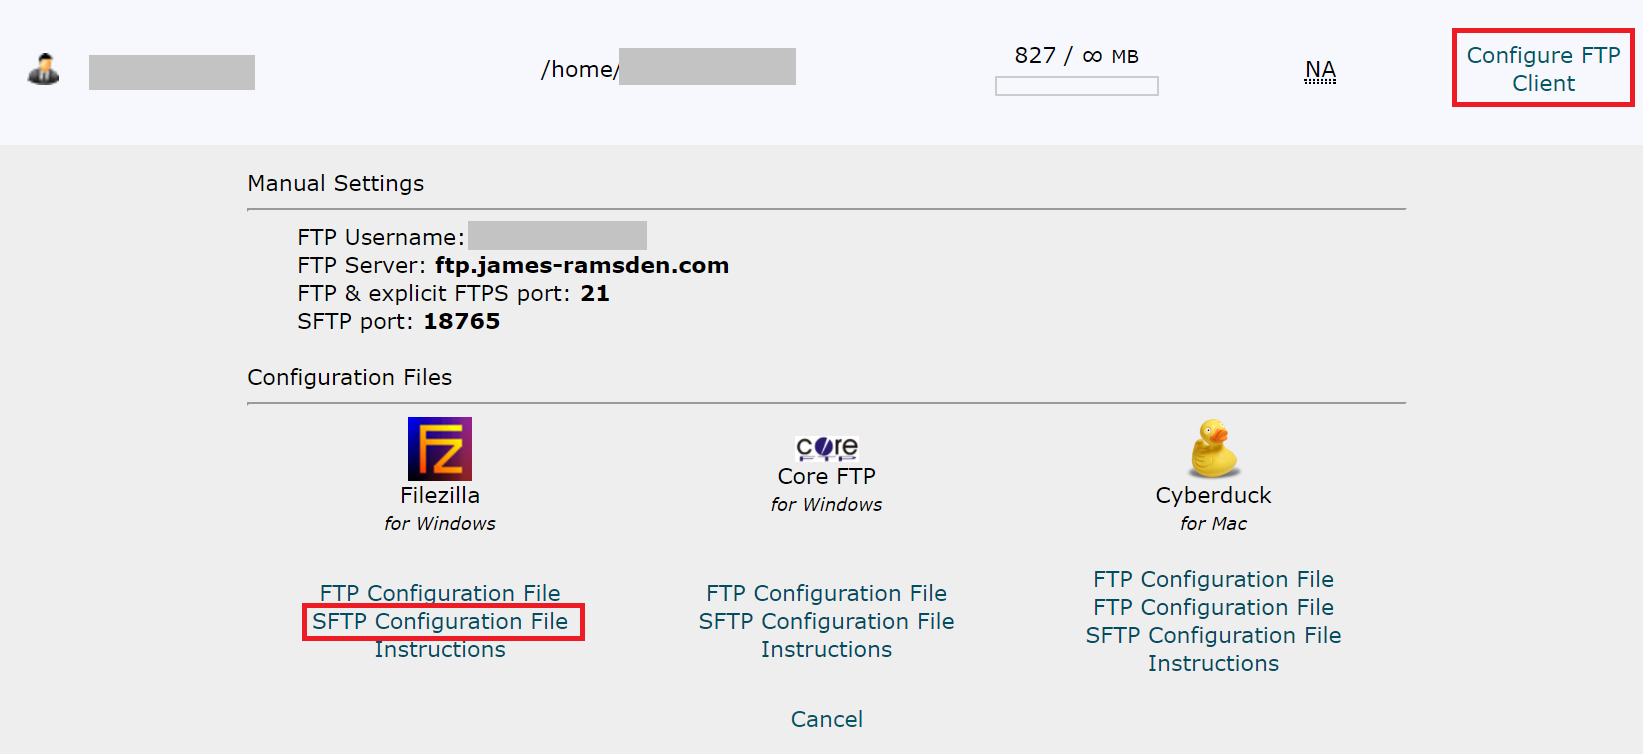
Once you have chosen which FTP account you want to use, click on Configure FTP Client:

You want to download the configuration file for your FTP client. SFTP (secure FTP) is better, but if it’s not available, or you have problems with SFTP, FTP configuration file is okay.

(No configuration file for your client? Skip to the last section!)

Step 3: Import FTP configuration file to FileZilla

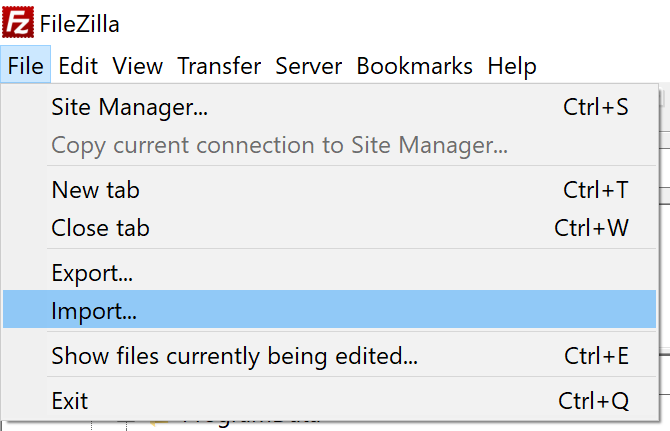
Open FileZilla. Go to File > Import. Open your configuration file that you just downloaded.

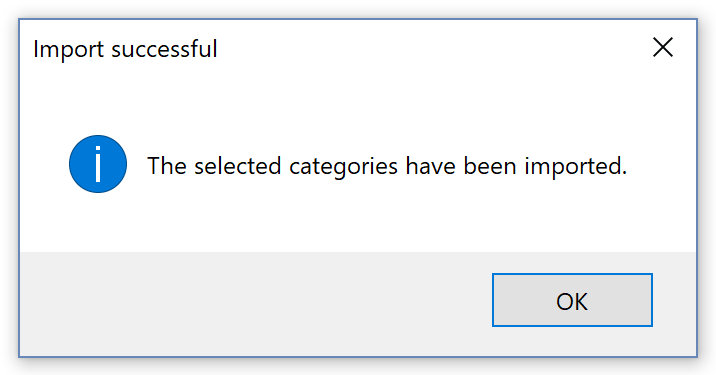
Confirm any messages that appear.

Step 4: Connect!

Now, we are ready to connect to our FTP account.

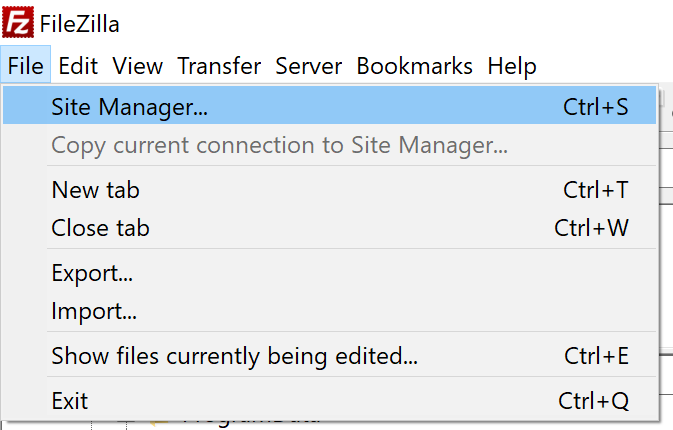
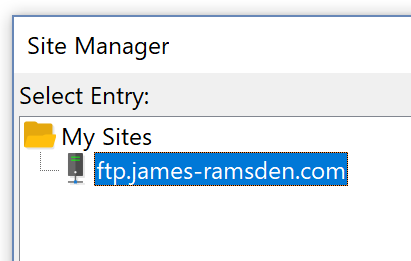
Go to File > Site Manager.

You should see an entry on the left. This is the FTP account we just added.

Select it and press Connect.

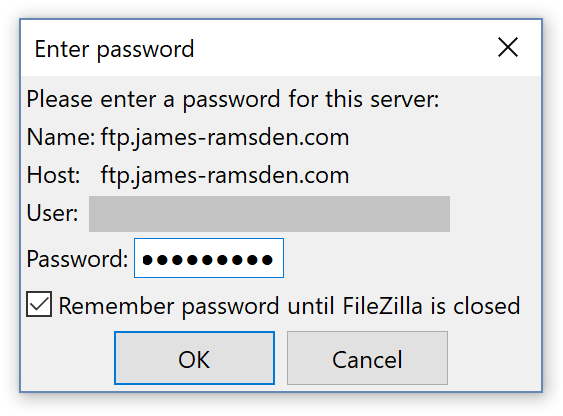
Enter your password. This will either be the password of your hosting account or, if you created an FTP account earlier, the password you made then.

If all has gone well, you should see your files appear in the main window. This is a direct link to your hosting account, and you can drag and drop files and folders into this window as you would the files on your own computer. They will be synced automatically to your hosting account. Nice!

In future, when you want to use FileZilla, head straight to the Site Manager, and connect from there. It will remember your configuration file, but you will need to put your password in each time.

The Last Section: Connecting without a configuration file

If, for whatever reason, you can’t use a configuration file, you can connect manually.

In step 2, instead of downloading a configuration file, look at the manual settings.

Then, in FileZilla, put these manual settings into the text boxes near the top of the window (click for full size):

Finally, hit Quick Connect. The process should be similar for other clients.

Creating video screen captures for a website: My workflow

I am trying to use videos more often when I create a post. I try to make a screen recording of whatever it is I am trying to show – it just makes whatever idea I am trying to convey that much clearer.

Adding videos to web pages is now much easier thanks to the HTML5 video tag, but choosing video formats for the web is still a bit of a nightmare.

Here is one recent example from this post:

And here is the code behind it:

<video autoplay loop muted height="522px" width="712px">
<source type="video/webm" src="http://james-ramsden.com/downloads/videos/20150614-instantiate-grasshopper-value-slider.webm">
<source type="video/mp4" src="http://james-ramsden.com/downloads/videos/20150614-instantiate-grasshopper-value-slider.mp4">
</video>

Long story short, you need to encode your video into at least two formats. WebM is free of licensing issues and produces very good quality videos, but is limited to certain browsers. MP4 is the backup format. And of course, we want the video to look as nice as possible, without unnecessary black borders.

This is the process I use:

  1. Install CamStudio, free screen recording software
  2. Install the lossless video codec for CamStudio. This ensures our video is of the highest quality, so we can re-encode it later without compounding data loss problems.
  3. Use CamStudio to record your screen. I like to use the ‘fixed region’ setting if I want to only record a part of a window. Make sure you’ve selected the lossless video codec under ‘video options’.
  4. Use OnlineConvert to convert your video both to WebM and MP4. Default settings are all fine.

Then, to actually upload the videos to the web, I have recently discovered the ease of using FTP to access my website server. I logged into cPanel (the interface provided by my hosting company to interact with the server) and set up an FTP account. Then, I installed FileZilla, and used this to upload the video from my computer to my webspace.

And as you can see, the above video is pin sharp. It really pays off to use the two-formats approach as, for those who are on WebM-compatible browser, amazing levels of quality can be achieved with tiny file sizes. The video above is a mere 47kB! (As a comparison, MP4 was 125kB and uncompressed was 531kB.)

Actually, the only major browsers that aren’t compatible with WebM are Safari and Internet Explorer. It’s actually quite tempting to just stick twos up at the incumbents until they get a move on, if it saves me a few minutes of my life…

Autoplay videos with three lines of HTML

I was mindlessly browsing the internet this evening, reading about smart watches on istartedsomething. A few pages into the post, a video was already playing as I scrolled down the page. I couldn’t see any Youtube or Vimeo branding, or any controls, so I assumed it was a GIF.

But it seemed too high-quality to be a GIF. Right-clicking the video showed otherwise – it was a proper video! This isn’t a product of the GIF and Flash internet we are accustomed to, but an example of HTML5 spotted in action.

I dug into the source code and found that the author was using the video tag. Reading up about the video tag on w3schools, the video tag is remarkably easy to use. It’s just a few lines of HTML, typed straight into an HTML file, no plugins or fuss necessary.

HTML video tag

Here is the source code you need to add a video to a web page:

<video autoplay loop muted>
<source type="video/mp4" src="http://james-ramsden.com/downloads/videos/smart-form-relax.mp4">
</video>

…and this is the output:

Useful video tags

The source code above is split into three lines, where we can define how the video plays. The first line must start with ‘video’. But after that, we can string together a list of terms to customise how it plays.

  • autoplay
  • loop
  • controls
  • muted
  • height=”640px”
  • height=”480px”
  • poster=”image.jpg” (image to show if the video isn’t loaded)

The second line defines the video location. Currently, the type can be ‘video/mp4’, ‘video/webm’ or ‘video/ogg’.

You can specify a start and end time within the source, for example:

src="http://james-ramsden.com/downloads/videos/smart-form-relax.mp4#t=10,11"

Will play the video between 10 and 11 seconds.

References

Creating my first WordPress plugin and learning PHP

Firstly, I have to say that I was pleasantly surprised how easy it was to do both of these – that is, creating a simple WordPress plugin as well as learning from scratch enough PHP to do this. It still required some cognitive effort, but the whole ordeal was completed within an evening.

One of my tasks this weekend was sorting out my links page. I want to keep it looking fairly tidy and organised, so I used a table. Even the simple layout below took a fair amount of repetitive HTML in order to do this. If I wanted to make a change (e.g. widen one column) this would mean modify a value for every row. Not efficient!

old-links-page

The above table was made with code that looks like this:

old-links-page-2

Imagine the list grows and there are 50 rows in the table. Then I decide to add a new column. I would have to manually add every extra cell manually, which is not going to be fun.

PHP

PHP is a scripting language that you can use to automate repetitive parts of your code, among many other tasks. It’s incredibly powerful – it’s the language that powers WordPress after all. I wondered if it was possible to have a PHP script generate the HTML to make the table.

So I set about learning some PHP using the excellent PHP tutorial at w3schools. I’m not familar with JavaScript, but PHP is similar enough to C# that it was mostly a breeze.

When learning, I found it was useful to create a document on my server. I logged into cPanel and created a new document here to practise with. cPanel includes a code editor. Alternatively you could create a local document. Which in hindsight is probably simpler.

Incidentally, what is the key difference between PHP and JavaScript? PHP runs on the server and delivers the output (i.e. the HTML) over the internet. With JavaScript, the server sends the code itself to the client machine (i.e. your computer) and the code executes there. I learnt that today 🙂

First attempt with PHP in WordPress (Spoiler: It fails!)

The easiest solution would be to add a bit of PHP script within the HTML that makes up the links page. On my practice page I eventually managed to get a solution working in principle. Essentially all you do is create a function with arguments like ‘URL’ and ‘description’, and in that function you use the echo command to construct the HTML.

function AddLinksRow($URL, $name, $description)
{
echo '<tr>
<td><a href="' . $URL . '"><img src="https://eu2.searchpreview.de/preview?s=' . $URL . '" /></a></td>
<td><b><a href="' . $URL . '">' . $name . '</a></b></td>
<td>' . $description . '</td>
</tr>';
}

echo '<table class="JR">';
AddLinksRow("http://www.google.co.uk","Google","Search the web with google");
AddLinksRow("http://www.bbc.co.uk","BBC","News");
echo '</table>';

This makes the following table:

php-test

If you’re already familiar with HTML table notation, you should be able to see how the function is constructing the HTML, and the great thing about PHP is that we can effectively include variables in our HTML. So we can reuse the same function to generate a new batch of HTML for each row of the table.

By default, I use the HTML editor in WordPress. (Not a fan of WYSIWYG as often what I see isn’t what I get.) So you would think that copying the code over into a WordPress page would be trivial.

If only! Even the HTML editor still undergoes some ‘tidying’ by WordPress. This is why it’s possible to create new paragraphs with the return key without having to use <p> tags. One other thing that it does is block PHP execution. Instead, your page will make a token attempt of trying to render your script.

There is a range of plugins for WordPress that re-enable in-line PHP execution in posts and pages, such as Insert PHP or Shortcode Exec PHP. Frustratingly, none of these seem to work.

Digging in, many of these projects have not been updated in a while, and none of them profess to have support for version 4.x of WordPress. This seemed to be a dead-end.

Shortcodes in WordPress plugins

But then it occurred to me that WordPress plugins are written in PHP. Many plugins use shortcodes to allow the user to interact with them. For example, a plugin has been written to generate a list of saved links from the Pocket bookmarking service. You can see my list here. All I had to do to generate this list was type [pocket_links] in my page, and this shortcode would find the Pocket WP plugin, which in turn would fill out the page for me. These shortcodes can also take arguments, e.g. [pocket_links count=5] to display 5 items only from my Pocket list.

So, in principle, would it be possible to write an extension where I could write a shortcode with the URL and description as arguments, and let a plugin turn this information into a table row? Instead of that messy HTML above, could I write something much tidier like this?

[AddRow URL=”http://www.google.co.uk” name=”Google” description=”Search the web”]

Starting my first WordPress plugin

The process is remarkably simple. I followed this tutorial to get going, but the process is basically:

  • Find the WP plugin folder on your server. Create a new folder for your plugin.
  • Create a new document called plugin_name.php
  • Type in some properties about the plugin you are about to create, such as file name and author.
  • Go to the plugins on your WP dashboard. Your plugin should already be there! Activate it.

And that’s about it. All you have to do then is create your actual plugin functionality.

Writing the plugin

To get the functionality I was after, I used a combination of this WordPress help file and also having a peek at the Pocket WP PHP file. Eventually, this was what my own plugin PHP file looked like:

<?php
/**
* Plugin Name: JR links
* Plugin URI: http://james-ramsden.com/downloads
* Description: Use shortcode [JR_Links address="" name="" description=""] within table tags. This adds a row for a table of links.
* Version: 1.0
* Author: James Ramsden
* Author URI: http://james-ramsden.com
**/

function JR_links_funct( $atts, $content = null ) 
{
	extract(shortcode_atts(array('address' => '','name' => '','description' => ''), $atts )); //extract parameters

	$html = '<tr>';
	$html .= '<td width="111px"><a href=" ' . $address . '"><img src="https://eu2.searchpreview.de/preview?s=' . $address . '" /></a></td>'; //image
	$html .= '<td width="20%"><b><a href="' . $address . '">' . $name . '</a></b></td>';
	$html .= '<td>' . $description . '</td>';
	$html .= '</tr>';
	return $html;
}
add_shortcode( 'JR_Links', 'JR_links_funct' ); //the shortcode is called [JR_Links] and calls the function JR_links_funct
?>

The entire code inside the PHP file.

And that’s it! This is about as short as meaningful extensions get, and I’m pretty pleased as a first attempt.

The green text at the top is the plugin properties that WordPress reads to populate the plugins list on your dashboard. It’s best to just copy-paste this for your own plugins, as you’ll find it in every one.

The add_shortcut function is the bit of code that tells the WordPress editor to listen for a shortcode. When the shortcode [JR_Links] is used, then WP feeds back to this function, which in turn will call the JR_links_funct function.

Within the extract line, we have added the ability to listen for three arguments: address, name and description. We can then inherit these arguments as variables in our function. A variable called $html is then used to construt the HTML we want to output. When we’ve finished, we return $html, which then returns this text back to the WordPress page.

Using the new plugin

Now the dirty HTML work has been pushed into the background, creating the table is now much tidier. Creating the table is now as simple as:

<table>
<p>[JR_Links address="http://www.giuliopiacentino.com/" name="Giulio Piacentino" description="Architect, Grasshopper, RhinoScript"]</p>
...
</table>

If I want to make any changes to the layout, I can now do this within the PHP file. The shortcode is simply passing over the information required; it’s up to the PHP file on what HTML this is turned into. For maintainability, this is so much better. Since the same PHP file creates every line of the table, we only have to make a change once in the PHP file for the change to propagate through every row.

new-links-page

Getting started with Amazon S3: A replacement for Dropbox

Dropbox is amazing. The ability to have files saved in the cloud, yet with the ease of use that comes with having them saved locally, is quite revolutionary. I could never imagine going back to the dark era of saving directly to the C drive, a time when one misplaced swing of your hard drive head could render your entire digital life erased forever.

But that’s not to say that Dropbox, or any of their rival clones like Google Drive or OneDrive, have to be the way forward. Many of these services use Amazon S3, Amazon’s famous web storage service, part of Amazon Web Services. If you’re here, you probably already have your own reasons for investigating S3, but for me it was a combination of cost (see below), wanting to learn more about how S3 works, and basically cutting out the middleman.

This guide will help you in getting started with Amazon S3: what S3 is, what it costs, and what you might do with it.

What is S3?

Think of S3 as a web app where you can store and access files online. Amazon explain the process in their words here.

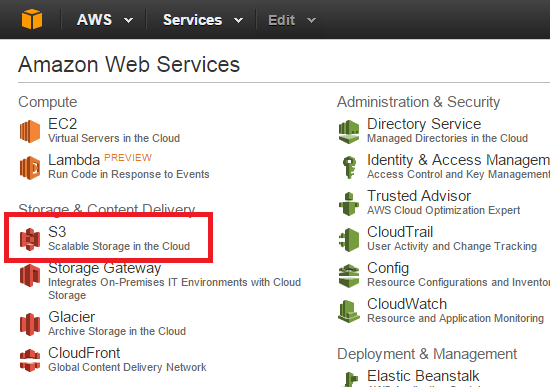
When you have registered for AWS, you can access the full suite of AWS apps on their dashboard. The number of things you can do with AWS is quite bewildering, but for now let’s focus on S3.

Amazon Web Services AWS dashboard

Creating your first bucket

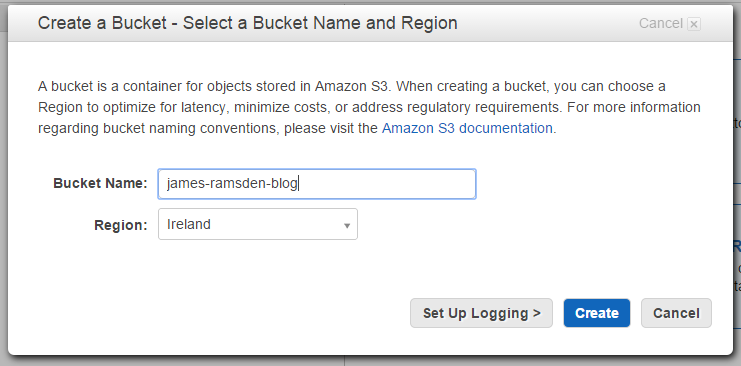
Within S3, you store files within top level folders called ‘buckets’. We need to create a bucket to store files in. This bucket name must be globally unique – i.e. no other bucket in the world can have the same name as yours. The reason for this is that we can choose to access our bucket with a URL, which of course must also be unique. It’s convention to start the bucket name with the organisation or website we represent.

Click ‘create bucket’ in the top left. Then give your bucket a name. You can’t change the name later, so give it something sensible.

Create new bucket for Amazon S3 dialog box

You also need to choose a region. This is the data centre that Amazon will use to store your data. There are two factors influencing your choice:

  • Price: Different regions have slightly different prices, and you might want to choose a cheaper region.
  • Distance: Generally speaking, the closer the server is to you, the faster it will be. If you are using S3 for public access (e.g. downloading files from your website) you may choose to use a region that is closer to where most of your visitors come from, rather than where you personally live.

For personal storage, Ireland was an obvious choice for me. It is close to England, and is among the cheapest.

Adding files to our bucket

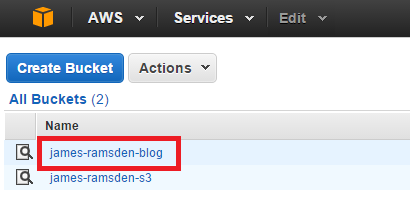
Once we’ve created our bucket, we can open it and start adding files to it.

List of buckets in Amazon S3

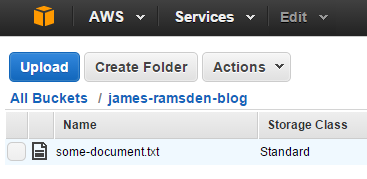
Once inside, click ‘upload’ and add some files. When you’re finished, you should see them in your bucket!

Uploaded file in Amazon S3 screenshot

Downloading files from our bucket

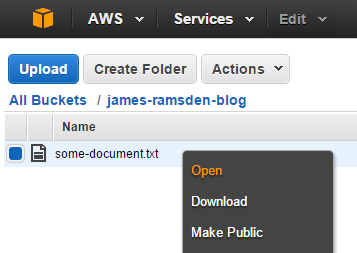
Downloading files is equally simple. Just right-click on any file and click open. (You may need to enable pop-ups in your browser for this to work.) Files like .txt and .pdf will open in your browser. Otherwise, it will download. You can also just use the ‘download’ option in the right-click menu.

Right click file to open in Amazon S3

What does S3 cost?

The short answer – S3 is cheap. The average domestic user is unlikely to spend more than a few dollars each month.

Calculating the price is difficult though. Whereas Dropbox uses a flat price (currently £7.99 per month in the UK for Dropbox Pro), S3 uses a pay-as-you-go system where you pay only for what you use. You pay both for storage and for transferring data.

The different components that contribute to your S3 bill are:

  • Storage: approx. $0.03 per GB per month
  • Uploading files: approx. $0.005 per 1000 items*
  • Downloading files: approx. $0.004 per 10,000 files* PLUS $0.09 per GB (first GB free)

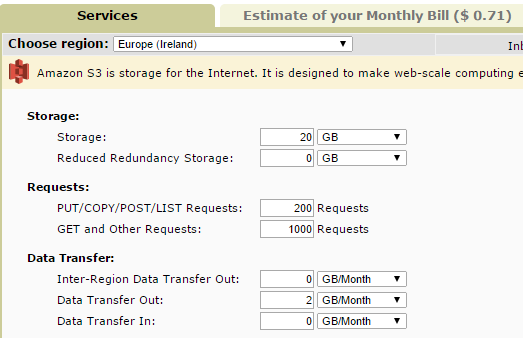
So, if you are storing 20GB, and each month you download 2GB consisting of 1000 files, as well as uploading/updating 200 files, you will pay (20GB * $0.03) + ($0.005 * 200 / 1000) + ((2GB – 1GB) * $0.09) + ($0.004 * 1000 / 10000) = $0.6914. These prices don’t include tax, so when we add tax of 20% (or equivalent in your country) the total is $0.83 per month.

Amazon provide a calculator to give more detailed estimated bills here. In the example above, we would enter the data as:

Estimated cost calculator example Amazon S3

Interestingly, Dropbox and other companies do offer as much as 1TB in their offers. To store 1TB with S3 would cost $30, much more than £7.99 (about $12). Costs do come down a little for large customers, but I can only assume that the 1TB is being promoted as a kind of loss-leader.

Free tier: Amazon’s introductory offer

As an added bonus, Amazon are offering 12 months of limited free service on all of AWS, including S3. Everything included in this deal is called the free tier. Among other benefits, the free tier offers:

  • 5GB free storage
  • First 2000 uploads (PUT requests) per month free
  • First 20000 downloads (GET requests) per month free


Read more here about the free tier.

So what can I use S3 for?

As we can see, the S3 interface is functional but very basic. In itself, it is not intended to compete with highly polished solutions like Dropbox, but with the right approach it can be a very powerful approach to handling files. Some things that you might use it for include:

S3 for personal backup

Save all of your important files to your S3 bucket. By default, your bucket is set on ‘private’ mode, so anything you upload will be secure and only accessible by you.

S3 for sharing public images and documents

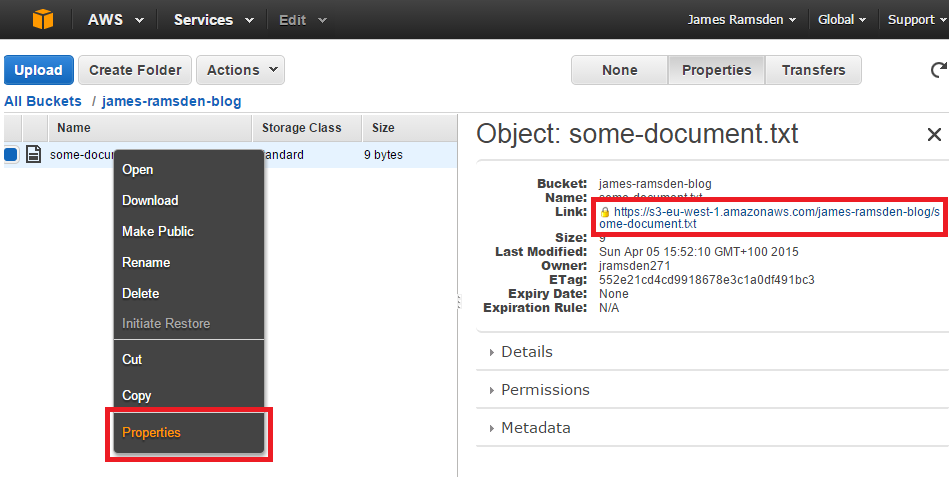
You can use S3 to host images and documents for websites, or otherwise provide an alternative to FTP. Every item you upload to S3 will get its own web address. You can find this address by looking at a file’s properties in the web interface:

Amazon S3 file properties and URL

If you copy the link on the right into your browser, it should open the document.

BUT, remember the permission settings? By default, if anyone other than you tries to view this link, they will get an ‘access denied’ error in their browser.

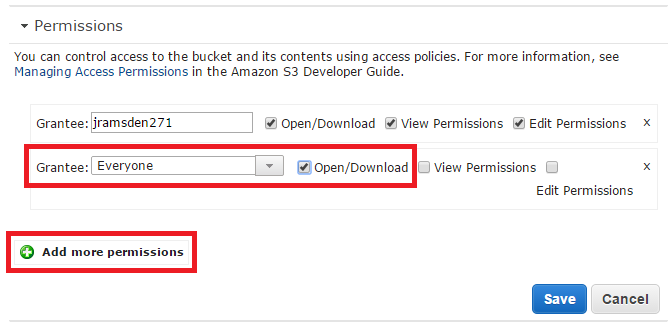
So what we do is to change the permission so that anyone can view the image. In the properties window again, find the ‘permissions’ tab:

Add custom permissions in Amazon S3

With the above settings, you should now be able to open the file from any web connection in the world, like this one.

But be careful with this setting! It exposes your file to the world, so don’t make the mistake that many have made and use it for sensitive information. See the next item if you want controlled sharing.

Sharing files with specific people

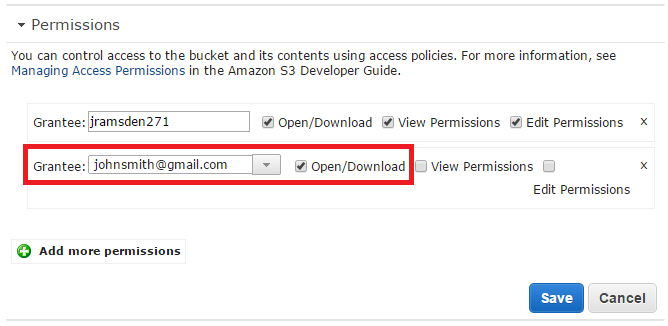
You can set permissions to any email address, assuming the owner of that email address has also signed up for AWS with that email address. In the permissions drop down box, you can type in the email address. If that doesn’t work, you can ask the other person for their account number.

Add custom permissions Amazon S3

Other cool stuff you can try with S3


Conclusion

We’ve seen how easy it is to create an Amazon S3 account and to upload and download files from it. But the current process still feels very manual – it lacks the streamlined set-and-forget syncing ability of Dropbox.

Over the next week I will be trying different solutions to see whether a full, convenient alternative to Dropbox is possible with S3. At the moment I am transferring data from Dropbox and OneDrive with MultCloud, so let’s see how it goes!

Should I use Adsense on my site? My first impressions

Regular visitors of this blog may have noticed that, a while back, Adsense adverts have started to appear in the right-hand column.

So, firstly, an apology. I put them there, I chose to put them there, and I am sorry for subjecting the People of the Internet to yet more garish and annoying advertising.

But that’s not to say that I put them there for financial reasons. It’s going to be a long time before I can ever make a website with enough traffic for me to retire early with a yacht and a mansion (at least on advertising money alone). The reason is more one of curiosity – with seemingly every website under the sun selling every spare pixel as advertising space, there has to be something in it, right? (Have you been on sites like lifehacker recently? Talk about shameless!) So, with a website with a steady, if modest, amount of traffic at my disposal, I decided to Do Some Science and sign up for Adsense.

Setting up AdSense

Adsense is pretty easy to set up if you have a website or a WordPress blog. Each ad is created by an ad unit, which essentially is a few lines of code you copy into your page’s html. If it’s the first time you have added ads to a website, the application process involves submitting your website address to check if it meets their content guidelines.

This process unfortunately takes a few days while you are left out in the cold as to where you are in the approval process – all you can do is wait. When you finally get the confirmation email, you can start to create ad units and put them on your site. These first ad units also take a few hours to appear on your site, so you don’t know immediately whether you have done it right.

After all this waiting around, the sense of achievement I got when I finally saw my first ad appearing on my site was quite remarkable!

A crash course in AdSense

Like I say, I never expect AdSense to deliver enough money to make me rich, or even to provide enough money to be equivalent to be a part-time job – a bit of pocket money at best. Even in these ambiguous terms, I had no idea how much I might actually earn.

The key metric of revenue in AdSense is RPM, or revenue per 1000 views. This is the money you make, divided by the number of views, times 1000, and this is normally calculated on a day-by-day basis (although of course you can average it out over longer timeframes). So, in order to calculate your predicted earnings, you can multiply your visitor count by your RPM. You probably know how many visitors you have on your site, so the missing value is your RPM. Find out what the RPM should be, and you can calculate your potential income. Sounds simple, right?

The problem is that the RPM is a difficult number to find out. Ads are sold by Google on an auction basis, and your earnings are based on a percentage of the ad unit sale price. These prices can fluctuate hugely depending on the balance of supply and demand for ad space, the kind of ads that you show, the country (or region) your visitors are from, the placement of your ads, not to mention a huge range of other factors. So when you are considering signing up for AdSense, it’s not much use Googling around for typical RPMs.

A further issue compounding the problem is that there are two sources of income from your ads. You get a small payment for every view and a larger payment for every click. The number of clicks that you get relative to every view is very small (a ratio known as the CTR, the Click-Through Rate) – typically less than 1%, but the payments for clicks are much higher. RPM is calculated based on the sum of views and clicks.

Earning my first penny

adsense

So what is my experience? On days when I get no clicks (which enables me to easily analyse the ‘view’ component of the RPM) I typically get an RPM anywhere between £0.05 to £0.50. The fluctuations seem to be heavily dependent upon the countries the views come from. Higher payments tend to come from views in English-speaking countries, especially the US. At the other end of the scale, views from the Middle East and India tend to generate almost nothing. Perhaps surprisingly, views from Japan generate very poor RPMs too. It comes down to the countries where Google are most able to sell adverts at a higher price – which arguably is easier both when the country has a stronger economy (it is more compelling for advertisers to buy adverts in a country where its residents have disposable income for overpriced holiday breaks) and where Google is already well-established as the go-to for online advertising. (I seem to recall for example that Yahoo is the internet company of choice in Japan, not Google.)

What about when I do get a click? These are quite uncommon compared to views. I currently have 1153 views registered and 3 (yes, three!) clicks – a CTR of 0.26%. Wow!!

However, it’s the income we’re really interested in. Based on n=3 (you’ve come to the right place if you want robust. statistically-sound Science), the average cost per click is £0.55 each. However, one click came in at £0.15 while another came in at over £1.00, so considering an average can be almost meaningless unless traffic is really high. My total income (clicks and views) is £1.92, so it’s obvious that clicks clearly hold more value, even when they are very infrequent.

In total, my lifetime RPM is £1.67. But filter out the clicks, and the views contribute only an RPM of £0.32.

Should I use Adsense then?

It’s becoming clear why websites have a nasty reputation of encouraging ‘accidental’ clicks. The AdSense conditions prohibit layouts and behaviours that encourage this (which makes sense – accidental clicks have no value to the advertiser and will eventually reduce the how much companies are willing to bid for clicks). It’s nice that there are two revenue streams within AdSense, but by my reckoning the ‘views’ component is almost worthless.

Furthermore, number of views reported in AdSense is much lower than the views reported in Jetpack, the free tool I use for site stats of this blog. Assuming Jetpack is reliable (which I can’t be completely sure about) the most likely candidate for this discrepancy might be AdBlock, a hugely popular tool for users to block ads showing on websites. This is maybe a blog post for the future, but the lost potential income in this discrepancy is something to consider.

How do these RPM values compare with information on other sites? Reliable information can be a little hard to come by since the internet is awash with dodgy consultants promising to you that elusive yacht and mansion if you buy their overpriced eBook. (Often, these sites themselves have AdSense advertising – or website that make money by Adsense by generating views by telling people how to make money by Adsense!) A few sources that seem to ring true for me include this one, which claims a RPM of $1 to $10 (£0.70 to £7.00) for content-rich sites and blogs. (Notice the large range again!)

Bear in mind that I have done absolutely no optimisation work on my AdSense. The content on my website is mostly difficult to monetise. Google’s algorithms choose adverts to display on your site based upon its content (see here). A website with reviews on hotels is likely going to deliver much higher RPMs since everyone researches and books hotels online nowadays. If your site offers products rather than information, there may be something in it for you.

But, if you are going to make money by promoting ways for people essentially to spend their money online, it might make more sense to look at affiliate programmes. Affiliate programmes are basically commission-based programmes where companies pay you directly if you directly point someone towards their site and they buy something. This blog post gives an example of such a site that increased their income with this method.

So in conclusion, what does that mean? If your site provides information, then you probably won’t earn much. If your site provides products, then there may be better ways of making money. So why use AdSense at all? I think the answer is that it’s easy money. It may not be much, but if you already have a site that has a decent amount of traffic, you can get a steady source of income with minutes of work (at least, once you know what you’re doing).

What next?

Will I keep AdSense on my blog? Now I have a couple of £s built up in my AdSense account, I feel it’s a small matter of pride not to lose it. Bear in mind that there are minimum payout thresholds – i.e. your account needs to hit a certain limit before Google will send you a payment. I will probably be an old man before I get to the £60 threshold, but I would feel a pain if I closed my AdSense account and went back to ad-free blogging, knowing that Google had made money from their defacement of my site without me getting my own share of the takings.

And as long as I keep the ads going, I am building up more data and getting a better understanding of the rewards of AdSense.

So, in the name of Science, should I keep going? I can’t decide.

Add a new domain and WordPress installation through cPanel

If you have a website using webhost such as SiteGround, you are probably using the cPanel software to manage it. Many hosting packages allow multiple domains to be hosted. This short guide shows how to set up a second and a third domain on your hosting service through cPanel, and how to set up a WordPress installation on it.

I have such a package with SiteGround, and of course I am running james-ramsden.com on it. After a recent trip to Japan, I am wanting to create a new website called ski-hokkaido.com to document the trip (though we’ll see if that actually happens!), and to save costs I am going to run it from the same SiteGround hosting account. It’s been a while since I’ve done something like this, and it was a bit of a headache when I couldn’t remember how to do it, so hopefully this guide will jog both my memory if I need to do it again, as well as hopefully being useful for anyone else…?

This process is free of charge. It takes about 10 minutes of your time, though it will take between 2-48 hours for the servers to catch up and your new website to be live.
Step 0: What you need

  1. A new domain address that you want to set up
  2. A hosting account which uses cPanel as its management tool

In my case, I bought the domain from NameCheap, and I use SiteGround as my webhost.

Looking for a webhost? James-Ramsden.com is hosted by SiteGround, and I happily recommend it to others. If you are looking for a fast and good value web host, you can help support this site by signing up for SiteGround here.

Step 1: Point your domain to your webhost’s server

Your Domain Name Server (DNS) information is what turns human-readable website names (www.something.com) into a computer-readable address that helps your browser find which computer in the world it is supposed to be talking to. Your website is ‘saved’ physically on your webhost, so when a user types your web address into their browser, it needs to be able to find your webhost so that they can access your website.

Your domain is what allows this process to happen. The domain registrar essentially is the company that ‘points’ a browser towards the computer where a website is being hosted. When you have just bought a new domain, you have to make the link yourself between the domain and your website.

So how do we do this? Basically, have to find the DNS information for our webhost, and point our domain towards it.

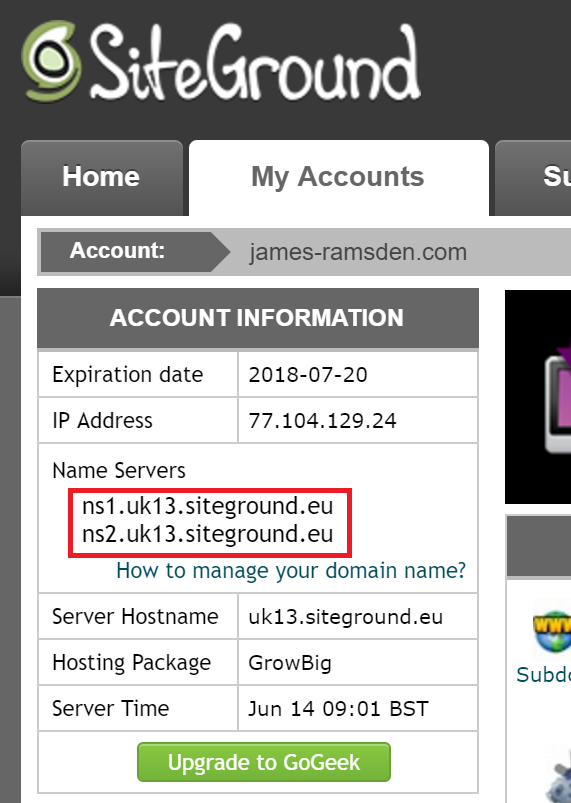
Step 1a: Go to SiteGround (or your equivalent) and log in to cPanel. Under ‘My Accounts’, look for ‘Name Servers’ in the top left.

siteground

Keep this tab open.

Step 1b: We need to tell your domain registrar about the DNS addresses we found on our webhost, and the process may vary slightly depending on which company you use.

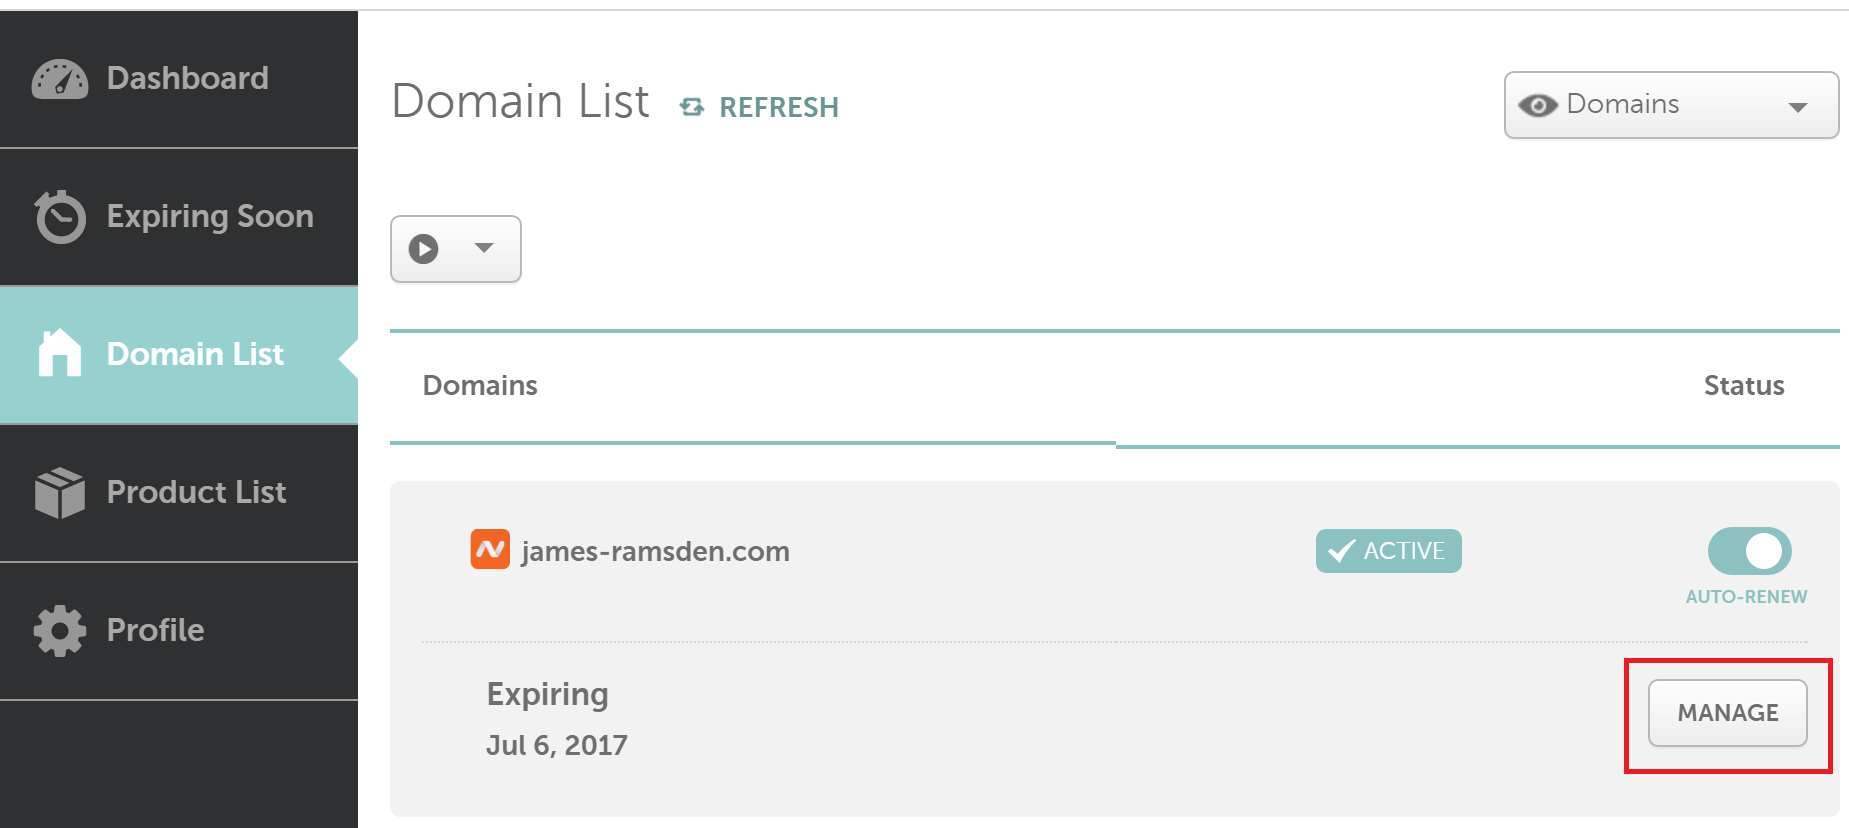
Open a new tab. Log in to Namecheap (or your own registrar) and go to ‘Domain List’.

namecheap1

Find your website and click the ‘Manage’ button.

namecheap2

Scroll down to the ‘Nameservers’ section.

Select ‘Custom DNS’ and copy the DNS information that you got from SiteGround into the textboxes.

namecheap3

Save changes.

Step 2: Set up your domain on your webhost’s server

We have now told your domain registrar to point to your webhost when someone enters your new domain into their browser, but we haven’t told the webhost what to do when they arrive. So now we need to set up our WordPress blog, and configure it so that it loads when someone comes to our webhost with this domain.

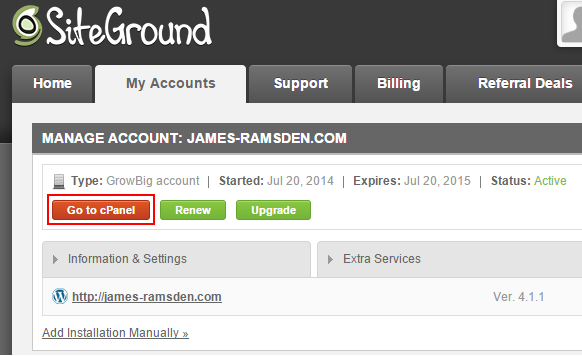
Firstly, you need to log in to your cPanel interface. I did this by going to SiteGround, logging in, going to ‘My Accounts’ and ‘Go to cPanel’.
dns6

Once inside, find ‘Addon Domains’.

dns7

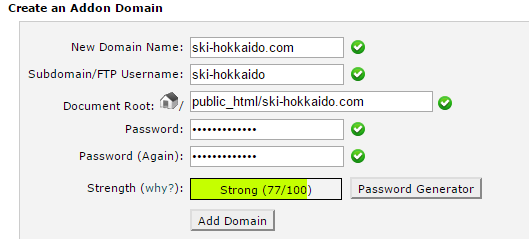
Fill in the fields below.

dns8

The ‘New Domain Name’ is the domain you have just bought, exactly as you registered it, but without the http part. The next two fields should autofill to sensible values, or if not then replicate the patterns in the image. Finally, enter a password.

Step 3: Set up WordPress (optional)

The above step created a folder in our server space, but there’s nothing in it. You can of course do anything with this space, but here we’re going to install WordPress.

Many webhosts using cPanel make it easy to install WordPress through cPanel. Go back to your cPanel interface and find the WordPress installer.

dns9

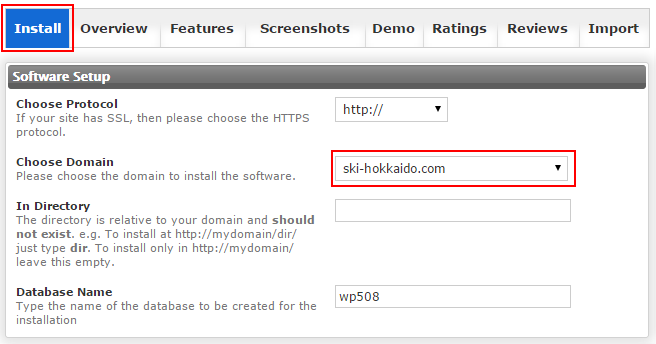
Select ‘Install’. A form will appear where we set up our WordPress blog. Find your domain in the drop-down box.

wp1

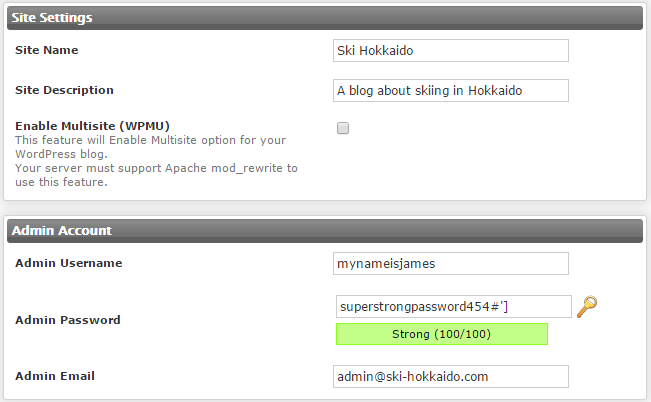
Give the site a name and a description. (You can change these later on from the WordPress dashboard.) Leave ‘multi-site’ off unless you know exactly what it is, even if you have multiple WordPress blogs. The username and the password is how you log in to the WordPress admin view, where you design your site and create content. You don’t want people hacking this, as it gives them full control of your WordPress site, so give it a secure username and password!

If you have email set up on your webhost, you can use something like has is given to you. Alternatively, you can use any email address you like. This address isn’t visible from anywhere on your site by default.

wp2

Everything else can be left as default. Click ‘install’ at the bottom, give it a few minutes, and you’re done!

So… where’s my website??

You would think now, that if we enter our address of our new website in our browser, we should see a tantalisingly empty blog, waiting to be filled. You may notice that something does load when we enter the address, but it’s a generic page filled with ‘NameCheap… website coming soon!’ with words to that effect, and no way of actually doing… anything!.

The answer is simply, relax! Transferring over domain names tends to take a while, and sometimes as long as 48 hours. With NameCheap and SiteGround, in my experience it does take a couple of hours.

And when it’s ready, you can start to edit your WordPress website in the usual way – just head to http://mydomain.com/wp-admin. Once there, enter the login details you gave when you created the WordPress installation.

Have fun!