Create a list of random numbers in C#

Generating random numbers in C# isn’t the most intuitive process. I originally learnt to code back in the day using VB, where generating a random number was as simple as calling the Rnd() function.

In C#, there is slightly more work to do. We first have to create an instance of the Random class, which is non-static. Only then can we call a function to generate a random number for us.

The example below is written for the C# component in Grasshopper, but the gist of it can be used for any C# application.

C# code

  private void RunScript(ref object A)
  {

    var rand = new Random();
    var rtnlist = new List<double>();

    for (int i = 0; i < 100000; i++)
    {
      rtnlist.Add(rand.Next(1000));
    }
    A = rtnlist;

  }

What’s happening here?

We create an instantiation of the Random class. We call this ‘rand’. This is what contains the logic to generate our random numbers.

Since computers are inherently quite terrible at generating truly random numbers, programming languages tend to use pre-programmed lists of random numbers instead. The random class picks a place in the list to start from. Then, every time we call for a new random number, it is simply reading the next value in the list.

This is why the function to generate a new random number is called ‘Next’ – it is simply looking at the next value in its list of random numbers. The 1000 in the brackets specifies that the number returned will be scaled between 0 and 1000. (If we left the brackets blank, the random number would be between 0 and the highest possible integer.)

The script creates a list of 100000 random numbers between 0 and 1000. The output is sent to the variable ‘A’. This is a Grasshopper specific thing – if you were writing this as a method, you could change this to ‘return rtnlist’.

If you need many random numbers, you should still only create one instance of Random, and then use ‘Next()’ to build your collection of random numbers. If you don’t do this, and instead create an instance of ‘Random’ for every random number you need, the resulting numbers may not be random at all.

Area of a triangle in 3D: C# code

The area of a triangle in 3D space can easily be calculated using Heron’s Formula.

The C# code below contains a method that returns the area of a triangle formed by 3 points. This code is written for RhinoCommon, though can be easily adapted for any C# application. ‘Point3d’ is a collection of XYZ coordinates for a single point, and the DistanceTo method returns a double equivalent to the Euclidean distance between the two points.

  public double AreaOfTriangle(Point3d pt1, Point3d pt2, Point3d pt3)
  {
    double a = pt1.DistanceTo(pt2);
    double b = pt2.DistanceTo(pt3);
    double c = pt3.DistanceTo(pt1);
    double s = (a + b + c) / 2;
    return Math.Sqrt(s * (s-a) * (s-b) * (s-c));
  }

References

Map a value from one number scale to another – formula and C# code

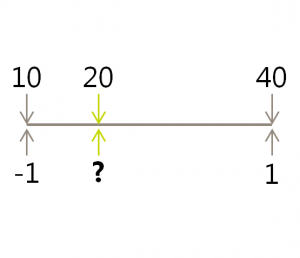
Let’s say you have a number scale that has a minimum and a maximum. You have a second number scale with a min and a max. How do you map an arbitrary value somewhere on that number scale to the second scale?

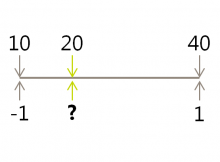
A number scale, map a value from one scale to anotherLet’s call the top scale a with a0 = 10 and a1 = 40. The bottom scale goes from b0 = -1 to b1 = 1. We want to map the value a = 20 to some value of b. The equation is:

b=b_{0}+(b_{1}-b_{0})\displaystyle\frac{a-a_{0}}{a_{1}-a_{0}}


If you are normalising a value to between 0 and 1, then b0 = 0 and b1 = 1. The equation reduces nicely to:

b=\displaystyle\frac{a-a_{0}}{a_{1}-a_{0}}


C# code example

public double MapValue(double a0, double a1, double b0, double b1, double a)
{
	return b0 + (b1 - b0) * ((a-a0)/(a1-a0));
}

Angle class for C#

A class which handles angles both as radians and degrees, with automatic conversions between each.

Using the class is easy.

Example usage:

Angle myAngle = new Angle(90, Angle.Type.Degrees); //new angle of 90 degrees
double myAngleAsRadians = myAngle.Radians; //returns 1.57

Angle myAngle2 = new Angle(Math.PI, Angle.Type.Radians); //new angle of PI radians
double myAngle2AsDegrees = myAngle.Degrees; //returns 180

Angle sum = myAngle + myAngle2; //returns a new angle of 1.5*pi rad

bool isSmaller = myAngle < myAngle2; //returns true

Angle class source code

Just add a new class file to your project and copy the text below. You may wish to change the namespace.

using System;
using System.Collections.Generic;
using System.Linq;
using System.Text;
using System.Threading.Tasks;

namespace YourNamespace
{
    /// <summary>
    /// Holds an angle as both radians and degrees, with conversions between each
    /// </summary>
    public class Angle
    {
        #region constructors
        /// <summary>
        /// Blank constructor. Remember to manually set some data to the properties!
        /// </summary>
        public Angle()
        {

        }
        /// <summary>
        /// Construct an angle with either a degree or a radian value
        /// </summary>
        /// <param name="input">Angle value</param>
        /// <param name="angleType">Specify whether input is in radians or degrees</param>
        public Angle(double input, Type angleType = Angle.Type.Radians)
        {
            if (angleType == Type.Degrees)
            {
                Degrees = input;
            }
            else if (angleType == Type.Radians)
            {
                Radians = input;
            }
        }
        /// <summary>
        /// Quickly construct a common angle
        /// </summary>
        /// <param name="preset">Choose angle</param>
        public Angle(Angle.Preset preset)
        {
            if (preset == Angle.Preset.Deg0) { Degrees = 0; }
            else if (preset == Preset.Deg180) { Degrees = 180; }
            else if (preset == Preset.Deg360) { Degrees = 360; }
            else if (preset == Preset.Rad2Pi) { Radians = twoPi; }
            else if (preset == Preset.RadPi) { Radians = Pi; }
            else Radians = 0;
        }
        #endregion constructors


        #region properties
        private double degrees;

        /// <summary>
        /// Angle in degrees
        /// </summary>
        public double Degrees
        {
            get { return degrees; }
            set
            {
                degrees = value;
                radians = ToRadians(value);
                updateFixedangles();
            }
        }

        private double radians;
        /// <summary>
        /// Angle in radians between -pi to pi
        /// </summary>
        public double Radians
        {
            get { return radians; }
            set
            {
                radians = value;
                degrees = ToDegrees(value);
                updateFixedangles();
            }
        }

        private double radians2pi;
        /// <summary>
        /// Angle in radians, modified to fall between 0 and 2pi. Read-only.
        /// </summary>
        public double Radians2pi
        {
            get { return radians2pi; }
        }

        private double degrees360;
        /// <summary>
        /// Value in degrees between 0 and 360. Read-only. 
        /// </summary>
        public double Degrees360
        {
            get { return degrees360; }
        }


        #endregion properties


        #region enums
        public enum Type { Radians, Degrees }
        /// <summary>
        /// Presets for quick setup of Angle constructor
        /// </summary>
        public enum Preset { Deg0, Deg180, Deg360, RadPi, Rad2Pi }
        #endregion enums


        #region constants
        private const double twoPi = 2 * Math.PI;
        private const double Pi = Math.PI;
        #endregion constants


        #region methods
        /// <summary>
        /// Convert an input angle of degrees to radians. Does not affect any properties in this class - set properties instead.
        /// </summary>
        /// <param name="val">Input in degrees</param>
        /// <returns>Value in radians</returns>
        public static double ToRadians(double val)
        {
            return val / (180 / Pi);
        }

        /// <summary>
        /// Convert an input angle of radians into degrees. Does not affect any properties in this class - set properties instead.
        /// </summary>
        /// <param name="val">Input in radians</param>
        /// <returns>Value in degrees</returns>
        public static double ToDegrees(double val)
        {
            return val * (180 / Pi);
        }

        /// <summary>
        /// Fixes an angle to between 0 and 360 or 2pi.
        /// </summary>
        /// <param name="val">Input angle</param>
        /// <param name="type">Specify whether the input angle is radians or degrees</param>
        /// <returns>The angle, fixed to between 0 and 360 or 0 and 2pi</returns>
        public static double FixAngle(double val, Type type)
        {
            if (type == Type.Radians)
            {
                //-2pi to 0 to between 0 and 2pi
                if (val < 0)
                {
                    return 2 * Math.PI - (Math.Abs(val) % (2 * Math.PI));
                }
                //over 2pi to between 0 and 2pi
                else if (val > 2 * Math.PI)
                {
                    return val % (2 * Math.PI);
                }
                //else it's fine, return it back
                else
                {
                    return val;
                }
            }
            else if (type == Type.Degrees)
            {
                //-360 to 0 to between 0 and 360
                if (val < 0)
                {
                    return 360 - (Math.Abs(val) % 360);
                }
                //over 360 to between 0 and 360
                else if (val > 360)
                {
                    return val % 360;
                }
                //else it's fine, return it back
                else
                {
                    return val;
                }
            }
            else return -1; //something's gone wrong
        }

        /// <summary>
        /// Looks at the radians and degrees properties, and updates their respective fixed angles
        /// </summary>
        private void updateFixedangles()
        {
            radians2pi = FixAngle(radians, Type.Radians);
            degrees360 = FixAngle(degrees, Type.Degrees);
        }

        /// <summary>
        /// Copies Radians2pi to Radians, and Degrees360 to Degrees. (I.e. fixes radians to 0<2pi and degrees to 0<360)
        /// </summary>
        public void FixAngles()
        {
            updateFixedangles();
            Radians = Radians2pi; //this also calls Degrees
        }

        #endregion methods


        #region operators

        /// <summary>
        /// Returns the sum of two angles
        /// </summary>
        /// <param name="a1">First angle</param>
        /// <param name="a2">Second angle</param>
        /// <returns>An angle constructed from the radian sum of the input angles</returns>
        public static Angle operator +(Angle a1, Angle a2)
        {
            return new Angle(a1.Radians + a2.Radians, Type.Radians);
        }

        /// <summary>
        /// Returns the difference between two angles
        /// </summary>
        /// <param name="a1">First angle</param>
        /// <param name="a2">Second angle</param>
        /// <returns>An angle constructed from the value that is the first angle minus the second angle</returns>
        public static Angle operator -(Angle a1, Angle a2)
        {
            return new Angle(a1.Radians - a2.Radians, Type.Radians);
        }

        /// <summary>
        /// Returns the exact division between two angles (i.e. how many times does the second angle fit into the first)
        /// </summary>
        /// <param name="a1">Numerator angle</param>
        /// <param name="a2">Dedominator angle</param>
        /// <returns>A new angle constructed from the value that is the first angle in radians divided by the second angle in radians</returns>
        public static Angle operator /(Angle a1, Angle a2)
        {
            return new Angle(a1.Radians / a2.Radians, Type.Radians);
        }

        public static Angle operator *(Angle a, double d)
        {
            return new Angle(a.Radians * d, Type.Radians);
        }

        public static Angle operator *(double d, Angle a)
        {
            return new Angle(a.Radians * d, Type.Radians);
        }

        public static Angle operator /(Angle a, double d)
        {
            return new Angle(a.Radians / d, Type.Radians);
        }

        public static bool operator <(Angle a1, Angle a2)
        {
            if (a1.Radians < a2.Radians) return true;
            else return false;
        }

        public static bool operator >(Angle a1, Angle a2)
        {
            if (a1.Radians > a2.Radians) return true;
            else return false;
        }

        public static bool operator <=(Angle a1, Angle a2)
        {
            if (a1.Radians <= a2.Radians) return true;
            else return false;
        }

        public static bool operator >=(Angle a1, Angle a2)
        {
            if (a1.Radians >= a2.Radians) return true;
            else return false;
        }

        public static implicit operator double(Angle angleobj)
        {
            return angleobj.Radians;
        }

        public static implicit operator string(Angle a)
        {
            return a.ToString();
        }

        #endregion operators


        #region overrides

        public override string ToString()
        {
            return Radians.ToString() + " radians";
        }

        #endregion overrides


    }

}

Convert from HSL to RGB colour codes in C#

A function to create a new colour in C# from HSL values:

class ColorScale
    {
        public static Color ColorFromHSL(double h, double s, double l)
        {
            double r = 0, g = 0, b = 0;
            if (l != 0)
            {
                if (s == 0)
                    r = g = b = l;
                else
                {
                    double temp2;
                    if (l < 0.5)
                        temp2 = l * (1.0 + s);
                    else
                        temp2 = l + s - (l * s);

                    double temp1 = 2.0 * l - temp2;

                    r = GetColorComponent(temp1, temp2, h + 1.0 / 3.0);
                    g = GetColorComponent(temp1, temp2, h);
                    b = GetColorComponent(temp1, temp2, h - 1.0 / 3.0);
                }
            }
            return Color.FromArgb((int)(255 * r), (int)(255 * g), (int)(255 * b));

        }

        private static double GetColorComponent(double temp1, double temp2, double temp3)
        {
            if (temp3 < 0.0)
                temp3 += 1.0;
            else if (temp3 > 1.0)
                temp3 -= 1.0;

            if (temp3 < 1.0 / 6.0)
                return temp1 + (temp2 - temp1) * 6.0 * temp3;
            else if (temp3 < 0.5)
                return temp2;
            else if (temp3 < 2.0 / 3.0)
                return temp1 + ((temp2 - temp1) * ((2.0 / 3.0) - temp3) * 6.0);
            else
                return temp1;
        }
    }

Thanks to David Greenwood for showing me this, and the unknown/unnamed elves who initially created it and saved it on our office server.

Multithreading a foreach loop in a Grasshopper component in C#

Grasshopper itself is a single-threaded process. That is, even if you have a very complicated calculation going on, and you have a powerful computer with many cores, it persists in using a single core. This is very frustrating when you end up waiting a long time for calculations to complete.

However, it doesn’t have to be the case that each component is single-threaded. Nearly all components are single-threaded, but when you create your own compiled component, there’s nothing to stop you from defying convention and making some lightning-fast multi-threaded components. And, as I have just found out, it’s very easy to set up.

While the code is simple, knowing when it is okay to use multi-threaded logic is a bit more challenging. Multi-threading works best when you have a single repetitive task. Rather than multithreading the entire component, you select bits of your code that are taking a long time to calculate, and set those up for multithreading.

Say you have a foreach loop. You might be looping through a list of 100000 points in a model, checking if they are intersecting a shape. You then build a list of true/false that describes if each point is intersecting that shape. In regular single-threaded programming, your loop would go through each point one at a time, doing the intersection result and saving the result to your list.

This is a prime candidate for multithreading. The task is repetitive, and very importantly, each loop is independent, i.e. any one loop’s action does not depend on the result of any other loop.

With multi-threading, instead of running one at a time, we can divide the task up for each core on your computer. For example, if you have 2 cores, one core does half of the loops and the other does the other half.

.NET has some very useful classes/methods that really simplify setting this up. There are many of these for different tasks, but here we will focus on one in particular. Note that, as far as I know, these parallelisation tricks only work for compiled components (such as those created in Visual Studio) and won’t work in the c# script component within Grasshopper.

How to convert a ‘foreach’ loop into a parallel foreach loop

Let’s say you have the following foreach loop, which sends an output of results to Grasshopper:

var results = new List<bool>(new bool[pts.Count]);
foreach (Point3d pt in pts)
{
    bool isIntersecting = CheckIntersection(pt, shape);
    results.Add(isIntersecting);
}

DA.SetDataList(0, results);

This code uses a method I wrote, CheckIntersection, to see if a list of points are interacting with an input shape.

We set up a list to take our results, we cycle through our points, do a calculation on each, and then save the result. When finished, we send the result as an output back to Grasshopper. Simple enough.

The best thing to do is I show you how to parallelise this, and then explain what’s happening. Here’s the parallel version of the above code:

var results = new System.Collections.Concurrent.ConcurrentDictionary<Point3d, bool>(Environment.ProcessorCount, pts.Count);
foreach (Point3d pt in pts) results[pt] = false; //initialise dictionary

Parallel.ForEach(pt, pts=>
{
    bool isIntersecting = CheckIntersection(pt, shape);
    results[pt] = isIntersecting; //save your output here
}
);

DA.SetDataList(0, results.Values); //send back to GH output

Going from ‘foreach’ to ‘Parallel.ForEach’

The Parallel.ForEach method is what is doing the bulk of the work for us in parallelising our foreach loop. Rather than waiting for each loop to finish as in single threaded, the Parallel.ForEach hands out loops to each core to each of them as they become free. It is very simple – we don’t have to worry about dividing tasks between the processors, as it handles all that for us.

Aside from the slightly different notation, the information we provide is the same when we set up the loop. We are reading from collection ‘pts’, and the current item we are reading within ‘pts’ we will call ‘pt’.

The concurrent dictionary

One real problem though with multithreading the same task is that sometimes two or more processes can attempt to overwrite the same piece of data. This creates data errors, which may or may not be silent. This is why we don’t use a List for the multithreading example – List provides no protection from multiple processes attempting to write into itself.

Instead, we use the ConcurrentDictionary. The ConcurrentDictionary is a member of the Concurrent namespace, which provides a range of classes that allow us to hold and process data without having to worry about concurrent access problems. The ConcurrentDictionary works just about the same as regular Dictionaries, but for our purposes we can use it much like a list.

It is a little more complicated to set up, as you need to specify keys for each value in the dictionary, as well as the value itself. (I have used dictionaries once before here.) Rather than having a collection of items in an order that we can look up with the index (the first item is 0, the second item is 1 and so on) in a dictionary we look up items by referring to a specific item. This specific item is called the ‘key’. Here, I am using the points as the key, and then saving their associated value (the results we are trying to calculate) as a bool.

How much faster is parallel computation?

Basic maths will tell you that you will that your code should increase at a rate of how many cores you have. With my 4-core machine, I might expect a 60 second single-threaded loop to complete in about 15 seconds.

However, there are extra overheads in parallel processing. Dividing up the work, waiting for processes to finish towards the end, and working with the concurrent dictionary, all take up processor power that would otherwise be used in computing the problem itself.

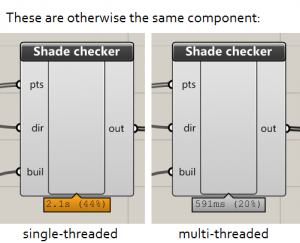
In reality, you will still likely get a substantial improvement compared to single-threaded performance. With 4 cores, I am finding I am getting a performance improvement of around 2.5 to 3.5 times. So a task that would normally take 60 seconds is now taking around 20 seconds.

Two Grasshopper components showing processing time difference between single-threaded and multi-threaded computation

References

Thanks to David Greenwood for getting me started with multithreading. Front image source under CC licence.

Bake and delete objects in Rhino with RhinoCommon

A very basic implementation of baking and deleting objects in Rhino through Grasshopper.

Rhino ObjectTable

Rhino objects are accessed through the object table – a container object which holds information about all objects in a Rhino document.

Rhino.DocObjects.Tables.ObjectTable ot = Rhino.RhinoDoc.ActiveDoc.Objects;

Add an object

Within the ObjectTable is a range of methods for adding objects. There is a method for each kind of geometry (meshes, lines, points and so on).

For example, to add a line:

ot.AddLine(new Point3d(0, 0, 0), new Point3d(1, 1, 1));

Deleting the most recent object

The Object Table appears to be sorted in order that objects were added, most recent first. So, to delete the most recent object, we need to delete object 0:

//get guid of the most recent object
Guid id = ot.ElementAt(0).Id;

//deletes this object
if(z) ot.Delete(id, true);

Get the number of objects

Unless there’s a better way to do it, the method below works. This returns the number of objects in the object table.

var sf = new Rhino.DocObjects.ObjectEnumeratorSettings();
int count = ot.ObjectCount(sf);

References

C#: Sort dictionary by key

How to sort dictionary by key in C#, and return a sorted list of values.

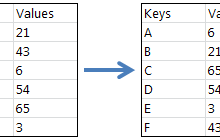
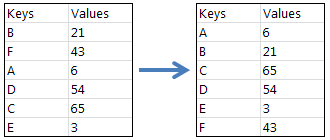
Let’s say you have some values. Each value is associated with a string, called a key. We want to sort the values such that their corresponding keys are in order.

c# sort dictionary by key

The basic idea is that we want to sort our keys, and then look up the dictionary according to the sorted keys.

But we have to be careful – we need to sort the keys without damaging the original dictionary. A good solution is to create a copy of the keys before you sort them.

See below for a full example:

Option 1: C# code to sort dictionary by key

  public List<object> SortDictionary()
  {
    //Create the data we want to sort.
    //In the data below, we are saying that "B corresponds to 21", "F corresponds to 43" and so on.
    //Normally, you would probably be feeding this data from somewhere else in your program.
    List<string> Keys = new List<string>();
    List<object> Values = new List<object>();
    Keys.Add("B");
    Keys.Add("F");
    Keys.Add("A");
    Keys.Add("D");
    Keys.Add("C");
    Keys.Add("E");
    Values.Add(21);
    Values.Add(43);
    Values.Add(6);
    Values.Add(54);
    Values.Add(65);
    Values.Add(3);

    //Declare new dictionary, where the key is a string and the corresponding data is an object
    var dict = new Dictionary<string, object>();
    //populate dictionary with data created above
    for (int i = 0; i < Keys.Count; i++) dict.Add(Keys[i], Values[i]);

    //Separately, sort our keys into alphabetical order
    //You need your keys in their own list. You may need to create this yourself if you don't already have it.
    Keys.Sort();

    //Now look up our dictionary according to our sorted keys
    List<object> sortedVals = new List<object>();
    for (int i = 0; i < Keys.Count; i++)
    {
      sortedVals.Add(dict[Keys[i]]);
    }
    return sortedVals;
  }

Thanks to Fraser Greenroyd for helping me with the code snippet above.

Option 2: Use SortedDictionary to sort a dictionary in C#

If you require that your dictionary is always going to be sorted, it might be better to use a SortedDictionary rather than just a Dictionary.

Whenever you add an item to a SortedDictionary, the item will be inserted into the correct location.

Note that there is a performance penalty for some SortedDictionary operations, so you should consider whether a SortedDictionary is best for you.

    var sdict = new SortedDictionary<string, object>();
    for (int i = 0; i < Keys.Count; i++) sdict.Add(Keys[i], Values[i]);
    return sdict.Values.ToList();

Creating my first WordPress plugin and learning PHP

Firstly, I have to say that I was pleasantly surprised how easy it was to do both of these – that is, creating a simple WordPress plugin as well as learning from scratch enough PHP to do this. It still required some cognitive effort, but the whole ordeal was completed within an evening.

One of my tasks this weekend was sorting out my links page. I want to keep it looking fairly tidy and organised, so I used a table. Even the simple layout below took a fair amount of repetitive HTML in order to do this. If I wanted to make a change (e.g. widen one column) this would mean modify a value for every row. Not efficient!

old-links-page

The above table was made with code that looks like this:

old-links-page-2

Imagine the list grows and there are 50 rows in the table. Then I decide to add a new column. I would have to manually add every extra cell manually, which is not going to be fun.

PHP

PHP is a scripting language that you can use to automate repetitive parts of your code, among many other tasks. It’s incredibly powerful – it’s the language that powers WordPress after all. I wondered if it was possible to have a PHP script generate the HTML to make the table.

So I set about learning some PHP using the excellent PHP tutorial at w3schools. I’m not familar with JavaScript, but PHP is similar enough to C# that it was mostly a breeze.

When learning, I found it was useful to create a document on my server. I logged into cPanel and created a new document here to practise with. cPanel includes a code editor. Alternatively you could create a local document. Which in hindsight is probably simpler.

Incidentally, what is the key difference between PHP and JavaScript? PHP runs on the server and delivers the output (i.e. the HTML) over the internet. With JavaScript, the server sends the code itself to the client machine (i.e. your computer) and the code executes there. I learnt that today 🙂

First attempt with PHP in WordPress (Spoiler: It fails!)

The easiest solution would be to add a bit of PHP script within the HTML that makes up the links page. On my practice page I eventually managed to get a solution working in principle. Essentially all you do is create a function with arguments like ‘URL’ and ‘description’, and in that function you use the echo command to construct the HTML.

function AddLinksRow($URL, $name, $description)
{
echo '<tr>
<td><a href="' . $URL . '"><img src="https://eu2.searchpreview.de/preview?s=' . $URL . '" /></a></td>
<td><b><a href="' . $URL . '">' . $name . '</a></b></td>
<td>' . $description . '</td>
</tr>';
}

echo '<table class="JR">';
AddLinksRow("http://www.google.co.uk","Google","Search the web with google");
AddLinksRow("http://www.bbc.co.uk","BBC","News");
echo '</table>';

This makes the following table:

php-test

If you’re already familiar with HTML table notation, you should be able to see how the function is constructing the HTML, and the great thing about PHP is that we can effectively include variables in our HTML. So we can reuse the same function to generate a new batch of HTML for each row of the table.

By default, I use the HTML editor in WordPress. (Not a fan of WYSIWYG as often what I see isn’t what I get.) So you would think that copying the code over into a WordPress page would be trivial.

If only! Even the HTML editor still undergoes some ‘tidying’ by WordPress. This is why it’s possible to create new paragraphs with the return key without having to use <p> tags. One other thing that it does is block PHP execution. Instead, your page will make a token attempt of trying to render your script.

There is a range of plugins for WordPress that re-enable in-line PHP execution in posts and pages, such as Insert PHP or Shortcode Exec PHP. Frustratingly, none of these seem to work.

Digging in, many of these projects have not been updated in a while, and none of them profess to have support for version 4.x of WordPress. This seemed to be a dead-end.

Shortcodes in WordPress plugins

But then it occurred to me that WordPress plugins are written in PHP. Many plugins use shortcodes to allow the user to interact with them. For example, a plugin has been written to generate a list of saved links from the Pocket bookmarking service. You can see my list here. All I had to do to generate this list was type [pocket_links] in my page, and this shortcode would find the Pocket WP plugin, which in turn would fill out the page for me. These shortcodes can also take arguments, e.g. [pocket_links count=5] to display 5 items only from my Pocket list.

So, in principle, would it be possible to write an extension where I could write a shortcode with the URL and description as arguments, and let a plugin turn this information into a table row? Instead of that messy HTML above, could I write something much tidier like this?

[AddRow URL=”http://www.google.co.uk” name=”Google” description=”Search the web”]

Starting my first WordPress plugin

The process is remarkably simple. I followed this tutorial to get going, but the process is basically:

  • Find the WP plugin folder on your server. Create a new folder for your plugin.
  • Create a new document called plugin_name.php
  • Type in some properties about the plugin you are about to create, such as file name and author.
  • Go to the plugins on your WP dashboard. Your plugin should already be there! Activate it.

And that’s about it. All you have to do then is create your actual plugin functionality.

Writing the plugin

To get the functionality I was after, I used a combination of this WordPress help file and also having a peek at the Pocket WP PHP file. Eventually, this was what my own plugin PHP file looked like:

<?php
/**
* Plugin Name: JR links
* Plugin URI: http://james-ramsden.com/downloads
* Description: Use shortcode [JR_Links address="" name="" description=""] within table tags. This adds a row for a table of links.
* Version: 1.0
* Author: James Ramsden
* Author URI: http://james-ramsden.com
**/

function JR_links_funct( $atts, $content = null ) 
{
	extract(shortcode_atts(array('address' => '','name' => '','description' => ''), $atts )); //extract parameters

	$html = '<tr>';
	$html .= '<td width="111px"><a href=" ' . $address . '"><img src="https://eu2.searchpreview.de/preview?s=' . $address . '" /></a></td>'; //image
	$html .= '<td width="20%"><b><a href="' . $address . '">' . $name . '</a></b></td>';
	$html .= '<td>' . $description . '</td>';
	$html .= '</tr>';
	return $html;
}
add_shortcode( 'JR_Links', 'JR_links_funct' ); //the shortcode is called [JR_Links] and calls the function JR_links_funct
?>

The entire code inside the PHP file.

And that’s it! This is about as short as meaningful extensions get, and I’m pretty pleased as a first attempt.

The green text at the top is the plugin properties that WordPress reads to populate the plugins list on your dashboard. It’s best to just copy-paste this for your own plugins, as you’ll find it in every one.

The add_shortcut function is the bit of code that tells the WordPress editor to listen for a shortcode. When the shortcode [JR_Links] is used, then WP feeds back to this function, which in turn will call the JR_links_funct function.

Within the extract line, we have added the ability to listen for three arguments: address, name and description. We can then inherit these arguments as variables in our function. A variable called $html is then used to construt the HTML we want to output. When we’ve finished, we return $html, which then returns this text back to the WordPress page.

Using the new plugin

Now the dirty HTML work has been pushed into the background, creating the table is now much tidier. Creating the table is now as simple as:

<table>
<p>[JR_Links address="http://www.giuliopiacentino.com/" name="Giulio Piacentino" description="Architect, Grasshopper, RhinoScript"]</p>
...
</table>

If I want to make any changes to the layout, I can now do this within the PHP file. The shortcode is simply passing over the information required; it’s up to the PHP file on what HTML this is turned into. For maintainability, this is so much better. Since the same PHP file creates every line of the table, we only have to make a change once in the PHP file for the change to propagate through every row.

new-links-page

Access files and folders in Grasshopper with the C# component

It is very easy to delve into the files and folders on your computer in C#. The DirectoryInfo class contains a wealth of methods for reading, creating and modifying files and folders.

Here is an example created in Grasshopper showing how we can use the DirectoryInfo class to get a list of subfolders contained within a folder.

A grasshopper component to read in a file path and return containing folders. Created using the C# component.

Source code

This code takes in a folder path as a string, and returns a list of folder names contained within that folder.

The code is formatted for the C# component in Grasshopper but can be modified to suit any C# application.

  private void RunScript(string dir, ref object dirs)
  {

    System.IO.DirectoryInfo dirInfo = new System.IO.DirectoryInfo(dir);
    System.IO.DirectoryInfo[] dirInfos = dirInfo.GetDirectories("*.*");

    List<string> dirNames = new List<string>();

    foreach(System.IO.DirectoryInfo d in dirInfos)
    {
      dirNames.Add(d.Name);
    }

    dirs = dirNames;

  }