Count the number of repeated strings in a list in Grasshopper

This script takes in a list of strings. It consolidates repeated values and tells you how many times equal strings are repeated.

string-histogram-grasshopper

To use, copy the code below into a standard C# script component in Grasshopper. Add an additional output called B. Output A will show all the different values found in the list, and B will show the count for each item in A for the number of times that item was found.

    var names = new List<string>();
    var counts = new List<int>();

    foreach (string str in x)
    {
      bool exists = false;
      for (int i = 0; i < names.Count; i++)
      {
        if(str == names[i])
        {
          exists = true;
          counts[i]++;
        }
      }
      if (!exists)
      {
        counts.Add(1);
        names.Add(str);
      }

    }
    A = names;
    B = counts;

Access any component properties in C# using the Grasshopper API

In previous posts, I have touched upon the idea that it is possible to connect remotely to any component in the Grasshopper canvas and read or edit it, even when there are no wires connecting them. And in this recent post where I accessed the draw order of all components on the canvas, I found it was very easy to build a list of every component on the canvas.

So how far can we take this – is it possible to access any piece of information about any component of the entire canvas? How much can we learn and edit about components just using a bit of C#?

The code below is my attempt to find out. It is my attempt to write a code that, given any component in the canvas, will tell you as much as possible about it. For lack of a better name, I call it the Interrogator.

The Interrogator

The Interrogator is currently not very smart, but is a good start. It is a WIP and I may update this page as I teach the Interrogator more tricks. Set it up with a panel and a timer, then click on any component in the canvas. The Interrogator will tell you all it can about that component.

grasshopper-interrogator

As I learn more about the class structure of Grasshopper, I learn more about where different pieces of information are hiding, and how to access them. (Short story – the class hierarchy of Grasshopper is more a tangled web of inheritance and it’s easy to get lost!) Eventually, I want to be able to know how to access and modify everything about any component, which will help greatly in my ability to develop new and interesting Grasshopper components.

Code

For now, the limited information I can access is presented in the code below, in all its partially-commented glory. Just copy into a standard C# component, and let the Interrogator pick the brains of your components…

    var rtnlist = new List<string>();
    var rtntree = new DataTree<string>();

    //get all guids in doc - this is used to find the draw order
    var guids = new List<System.Guid>(); //guids of all componets
    foreach (IGH_DocumentObject docObject in GrasshopperDocument.Objects)
    {
      guids.Add(docObject.InstanceGuid);
    }
    //A = guids;

    foreach (IGH_DocumentObject obj in GrasshopperDocument.Objects)
    {
      if(obj.Attributes.Selected)
      {
        //find this object in the list of guids
        int loopno = 0;
        bool endloop = false;

        while (!endloop)
        {
          GH_Path pth = new GH_Path(loopno);
          //if object is selected, let's display its properties
          if(guids[loopno] == obj.InstanceGuid)
          {

            //build our component info list here!

            rtntree.Add(obj.NickName + " (" + obj.Name + ")", pth);
            rtntree.Add("Category: " + obj.Category + " > " + obj.SubCategory, pth); //the category in the GH tab
            rtntree.Add("Component GUID: " + obj.ComponentGuid.ToString(), pth);
            rtntree.Add("Description: " + obj.Description, pth);
            rtntree.Add("Draw order: " + loopno.ToString(), pth); //used for calculation order. New objects go to the end of the list by default
            rtntree.Add("Exposure: " + obj.Exposure, pth); //what is this?
            //you can  access the icon under obj.Icon
            rtntree.Add("Instance description: " + obj.InstanceDescription, pth);
            rtntree.Add("Instance GUID: " + obj.InstanceGuid.ToString(), pth);
            rtntree.Add("Attributes: " + obj.Attributes.ToString(), pth); //namespace and class in DLL

            rtntree.Add("Namespace: " + obj.Attributes.DocObject.ToString(), pth);


            //inputs
            //IList < Grasshopper.Kernel.IGH_Param > things = GrasshopperDocument.Objects as IList<Grasshopper.Kernel.IGH_Param>[0];
            //A = things;
            var para = obj as Grasshopper.Kernel.GH_ActiveObject;
            if(para != null)
            {
              rtntree.Add("Successfully cast as GH_ActiveObject", pth);
              rtntree.Add(para.ProcessorTime.ToString(), pth);
            }
            var para2 = obj as Grasshopper.Kernel.IGH_Component;
            if(para2 != null)
            {
              rtntree.Add("Successfully cast as IGH_Component", pth);
              rtntree.Add("Number of inputs: " + para2.Params.Input.Count().ToString(), pth);
            }
            //var para3 = obj as Grasshopper.Kernel.GH_PersistentParam<Grasshopper.Kernel.Types.IGH_Goo>;
            //rtntree.Add(para3.PersistentData[0].ToString(), pth);
            //var para4 = obj as Grasshopper.Kernel.Parameters.
            //if(para4 != null) rtntree.Add("yay", pth);


          }
          loopno++;
          if(loopno >= guids.Count) endloop = true;
        }
        A = rtntree;
      }
    }

How the draw order affects calculation order in Grasshopper

Usually, calculation in Grasshopper goes from left to right along the wires. The components on the left get calculated first, then they trigger components downstream to the right. This continues until the canvas has been fully calculated. After many months using Grasshopper, this is so obvious that it doesn’t even need thinking about.

Until, that is, you try to use Grasshopper contravening this fundamental logic. I recently had a task where I needed to calculate the glare using Honeybee. The glare calculation component uses the Rhino camera, meaning that the camera has to be moved into the correct position if the glare is going to be calculated correctly.

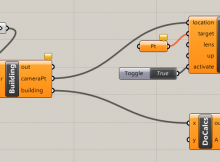
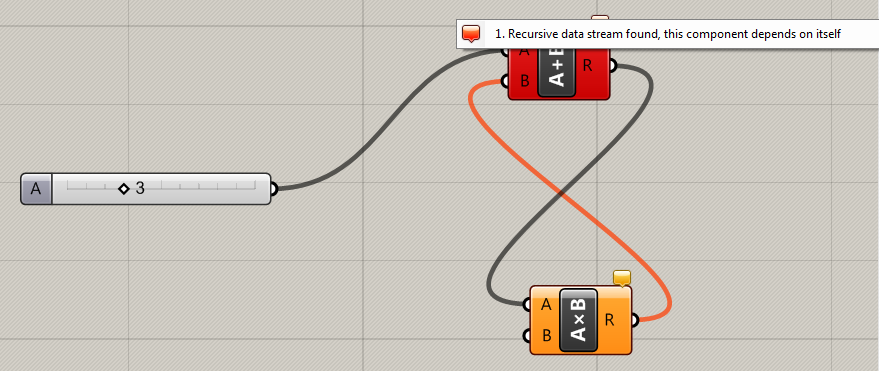
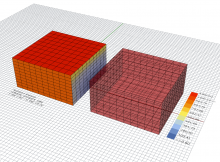
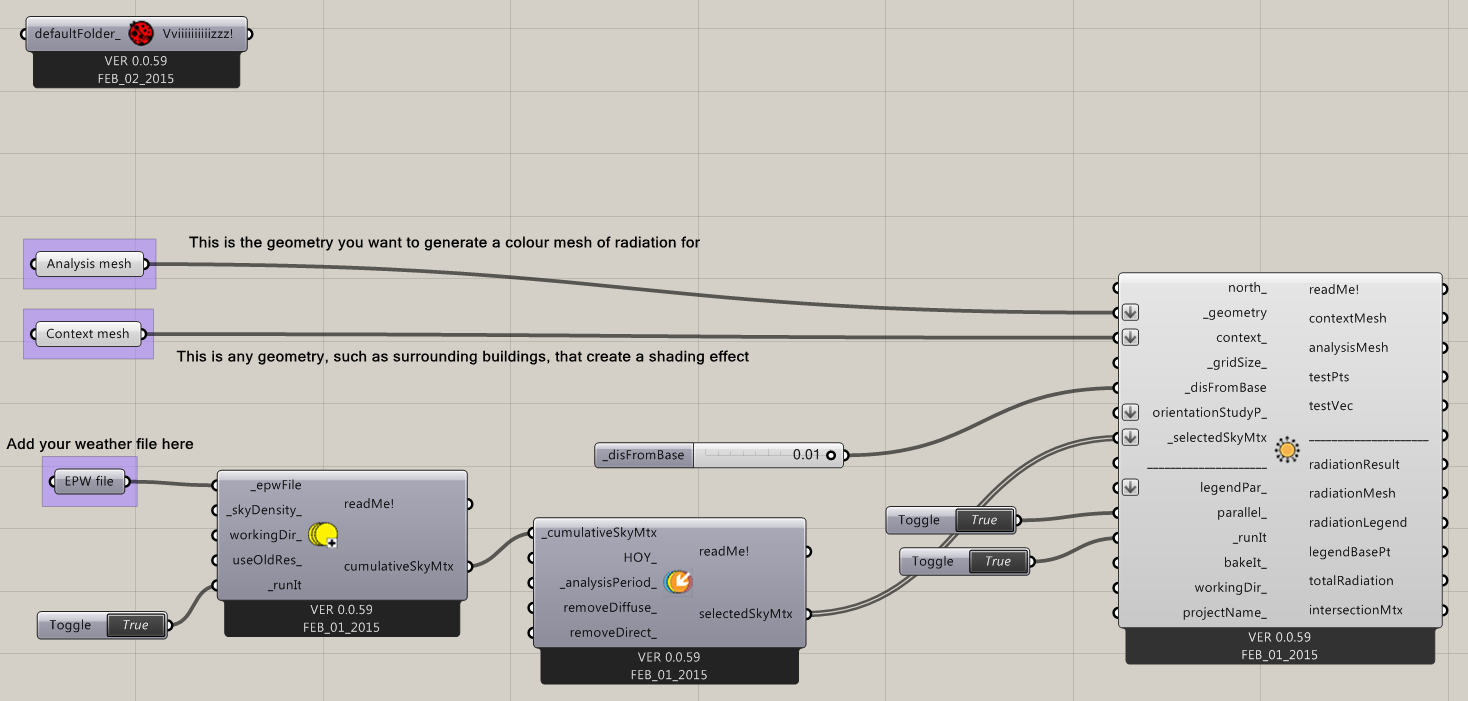
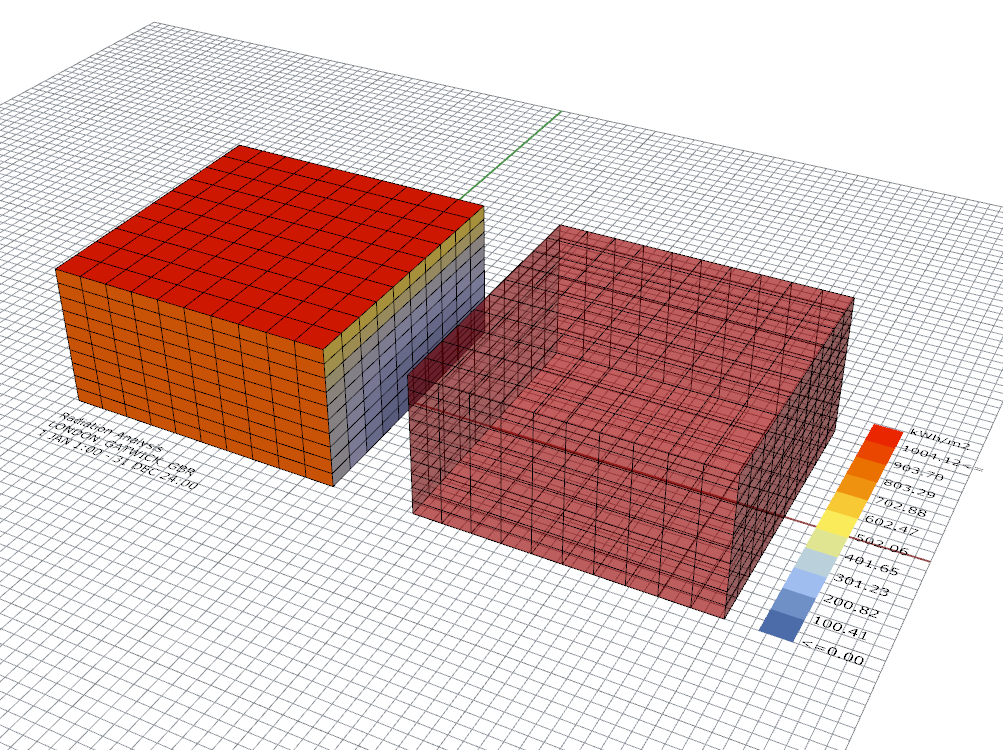
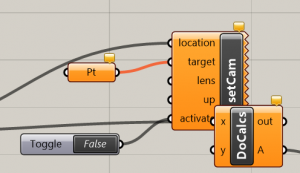
I decided to use the Horster camera control to adjust the camera. This gave me something like this:

Grasshopper component order problem with horster camera control and Honeybee glare calculation

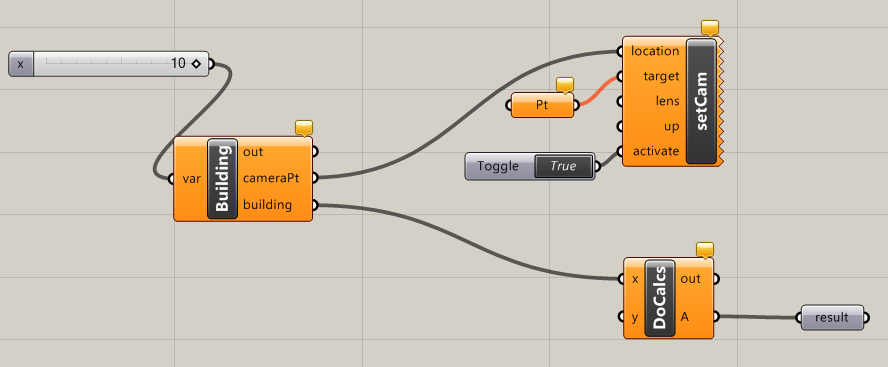
The calculations are dependent upon the camera having already been placed in the correct position here. In other words, the camera must be set before the calculations are done. See the problem? Without an output on the camera component, the calculation geometry must come from the ‘building’ component. It’s therefore impossible to ensure that the camera is moved before the calculations are done.

Which component does Grasshopper calculate first?

A bit of background first. When Grasshopper calculates components, it has a property called expired. If a component needs calculating, it is marked as expired=true. If it is up to date and doesn’t need calculating, it is marked as expired=false. When you make a change to a component (such as changing its input values) it is marked as expired. And when a component is marked as expired, everything downstream (i.e. to the right) is also marked as expired.

In short, ‘expired’ means that the component is waiting to be re-calculated.

Once Grasshopper has a list of expired components, it must then choose how it is going to re-calculate them. It does this by working from left to right, starting with a component that has no un-expired inputs.

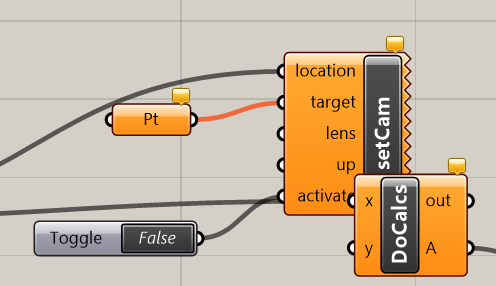
For most Grasshopper documents, this explanation is quite sufficient. But, in reality, there is a much more complicated algorithm going on. Notice in my diagram that there is more than one valid order it can choose to calculate the components:

  • Building, setCam, DoCalcs, result
  • Building, DoCalcs, setCam, result

So Grasshopper has two possible choices in what it wants to calculate first. And since, at the end of the day, it does choose one option, there must be some kind of further logic in the background on how it chooses calculation order. Without much else to go on, I head to the Grasshopper forums, where I read this older post and also asked this post.

What the calculation order does NOT depend on

The calculation order in Grasshopper does not depend on any of the following:

  • Component position (i.e. its x and y coordinates)
  • Order of inputs or outputs
  • The data contained within a component
  • The type of component *

So what does the calculation order depend on?

The draw order in Grasshopper

The calculation order is driven by one key thing: the draw order. In the background, Grasshopper saves a copy of all the components in your document in a list. The order of this list is the draw order.

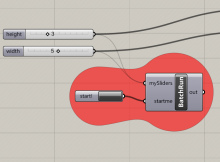
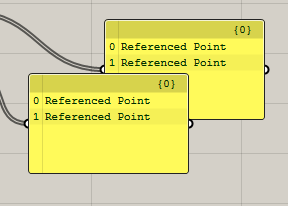
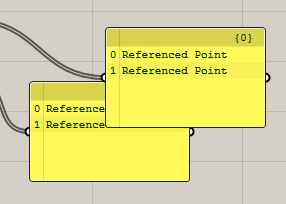
It is called the ‘draw order’ as it is this that governs which components are ‘drawn’ on top of each other. See how the panels below are drawn one on top of the other? That’s the draw order in action.

Grasshopper draw order shown by two panels

You can easily change the draw order by using keyboard shortcuts:

  • CTRL+B sends the component to the back
  • CTRL+F sends the component to the front

Grasshopper draw order shown by two panels

How Grasshopper does calculations using the draw order

The draw order does more than help to prettify your Grasshopper canvas – it is a primary driver in the calculation order too. Essentially, when Grasshopper is solving the canvas, what is happening is:

  1. Grasshopper makes a list of all components in your canvas. The order of these is the same as the draw order. The component drawn at the back of everything else is item 0 in the draw order, and the draw order increases to the front as you go down the list.
  2. Grasshopper finds the back-most expired component. It asks this component to solve itself.
  3. Before this component actually calculates anything, first it looks to see if any of its inputs are also expired. If they are, it asks these to solve themselves too.
  4. Again, these components also check their inputs before doing any calculations. This continues until a component is found which is expired, but which has no expired inputs. This component then calculates itself and marks itself as not expired.
  5. Go back to number 2. Repeat until nothing is expired.

How to check the draw order

The easiest way to check the draw order, and thus the calculation order, is simply to drag the components each other and see what appears on top. The component on the bottom will be calculated first. And if we aren’t happy with the order, we can use CTRL+B and CTRL+F to change them.

horster-order-test-grasshopper

Looks like setCam is being calculated first. Yay!

But wait – it’s not quite as simple as that! What if the setCam component is behind DoCalcs, but ‘result’ is behind both setCam and DoCalcs? ‘Result’ will be triggered first by Grasshopper, and this will then trigger DoCalcs to solve itself. So what will happen is that, even though setCam is behind doCalcs, setCam will be calculated after doCalcs because of the influence of ‘result’.

We need to be completely sure that setCam is therefore behind everything, not just DoCalcs. We can use the CTRL+B shortcut to do this, but how can we be sure it’s working properly? There’s no visual feedback that the shortcut has sent the component behind everything else without checking manually for every component.

How to check the draw order – for geeks

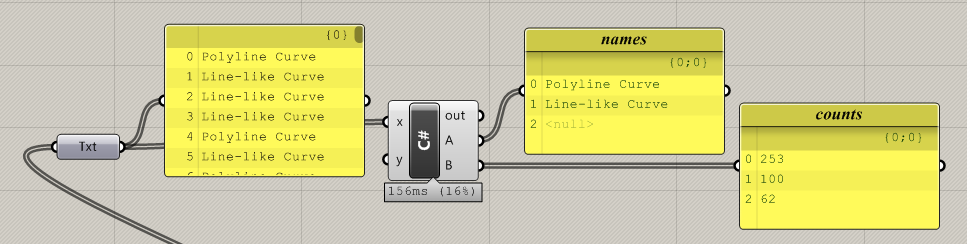
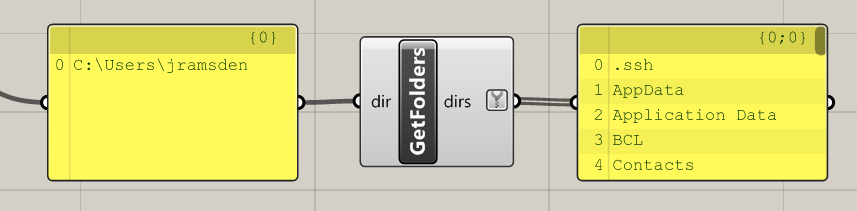
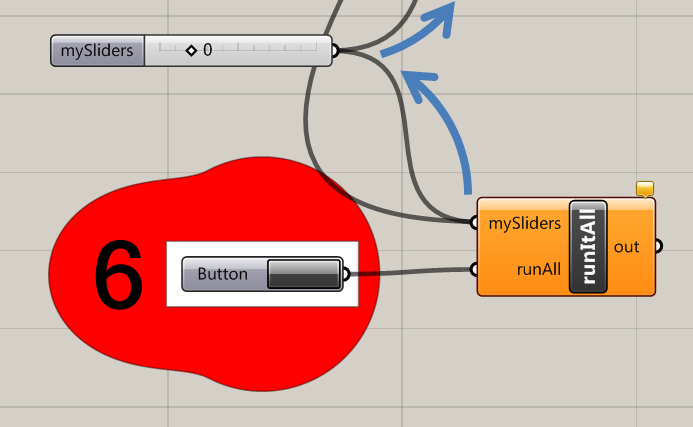
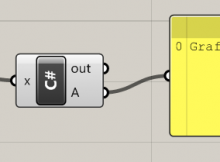
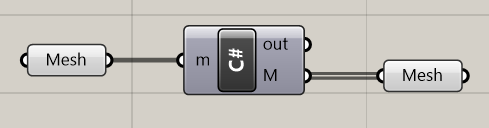
And again, it’s C# to the rescue! With a quick C# component, we can get a list of all objects in the Grasshopper document – all in the draw order. And with a timer and a panel attached, we can add a bit of extra functionality – click on any component and it will be shown as ‘selected’ in the panel.

grasshopper-get-draw-order

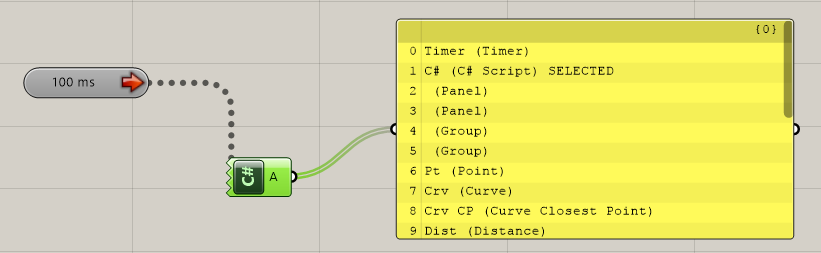
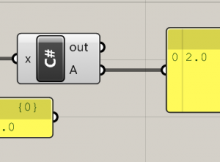
To use this yourself, copy the code below into a C# component, and set up as in the diagram. To use, turn on the timer and select any component (or components) in your Grasshopper document.

    var rtnlist = new List<string>();

    foreach (IGH_DocumentObject obj in GrasshopperDocument.Objects)
    {
      if(obj.Attributes.Selected) rtnlist.Add(obj.NickName + " (" + obj.Name + ") SELECTED");
      else rtnlist.Add(obj.NickName + " (" + obj.Name + ")");
    }
    A = rtnlist;

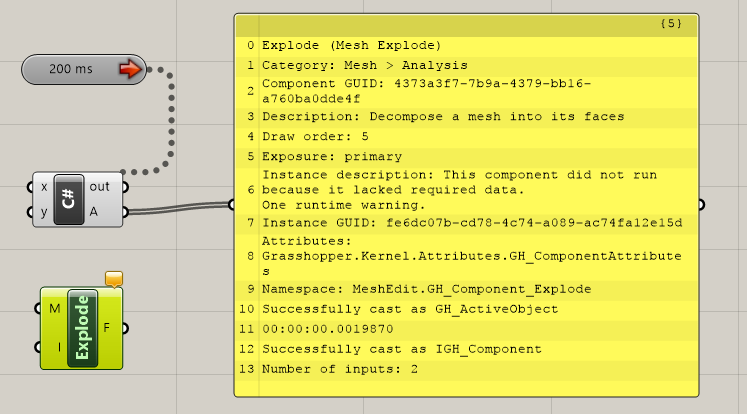
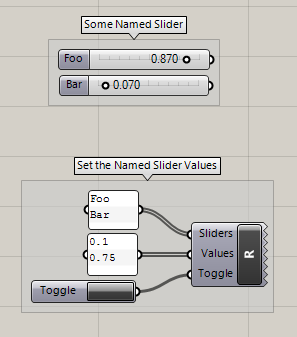
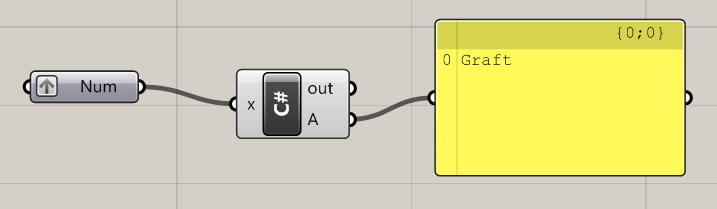
Using this component, we can verify that we have successfully moved our setCam to the back of the draw order list:

grasshopper-check-draw-order

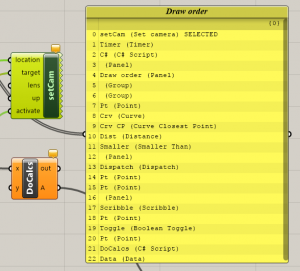
Our selected component is item 0 in the list, and so is right at the back of all components in the canvas. Great news!

Access files and folders in Grasshopper with the C# component

It is very easy to delve into the files and folders on your computer in C#. The DirectoryInfo class contains a wealth of methods for reading, creating and modifying files and folders.

Here is an example created in Grasshopper showing how we can use the DirectoryInfo class to get a list of subfolders contained within a folder.

A grasshopper component to read in a file path and return containing folders. Created using the C# component.

Source code

This code takes in a folder path as a string, and returns a list of folder names contained within that folder.

The code is formatted for the C# component in Grasshopper but can be modified to suit any C# application.

  private void RunScript(string dir, ref object dirs)
  {

    System.IO.DirectoryInfo dirInfo = new System.IO.DirectoryInfo(dir);
    System.IO.DirectoryInfo[] dirInfos = dirInfo.GetDirectories("*.*");

    List<string> dirNames = new List<string>();

    foreach(System.IO.DirectoryInfo d in dirInfos)
    {
      dirNames.Add(d.Name);
    }

    dirs = dirNames;

  }

Looping through the Grasshopper canvas

Loops in programming are very powerful. Oftentimes, we want to repeat the same piece of code several times, maybe with some slight changes each time.

Grasshopper, being a visual programming interface, tries to be a little simpler and easier to grasp than the regular horror of text-based programming. One of the key losses that comes from this simplicity is the inability to natively perform loops – we cannot use the output of one component as an input for a component upstream.

Trying to perform a recursive calculation in Grasshopper produces a recursion error
This is bad!

Hoopsnake

Hoopsnake gets around this problem using an approach similar to the way that Excel deals with the problem – what it calls circular references. But while a good solution in certain cases, Hoopsnake isn’t always easy to grasp and can be clumsy to set up in larger canvases – highlighting possibly why Grasshopper has removed the ability in the first place.

David Rutten’s permutation component

An alternative solution was created by David Rutten in this post, and looks at creating loops by cycling through values in the number slider component.

Say you have a few sliders in your canvas. Rutten’s component looks for all sliders. When the slider is changed, the canvas recalculates, as always happens in Grasshopper. The component listens for when all calculations have finished, then it changes the value of one of the sliders. This of course triggers another recalculation. The component listens again for calculations to finish, and changes the slider again. It cleverly repeats this cycle until it has gone through every value in the slider. If the component has found multiple sliders, it will run through every combination of these slider values. So if you have two sliders with integer values of 0-10, the canvas will recalculate 121 times (i.e. 11 x 11).

A component created by David Rutten that cycles through all possible permutations of a number slider in Grasshopper

The curse of dimensionality

Nowadays, Grasshopper is being used for much larger projects than ever envisaged when it was first created. GH documents are likely to have many dozens of sliders. If we have 20 sliders each with just 11 possible settings, Rutten’s component will force the recalculation 11^20 times – i.e. 672 billion billion times! (This concept of small numbers multiplying up very quickly is something referred to as the curse of dimensionality and is a big challenge when designing computational algorithms on large data sets.)

Mostapha’s modification

Perhaps in recognition to the Curse of Dimensionality, or simply the need that you might not want to involve every slider in your canvas in your recursion, Mostapha Roudsari has created a modified version of Rutten’s component. You can find it as part of his example files for his Honeybee plugin. (Jump to example 6, “Parametric grid-based analysis” and look for the component called “runItAll”.)

The key change in this component is that there is now an input called “mySliders”. Instead of running through all sliders like Rutton’s solution, this component will only cycle through those sliders connected to “mySliders”. While very powerful, this creates an initially surprising behaviour since, visually, it looks like the action to change a slider flows backwards along the wire!

The runItAll component created by Mostapha Roudsari, which allows a user to cycle through selected number sliders in Grasshopper

If no wires are connected, then the component resorts to Rutten’s component’s behaviour of modifying the values of all sliders in the canvas. This is still useful when you want to modify all sliders without spending time connecting them up.

My token improvement

This component has proven very useful for my own parametric studies, and I have been using it a lot. By using it a lot though, I have made a lot of mistakes. I’ve found it’s all too easy to accidentally run it and realise you’ve connected the wrong sliders, and find that you’ve asked Grasshopper to run a billion permutations, which GH diligently makes a happy start with. The only solution is to kill Grasshopper and reload.

I have added a message box that fires when you press the start button. This tells you the name of the connected sliders that the component will cycle through, and will calculate the number of permutations. You are then free to proceed or cancel.

jr-grasshopper-permutations

You can download this component as a UserObject here:


Next steps

This component has proven to be very useful in parametric studies. For example, if you are looking at optimal depth of window shading to control glare from the sun, you might set the depth of the shading with a slider. You can then set up a run where the glare values are automatically calculated for different shading depths.

Using a slider is quite limited however. What if you want to explore values of 0, 0.5 and 1 only? It is not possible to create a slider containing these three values. One solution is to connect a slider to a ListItem component (below) but this is quite a clumsy solution that takes time to set up and modify.

grasshopper-list-item

I have been looking at different components that can be modified remotely. For example, is it possible to use the Num component to hold modified values instead of the slider component? In a couple of recent posts, we have been looking at the ways that data is programatically stored within Grasshopper components. (Short answer – it’s possible to access, but not easy or obvious how to do it!)

grasshopper-persistent-data-access

Eventually, I want to be able to have a component where input values can be modified within a range. We don’t necessarily need to do an orthogonal grid of values like the recursive slider solution provides. If we are doing a parametric study, there are numerous other ways of choosing which discrete values we want to select as a sample within our ranges. This is a whole field called design of experiements which I am beginning to touch upon.

Appendix: BatchRun source code

private void RunScript(List<System.Object> mySliders, bool startme)
  {
    if (!startme)
      return;

    if (_running)
      return;


    _run = true;

    _mySliders = mySliders;

    GrasshopperDocument.SolutionEnd += OnSolutionEnd;
    Print(_rtnmessage);
  }

  // <Custom additional code> 
  private bool _run = false;
  private bool _running = false;
  private List<System.Object> _mySliders;
  private string _rtnmessage;

  private void OnSolutionEnd(object sender, GH_SolutionEventArgs e)
  {
    // Unregister the event, we don't want to get called again.
    e.Document.SolutionEnd -= OnSolutionEnd;

    // If we're not supposed to run, abort now.
    if (!_run)
      return;

    //throw new System.ArgumentException("Parameter cannot be null", "something weird");

    // If we're already running, abort now.
    if (_running)
      return;

    // Reset run and running states.
    _run = false;
    _running = true;

    try
    {
      // Find the Guid for connected slides
      List<System.Guid> guids = new List<System.Guid>(); //empty list for guids
      Grasshopper.Kernel.IGH_Param selSlidersInput = Component.Params.Input[0]; //ref for input where sliders are connected to this component
      IList<Grasshopper.Kernel.IGH_Param> sources = selSlidersInput.Sources; //list of things connected on this input
      bool isAnythingConnected = sources.Any(); //is there actually anything connected?

      if (isAnythingConnected) { //if something's connected,
        foreach (var source in sources) //for each of these connected things:
        {
          IGH_DocumentObject component = source.Attributes.GetTopLevel.DocObject; //for this connected thing, bring it into the code in a way where we can access its properties
          Grasshopper.Kernel.Special.GH_NumberSlider mySlider = component as Grasshopper.Kernel.Special.GH_NumberSlider; //...then cast (?) it as a slider
          if (mySlider == null) //of course, if the thing isn't a slider, the cast doesn't work, so we get null. let's filter out the nulls
            continue;
          guids.Add(mySlider.InstanceGuid); //things left over are sliders and are connected to our input. save this guid.
          //we now have a list of guids of sliders connected to our input, saved in list var 'mySlider'
        }
      }

      // Find all sliders.
      List<Grasshopper.Kernel.Special.GH_NumberSlider> sliders = new List<Grasshopper.Kernel.Special.GH_NumberSlider>();
      foreach (IGH_DocumentObject docObject in GrasshopperDocument.Objects)
      {
        Grasshopper.Kernel.Special.GH_NumberSlider slider = docObject as Grasshopper.Kernel.Special.GH_NumberSlider;
        if (slider != null)
        {
          // check if the slider is in the selected list
          if (isAnythingConnected)
          {
            if (guids.Contains(slider.InstanceGuid)) sliders.Add(slider);
          }
          else sliders.Add(slider);
        }
      }
      if (sliders.Count == 0)
      {
        System.Windows.Forms.MessageBox.Show("No sliders could be found", "<harsh buzzing sound>", MessageBoxButtons.OK);
        return;
      }

      //we now have all sliders
      //ask the user to give a sanity check
      int totalLoops = 1;
      string message = null;
      foreach(Grasshopper.Kernel.Special.GH_NumberSlider slider in sliders)
      {
        totalLoops *= (slider.TickCount + 1);
        message += slider.ImpliedNickName;
        message += "\n";
      }
      if (System.Windows.Forms.MessageBox.Show(sliders.Count + " slider(s) connected:\n" + message + "\n" + totalLoops.ToString() + " iterations will be done. Continue?", "Start?", MessageBoxButtons.YesNo) == DialogResult.No) return;


      // Set all sliders back to zero.
      //GH_Document.EnableSolutions = false;
      foreach (Grasshopper.Kernel.Special.GH_NumberSlider slider in sliders)
        slider.TickValue = 0;

      // Start a giant loop in which we'll permutate our way across all slider layouts.
      while (true)
      {
        int idx = 0;
        if (!MoveToNextPermutation(ref idx, sliders))
          break;

        // We've just got a new valid permutation. Solve the new solution.
        e.Document.NewSolution(false);
        Rhino.RhinoDoc.ActiveDoc.Views.Redraw();
      }
    }
    catch {
      _rtnmessage = "something went wrong!";
    }
    finally {
      // Always make sure that _running is switched off.
      _running = false;
    }
  }

  private bool MoveToNextPermutation(ref int index, List<Grasshopper.Kernel.Special.GH_NumberSlider> sliders)
  {
    if (index >= sliders.Count)
      return false;

    Grasshopper.Kernel.Special.GH_NumberSlider slider = sliders[index];
    if (slider.TickValue < slider.TickCount)
    {
      // Increment the slider.
      slider.TickValue++;
      return true;
    }
    else
    {
      // The current slider is already at the maximum value. Reset it back to zero.
      slider.TickValue = 0;

      // Move on to the next slider.
      index++;

      // If we've run out of sliders to modify, we're done permutatin'
      if (index >= sliders.Count)
        return false;

      return MoveToNextPermutation(ref index, sliders);
    }
  }

Update: Another solution for modifying sliders

Anders Deleuran has created an alternative way of remotely modifying slider values. His method is similar, but looks for sliders based upon their name. It is written in Python. You can download the file from the Grasshopper forum.

anders-grasshopper-loop

Radiation analysis in Ladybug for Grasshopper: Example file

How to set up an incredibly simple solar radiation analysis in Grasshopper using the Ladybug plugin. Read this post if you need to install Ladybug.

This example creates a simple shoebox that receives radiation from a sky. It is coloured according to how much radiation it receives across its surface. It is also partly shaded by a shading object (another shoebox) so you can see how to set up shading objects, and see the effect on your measurement objects.

Just follow the picture below! You can also download this GH file with the link at the bottom.

ladybug-radiation-example-grasshopper

Click the image for full size.

You should get something like the image below. Notice how the context geometry (coloured red at the right) provides shading on the left hand block, producing blue (shaded) results in its shadow.

radiation-analysis-example-ladybug

Download example file

Video game control for Grasshopper

Using a combination of the keyboard reader and the camera control components for Grasshopper, it is possible to create a rather cool video-game-like keyboard control for walking around your Rhino/Grasshopper file.

Make sure you have installed the keyboard reader. Then click the link below to download the example Grasshopper file. This uses WASD controls, though you can remap the controls as you please.

Access persistent data in Grasshopper in C#

How to access the persistent data property of Grasshopper components in C#.

Say for example you want to read the value of ‘2’ which is saved internally within a ‘Num’ component.

grasshopper-persistent-data-access

We can look up the Num class and access the property from here quite easily. But what if we want to do it a bit more generically, so we can access the persistent data within any component?

We can do this by accessing the GH_PersistentParam(T) class. But because this class is in a different namespace/class hierarchy to the IGH_Param class (where we would normally be working to access component properties) it takes a little bit of work to manoeuvre data without Grasshopper having a small fit. (Read here for a forum post where David Rutten explains the class hierarchy behind Grasshopper.)

Two similar solutions I’ve produced today are:

var param2 = Component.Params.Input[0].Sources[0] as Grasshopper.Kernel.GH_PersistentParam<Grasshopper.Kernel.Types.GH_Number>;
A = param2.PersistentData[0];

…and the one-line alternative:

A = ((Grasshopper.Kernel.GH_PersistentParam<Grasshopper.Kernel.Types.GH_Number>) Component.Params.Input[0].Sources[0]).PersistentData[0];

This is a great simplification of the problem – it will only looks at the 1st component connected to the 1st input. And since PersistentData returns as GH_Structure, rather than dealing with data trees, it is easiest just to use square bracket notation to retrieve the first item (which is valid if we only have one item in our persistent data, as in this example).

How to access GH_Param

Today we have a special guest post from my colleague and friend Fraser Greenroyd. Fraser is the team’s resident computer scientist, and as such he is subject to the daily brunt of my programming woes. Here he recounts one of the many challenges we face in another day of beating Grasshopper into submission…

How often do you think “this won’t take more than a few minutes to figure out” and then spend far longer solving the problem? For me, that happens on an almost daily basis in my work with James, and today was no exception. Starting with a simple “before you sit down” question, James and I spent an hour traversing the inheritance of Grasshopper to solve one problem – accessing the DataMapping property of any plugged in component.

To begin with, James had created a C# component that read the component plugged into the inputs and checked if it was a ‘Num’ component. From there, he was able to output the DataMapping type, but the code doing this limited the functionality to only the ‘Num’ component. Useless for any other type.

It was recognised that, as multiple components shared similar data members, the chances of them inheriting from a single class were high, but knowing which class was, to begin with, tricky. This was compounded by the fact that I am a Computer Scientist, I’ve been programming for years and am used to reading and digesting well written SDKs but it appears the Grasshopper SDK is not well written. But never-the-less, James took me to the beginning steps and from there we began a journey up and down the inheritance tree until we stumbled upon GH_Param – a class housing such members as the Description, DataMapping and VolatileData.  Further up the tree, this inherited from the GH_DocumentObject class which meant access to this generic class should be possible from the bottom level of a component.

grasshopper-param-access-graft

Our goal – seems simple, no?

The majority of the hour we spent on this was looking at the SDK and figuring out where we needed to be on the inheritance tree. The minority was the actual nice bit – coding. Our initial development, which was based on James’ first piece of code for the ‘Num’ component gave us a bit of a headache when the GH_Param<T> didn’t like the type we supplied. Unfortunately, the not so well written documentation did not reveal what type we needed but through some trial and error we found it to be the IGH_Goo type.

If you’re a developer, you’ll know only too well the scent of victory drawing ever closer as you change lines here and there, and the sheer frustration when it won’t compile, or doesn’t provide the output you expect. For James and I, we reached this point when the code compiled but the output wasn’t the correct DataMapping for the component plugged in. Thankfully, this did not last long as, not being a Grasshopper developer, it transpired I had forgotten to make use of the ‘sources’ of the inputs.

The final code, included in this post does not do credit to the journey we went on. From an original 30 lines of code, James was able to condense what we needed into two lines (I would have condensed it into one but that’s another story). The source code supplied here allows you to access the DataMapping variable for the first component plugged into the input side of a component, but can be easily extended using lists to include all components plugged in OR, with some clever use of the GH_DocumentObject any component on the canvas (but whether that would be useful is up for debate).

However, if you take just one thing away from this post let it be this – if you ever have to write SDK documentation, for the sanity of those using it write it properly and write it well!

Grasshopper.Kernel.IGH_Param param = Component.Params.Input[0].Sources[0];
A = param.DataMapping;

or
A = ((Grasshopper.Kernal.IGH_Param)Component.Params.Input[0].Sources[0]).DataMapping;

How to explode a mesh in Grasshopper

Exploding a mesh is a key skill in handling meshes. Knowing the different ways is a good way of demonstrating you understand how to manipulate meshes. You might need to redefine some faces in your mesh, or you might want to colour a mesh face-by-face.

What does it mean to explode a mesh? It essentially means taking each face of the mesh, and making it a separate mesh in its own right. So a single mesh with 100 faces will become 100 meshes with one face.

There are broadly three ways of exploding a mesh, depending on what you want to do, your ability level, and the wider task you are trying to achieve. Let’s say we want to explode the mesh below.

Rhino mesh grid

Starting with the easiest…

Method 1: Use MeshEdit

Use the Explode component in the MeshEdit collection of components:

Grasshopper explode mesh with MeshEdit component

Notice how we feed a single mesh into the left, and a list comes out the other end.

This method is dependent upon MeshEdit being installed on the computer that the Grasshopper file is being used on. In cases where you can’t rely on this, for example in team working or when sharing files with clients, you might want to try…

Method 2: Use native Grasshopper components

Use this slightly clunkier method which grafts mesh data to create multiple meshes. The two components are ‘Construct Mesh’ and ‘Deconstruct Mesh’. Take care of the grafts and flattens. You could always turn these into a cluster for tidiness.

Explode Grasshopper mesh with native Grasshopper components

Method 3: Use C#

If you are writing C# and want to merge the mesh explode into a script for efficiency, or you just want to show off your Grasshopper Geek credentials, you can use the following method:

  List<Mesh> Explode(Mesh m)
  {
    var rtnlist = new List<Mesh>();

    for (int f = 0; f < m.Faces.Count; f++)
    {
      var newmesh = new Mesh();
      newmesh.Vertices.Add(m.Vertices[m.Faces[f].A]);
      newmesh.Vertices.Add(m.Vertices[m.Faces[f].B]);
      newmesh.Vertices.Add(m.Vertices[m.Faces[f].C]);
      if(m.Faces[f].IsQuad) newmesh.Vertices.Add(m.Vertices[m.Faces[f].D]);

      if(m.Faces[f].IsTriangle) newmesh.Faces.AddFace(0, 1, 2);
      if(m.Faces[f].IsQuad) newmesh.Faces.AddFace(0, 1, 2, 3);

      rtnlist.Add(newmesh);
    }

    return rtnlist;
  }


…which you can easily call with:

    M = Explode(m);


This gives a nice, tidy component:

Explode mesh in Grasshopper C# component

Learning to manipulate meshes in C# is a great skill to have, and I recommend you get into it. Recently, I have used C# to turn curves into data-light meshes, and to turn curves into roads suitable for mapping.

Whichever method you’ve chosen, if you bake the result, you should end up with something like this:

Exploded Rhino grid mesh